This article provides a detailed introduction to the general concepts of GitLab CI/CD pipelines. It discusses the anatomy of the pipeline definition file, how GitLab distributes and runs jobs on runners, and what good practices you can follow. I also explain how the containerization of CI jobs affects their ability to build Docker/OCI images.
Introduction
As I explained in my previous CI/CD Basics article, CI/CD is the process of fully automating tasks such as building, testing and deploying your software. Instead of running these tasks manually, on a developer laptop, you have them executed on a server all the time.
In this article I provide an introduction to how CI/CD specifically works in GitLab. I created this guide because the official GitLab CI/CD manual is huge. The relevant content is scattered on various pages, giving you a hard time when you are completely new to the topic.
Recommended reading
If you are new to CI/CD, I highly recommend that you read my CI/CD Basics article first, so that you understand what CI/CD stands for, what tasks it includes, and why you need it.
Required prerequisite: YAML
In GitLab, you define the pipeline in a YAML file called “.gitlab-ci.yml“. Before you read any of the sections below, you must acquire a solid basic knowledge of the YAML file format. Otherwise, you will pull your hair over “weird errors”, or worse, there are no errors but the pipeline does not behave the way you want it to.
If any of the following things sound unfamiliar to you, you should definitely brush up your knowledge first, e.g. with an introductory guide such as this one:
- Whitespace / indentation matters and often produces no parser errors (but instead changes the meaning)
- There are several alternative ways of expressing arrays
- There are different approaches to express multi-line values
- You know when to quote values, and why quotes are necessary for something like
ENV_VAR: "true"
While you are still learning (and assuming that you understand JSON syntax well), it can be helpful to test your knowledge, by converting test files between JSON and YAML, e.g. using this online converter.
High-level overview
In GitLab, you define your CI/CD pipeline in a YAML file named .gitlab-ci.yml, which is located on the root level of your project. In this file you declare one or more jobs. Each job defines a script (=one or more shell commands) to be executed. They could do any kind of task, e.g. running a unit test, compiling your software, etc.
A job is always assigned to a stage. You can define which stages you want your pipeline to have, by creating a “stages” key in .gitlab-ci.yml and specifying an array of arbitrarily named strings, e.g. stages: [lint, build, test, docs, deploy]. If you don’t specify these stages, GitLab has a few default stages configured (see docs).
The basic idea of stages is to introduce a virtual “barrier”, so that first all jobs of a specific stage have to complete successfully, before jobs of the next stage start. All jobs in a particular stage are started in parallel, unless you have added artificial constraints (e.g. “needs“, see docs). If any job in a stage fails, the next stage (usually) is not executed, and the pipeline ends early.
The following is a simple example pipeline:
image: alpine:latest  # define the Docker image used for all jobs

stages:
  - build
  - test
  - deploy

build-job:       # This job runs in the build stage, which runs first.
  stage: build
  script:
    - echo "Here you would place calls like 'make' to verify that the software can be compiled."
    - echo "The output (binary files) can be shared with the below jobs (omitted in this example)"

unit-test-job:   # This job runs in the test stage.
  stage: test    # It only starts when the job in the build stage completes successfully.
  script:
    - echo "Here you place commands that run your unit tests, e.g. 'pytest <path to dir>'."
    - sleep 60

lint-test-job:   # This job also runs in the test stage.
  stage: test    # It can run at the same time as unit-test-job (in parallel).
  script:
    - echo "Here you would place commands that lint your code."
    - sleep 10
    - echo "No lint issues found."

deploy-job:      # This job runs in the deploy stage.
  stage: deploy  # It only runs when *both* jobs in the test stage complete successfully.
  script:
    - echo "Here you would place commands that deploy your application, e.g. via SSHing to a server."
    - echo "Application successfully deployed."Code language: YAML (yaml)
Visually, illustrating the 3 stages:
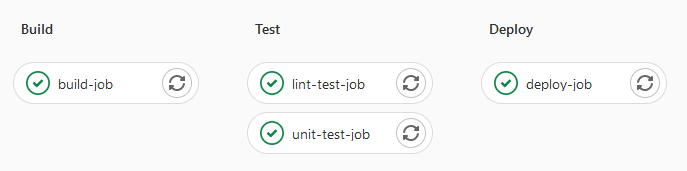
How jobs are run
Distributed architecture to run jobs
GitLab uses a distributed architecture that consists of a GitLab server (that also renders the web interface) and several (shared) runners. The server could be the SaaS offering (gitlab.com), or your company’s self-hosted instance. A runner is essentially just a CLI tool (running on some dedicated machine) that registers with the server, and keeps a permanently-opened HTTP connection to the server, waiting for jobs that it should execute. If you use gitlab.com, there are already shared runner instances that you can use, see these docs. For self-hosted GitLab servers, your IT department usually sets up shared runners for you, and documents how to use them.
The GitLab server is in charge of detecting trigger events that start one or more pipelines (see next subsection). Whenever a new pipeline starts, the GitLab server figures out which of the jobs (defined in your .gitlab-ci.yml file) actually need to run (some might be skipped, some might have to wait for other jobs), and distributes these jobs to available runners in the right order.
“Pipeline” term
In GitLab, the .gitlab-ci.yml file is the pipeline definition. Whenever some trigger event is detected, the GitLab server creates one or more new pipelines, as in, instances of a pipeline execution, which the GitLab docs simply call “pipelines”.
Pipeline trigger events
There are many possible trigger events that start a pipeline. Most notably:
- A developer executed “
git push” on their machine, or edits and commits files in the GitLab web IDE - A regular schedule was triggered (defined in GitLab, see menu “CI/CD → Schedules”)
- Someone clicked on the “Retry” button for a failed pipeline (see menu “CI/CD → Pipelines”)
- Someone created a pipeline manually, by clicking on “CI/CD → Pipelines” and then on the “Run pipeline” button
- A pipeline was triggered via the GitLab API or web hooks
It is important to be aware which pipeline(s) are created as a consequence of a push. A push might cause these pipelines (started and running in parallel):
- A branch pipeline, run only for the newest commit of a push (in case your push contained multiple commits).
- An additional tag pipeline for all pushed Git tags
- Note: you need to explicitly push tags with your local Git client, it does not happen automatically on “
git push“!
- Note: you need to explicitly push tags with your local Git client, it does not happen automatically on “
- An additional Merge Request pipeline in case the commit was for a branch that is associated to an open MR
See docs to learn how you can avoid that a push triggers both a branch and a MR pipeline.
In the GitLab web UI (clicking on “CI/CD → Pipelines”), you can visually identify the pipeline type as follows:
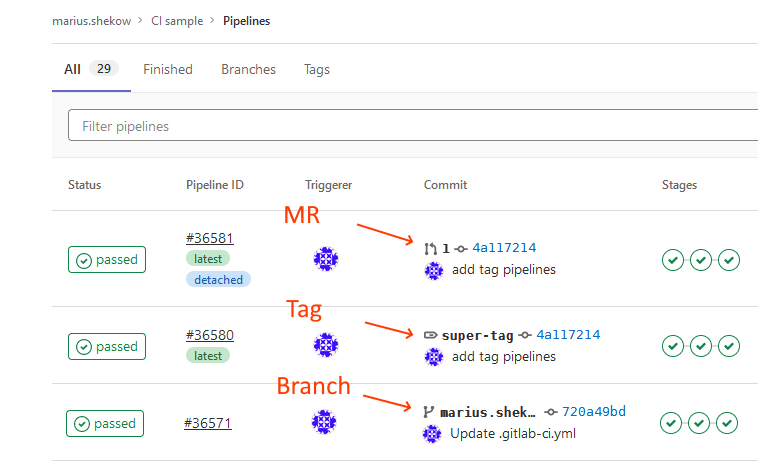
A pipeline is always associated to a specific commit (shown in blue in the above image), which is immutable. Consequently, re-running an older, failed branch pipeline will run it against that (possibly now-outdated) commit.
A pipeline also always has a “triggerer” (see the Triggerer column in the above image), which is a user who owns that pipeline. The triggerer is relevant in case you want to do other things in a job that require permissions, such as cloning another GitLab project located on the same GitLab server. See these docs for more details.
While a pipeline is running, you can inspect the current progress and see a live log view from the runner for each job, by clicking on “CI/CD → Pipelines” in the GitLab web UI.
Runners: (isolated) execution environment
Whenever the GitLab server sends a job to a runner, the runner will execute this job in some kind of isolated execution environment. This execution environment is determined by an “executor“, and a runner can be configured with one or more executors. There are many different kinds of executors (see docs), e.g. a “shell executor”, “Docker executor” or “Kubernetes executor”. The Docker and Kubernetes executors provide a very high isolation level, because they will start each job in a separate Docker container (or as container in a Kubernetes Pod), using the image that was specified in the .gitlab-ci.yml file for your job (e.g. alpine:latest in the above example). The shell executor has a much lower level of isolation, because it runs the commands (from the script section of your jobs) in a shell right on the host on which the GitLab runner is running.
It is important to understand that shared runners are set up by admins who choose which executor(s) these runners will use – if you are just a developer, you cannot influence this. However, as explained below (section Control who runs the job), you can specify tags, to select which one of the available executors shall be used. If you use gitlab.com, the official docs explain how the shared runners are configured. See e.g. here for Linux runners, which uses a Docker-based executor, and thus your jobs will run as Docker containers!
Runners: execution sequence when receiving a job
Whenever a runner receives a job from the GitLab server, it performs these steps:
- Start a new execution environment (e.g. a Docker container, or a shell, or a VM for the Virtual box executor), in which it sets pre-defined environment variables (such as
$CI_REGISTRY, see docs for more) that it received from the GitLab server. - Clone the Git repo into a new, temporary directory (e.g. “
/builds/<runner-ID>/<GitLab-group>/<project-name>/” when running inside a container). The runner clones the commit associated to the pipeline instance.- If you use git sub-modules, and configured the paths correctly, sub-modules are also automatically cloned. See docs for more details.
- Download artifacts of previously finished jobs
- Restore caches defined for the job
- Run the
before_script,scriptandafter_scriptsections. - Upload the logs and job artifacts to the GitLab server.
Anatomy of the .gitlab-ci.yml file
The following subsections explain the most important keywords and structures you would put into the YAML file. You should always have a bookmark of the Keyword reference ready, which explains all keywords.
Bird’s eye perspective: what is placed on the root level
On the root level of the .gitlab-ci.yml file, you declare 3 kinds of objects:
- Jobs,
- Hidden jobs,
- Other global concepts, such as
default, image, services, cache, before_script, after_script, variables, stages, includeorworkflow.
The example above declared 4 jobs (build-job, unit-test-job, lint-test-job, deploy-job), and the global concepts image and stages.
Jobs can have arbitrary names (even multiple words separated by spaces), but the job’s name must be different to any of the reserved keywords mentioned above. That is, a job may be named “set variables” but not “variables”.
Control what the job does: via script
Each job needs to do something, which you control via the keywords script, before_script and after_script. Essentially, any of these sections are an array of shell commands. The concrete shell that is used (sh, bash, PowerShell, …) depends on the execution environment (see above). If the job is executed by a Windows runner, it would be PowerShell, if it is run by a Docker or Kubernetes executor, it depends on what shell is the default shell in the image you are using (usually bash or sh).
Make sure to read up on the script, before_script and after_script keywords in the Keyword reference, and also this section of the manual. You will learn how to break long single-line commands into multiple lines, and you will learn about horrible caveats that arise due to the YAML interpretation process. For long and complex scripts, consider extracting them into a separate shell script (with .sh extension) instead of putting them directly into the .gitlab-ci.yml file.
Note: the commands run during script, before_script and after_script will abort on the first command that returns an error (and the job will fail). The reason is that the runner will first run “set -eo pipefail” for you, before starting any of your scripts.
Control who runs the job: via tags
Whenever an admin sets up a shared runner and its executors, they assign one or more tags to the executors. Tags are simple strings, usually using kebab-case naming. To find out which executors are available for your project, open the GitLab UI, click on “Settings -> CI/CD” and expand the “Runners” section. The tags are highlighted in blue.
You can control to which runner/executor each job is sent, by setting the tags keyword to an array of tag-strings (docs) in the .gitlab-ci.yml file. You can set a different tag for each job, if you want to. If you don’t specify any tags, the GitLab server will send the job to any available runner, selected at random.
Control when jobs are run or skipped: via rules/only/except
You can control when jobs are actually sent to a (shared) runner, or whether they are simply skipped. For instance, you may want to run a job only for certain branches, or only if specific files have changed.
GitLab has two mechanisms for this:
onlyandexcept(docs): this is the older mechanism which is now deprecated, but is kept to avoid breaking changes. It is no longer recommended to use it.rules(docs): this is the modern (and more powerful) mechanism. However, it is a bit more complex and has a steeper learning curve, but the official docs explain it sufficiently well. In summary:rulesspecifies an array of rule-objects. Each rule object can have the following (optional) keys:if, changes, exists, allow_failure, variables, when.- You will usually specify an “
if” keyword, but you can also omit it, which is equivalent to “if: true“- If you are using regular expressions in the
if, you can use https://rubular.com/ to test them.
- If you are using regular expressions in the
- The GitLab server evaluates the rules one after another, considerung only the keys
if, changes, exists. If you specified several of these, then all of them must evaluate totrue. The first match counts, there is no “fall-through”. If there was no match, the job won’t be run. - In case a match was found, the
whenkeyword controls whether the job should be run, see the docs here for an explanation of thewhen-values.
You cannot combine these two mechanisms only/except and rules, you must choose one.
rules:changes and multiple commits
Whenever you push code (running git push) that consists of one or more commits, GitLab runs a branch/MR pipeline only for the newest commit of that push.
However, the changes feature of the rules object is smart: it will evaluate to true even if the file(s)/dir(s) that you mention in the changes array was not changed in the newest commit, but in an older commit of the push.
Control the job’s execution environment: via image
Assuming that your jobs are executed by a (shared) runner that uses the Docker or Kubernetes executor (see above), you can control which Docker image is used while executing the script section, by specifying the image keyword (docs). You can specify the image globally on the root level of the .gitlab-ci.yml file (which is inherited by all jobs), or overwrite it for each job separately.
If you don’t specify any image at all, some default image is used, which was chosen by the admin who configured the executor for the shared GitLab runner. Since you don’t know (or control) this image, it is highly recommended to always set the image.
Hidden jobs
When you prefix a job name with a dot (e.g. “.some-job-name“), then this job is a hidden job (docs). Hidden jobs have two purposes:
- Temporarily disable a job, without having to comment out the entire job section in the
.gitlab-ci.ymlfile - Use job inheritance (see below for details)
Variables
GitLab CI/CD variables (docs) are simply (Shell) environment variables. There are many predefined ones (defined by the GitLab server, sent to the runners along with other job meta-data), but you can also define your own ones.
Defining and using variables
Definition: you can define your own variables in the .gitlab-ci.yml file (docs) or on a project/group level using “CI/CD variables” in the GitLab web UI (docs). Variables you define globally are inherited by all jobs.
Usage: like with any Shell script, the usage of these variables in the script section depends on the shell:
- If you run a Windows-based GitLab runner (with PowerShell), variables are used like this:
$env:MY_VARIABLE - If you run a Linux-based runner: use variables by prepending the dollar sign, e.g.
$MY_VARIABLEor${MY_VARIABLE}. The second form (using curly braces) is only needed if the shell would otherwise not be able to understand where your environment variable ends- Incorrect example: “
echo $MY_VARIABLEisgreat” – the shell would try to expand the variableMY_VARIABLEisgreat - Correct example: “
echo ${MY_VARIABLE}isgreat“
- Incorrect example: “
Note: since GitLab 14.4, variables can be nested, which can make your definition of variables (that depend on each other) cleaner and shorter. See docs for details.
Predefined variables
There are many predefined variables set by the GitLab server when running your job. See docs for details.
Because the docs don’t always show concrete example values, it can be helpful to create your own minimal GitLab project, with a .gitlab-ci.yml file that has a job that prints the values of all defined variables, e.g. like this:
print-variables-job:
  stage: build
  script:
    - setCode language: YAML (yaml)
Creating and working with containers in CI/CD
There are several jobs in a CI/CD pipeline that need access to a container engine, such as Docker or containerd. Typical jobs include building, modifying, tagging and pushing (Docker) images, or temporarily starting containers for testing purposes.
Most commonly, GitLab already launches CI/CD jobs as Linux containers. By default, due to the high isolation levels of container engines, containers cannot simply build or start other containers. Consequently, you cannot simply run something like “docker build ...“, or “docker run ...” in the script section of a job, because that script is actually executed inside a container itself.
There are several technical workarounds for this:
- Use a tool such as kaniko, which lets you build, tag and push containers (but cannot run them). These tools require little to no privileges or container engines to work.
- Unfortunately, kaniko has become unmaintained recently. It is riddled with bugs, and therefore risky to use. I might go into details of my kaniko experience in a future article.
- For pure image-related maintenance tasks (e.g. re-tagging and pushing an already-existing image), you can use skopeo, which also does not require any privileges or container engines to work.
- Use Docker-in-Docker (official GitLab docs), which lets you do everything that the
dockerCLI can do (building and running images). For this to work, the GitLab executor/runner itself must be configured inprivilegedmode by the administrator. By adding aservicesdeclaration in the.gitlab-ci.ymlfile, you instruct GitLab to start a completely new, temporary Docker daemon(!), which Linux only allows because of theprivilegedmode. That new daemon is then used for building Docker images and starting Docker containers. - Use Docker socket binding (official GitLab docs), which gives you the same power as Docker-in-Docker, but technically works differently. Socket binding mode always uses the host‘s Docker daemon. Containers you create from inside your job’s container are sibling containers of the job container. See the last section of this article for further details about the differences between Docker-in-Docker and Docker socket binding.
Which workaround you need to use is decided by the administrators who configure the (shared) runners and their executors:
- If you use GitLab.com’s SaaS shared Linux runners (whose configuration is documented here), you have to use the Docker-in-Docker workaround. In your
.gitlab-ci.ymlfile, you must declare aservice: ["docker:dind"]section (see here for an example project, and here to learn whatservicesare and how they work). Thisservicedeclaration starts a completely new, temporary Docker daemon(!), which your CI job can reach via the virtual container network, under the “docker” hostname. Your CI job definition (in the.gitlab-ci.ymlfile) should use animage: docker:latest(or some fixed version, e.g.docker:stableordocker:20.10). Not only does this Docker image contain the Docker CLI, but itsentrypoint.shscript automatically discovers the temporary “remote” Docker daemon, and sets theDOCKER_HOSTenvironment variable, thereby configuring the Docker CLI to use that daemon. Here is an example of theentrypoint.shscript of the Docker image. - If your organization / team uses a self-hosted GitLab version, you have to talk to your administrators and ask them which approach they use. In case they are using the Docker socket binding mode, you simply set the
imagetodocker:latestfor your CI job, and do not use theservicesdeclaration. The Docker image’sentrypoint.shscript will automatically determine that the host‘s daemon socket is available inside the CI job container, and configure the Docker CLI to use it.
Good practices
The following practices will help you improve working with GitLab CI/CD pipelines.
Use editors / IDEs with syntax support
While writing the .gitlab-ci.yml file, use a text editor or IDE that supports the CI YAML syntax. Editors such as IntelliJ-based IDEs (PyCharm, etc.), or VS Code (via plug-in) provide features such as syntax highlighting and auto-complete, and in some cases even validation (which checks for semantical correctness – not all editors do this, e.g. IntelliJ-based IDEs check only the syntactical correctness!). You can also (semantically) validate the file on the GitLab server, see docs. Doing so avoids that you accidentally push commits that break the pipeline definition, simply because the .gitlab-ci.yml file is invalid.
Use job inheritance (via “extends“) for a cleaner, shorter .gitlab-ci.yml file
Beginners often make the mistake of copying&pasting jobs, and then changing only very small bits in the copy. This not only blows up the length of your .gitlab-ci.yml file, but also makes it harder to maintain, because you are violating the DRY principle.
Instead, it is usually better to define an inheritance hierarchy, using hidden jobs (see also above), where all commonalities are placed in a hidden job, and the jobs inheriting from it only override the necessary specific bits.
GitLab offers two mechanisms for job inheritance:
The extends keyword mechanism usually looks a lot cleaner, and is therefore recommended. See the docs for an example.
Reducing the length of the .gitlab-ci.yml file
Once your .gitlab-ci.yml file has become very long and confusing, it makes sense to reduce its length:
- Approach 1: extract long
before_script/after_script/scriptsections into separate shell scripts. For Linux shell scripts, make sure that these shell scripts have the executable bit set when committing them, see my previous article here for background information. - Approach 2: split the large
.gitlab-ci.ymlfile into several smaller.ymlfiles, using theinclude(docs) ortrigger(docs) mechanism.
Test extensive changes in a separate project
Whenever you need to make extensive changes to your .gitlab-ci.yml file, you might be afraid to break something. You might also fear that you need many commits to get it right, but you don’t want to pollute the commit history. There are two approaches to solve this:
- Create a fork of the project, and work only in a new branch of your fork. Once the file is in a good state, you can (optionally) create another branch in which you have (selectively) squashed bad commits (e.g. using Git’s interactive rebase functionality). Finally, you create a GitLab merge request that merges the branch of your fork into some branch of the real project.
- Since you are working in your own fork, you can even merge the branch in which you are manipulating the
.gitlab-ci.ymlfile into other branches of your fork (e.g. integration, develop, staging, …), to test pipeline feature that are sensitive to the branch. Everything happens inside your fork, so you are not polluting the real project!
- Since you are working in your own fork, you can even merge the branch in which you are manipulating the
- Create a new GitLab project in your private namespace, with a stripped down version of your real project’s
.gitlab-ci.ymlfile, which uses dummy commands instead of the real script steps (e.g. replacing “make” with “echo make“). This approach is suitable if you are experimenting with the GitLab CI syntax, e.g. debugging problems withinclude, orrules. Thanks to using dummy commands, the pipelines in the stripped-down project will execute much faster compared to the pipelines of the real project, which lets you to iterate on the.gitlab-ci.ymlfile much faster.
Caveats
Unavailable pipeline features due to license
Some CI/CD pipeline-related features are only available in GitLab premium or ultimate editions. For instance, the free license does not include the Pipelines for Merged Results feature. Keep this in mind when reading the manual, which indicates which features are free. Look at labels next to the headlines, such as “ALL TIERS” (meaning that it’s free), or “PREMIUM” (only for premium editions).
Running pipelines for older commits
You cannot (retroactively) create and run a pipeline for a specific, older commit for which no pipeline was ever executed. When you create a manual pipeline instance in the GitLab web UI, you can only select the branch/tag, and the pipeline will run against the latest commit of that branch, or the specified tag.
To run a pipeline against an older commit, you need to (locally) check out that commit, tag it (git tag), push that tag, and then select that tag in the GitLab web UI in the dialog shown once you clicked the “Run pipeline” button.
Conclusion
The keyword reference makes it obvious that GitLab’s CI/CD feature is very powerful. Once you have successfully built and optimized your pipelines, you can always learn about more features (by skimming these docs), which gives you ideas for further improvements of your pipeline.
Some useful (advanced) concepts you might consider are:
Hi ! thanks for the amazing content! my 2 cents : for testing big changes made to gitlab pipelines I recommend having a look at https://github.com/firecow/gitlab-ci-local and consider to add it to your palette of solutions when a refactoring or even a small change requires testing.