This article explains BuildKit caching in detail. First you learn background knowledge, e.g. how the local and remote cache differs, and what kinds of cache items BuildKit can store where. Then, BuildKit’s garbage collection is explained in detail. Finally, I present 5 tricks to speed up your image builds, e.g. tuning the garbage collection policies, or how to efficiently use the right remote cache exporters.
Introduction
BuildKit is a tool that builds OCI/container/Docker images, from a Dockerfile (and various other input formats). Whenever you run “docker builld”, the Docker engine actually uses BuildKit under the hood, and BuildKit can also be used as a standalone tool.
This is part two (of two) of my in-depth series about BuildKit. To fully understand it, please read part one first, where I explain how BuildKit and Docker are related. Part 2 goes into details about BuildKit’s caching mechanism and its garbage collection, and how to tune them. You can use the gained knowledge to improve the image build speed in a CI-pipeline that uses many (elastically-scaling) build agents.
BuildKit caching – background
Caching is one of the best techniques to reduce the time it takes to build Docker images. In general, caching means that instead of repeatedly executing a slow task (such as computing results or fetching data over a slow network connection), you do that slow task only once, then store the result in a location that you can access with high bandwidth (e.g. a local disk), and then reuse the stored results instead of repeating the computation.
Let’s see how BuildKit handles caching.
Refresher: what are images and how are they stored
In strongly simplified terms, OCI/Docker images consist of a manifest and a series of file system layers.
- The manifest is a JSON document that stores:
- meta-data about the image (e.g. the image author or the creation time)
- a pointer to a configuration data JSON file (e.g. the container’s working directory, the active UNIX user account, or environment variables)
- pointers to a list of image layers
- Each image layer stores file system differences: it marks files/folders of previous layers as deleted, or adds/changes new files/folders. There is an image layer for each
RUN/COPY/ADDcommand in yourDockerfile.
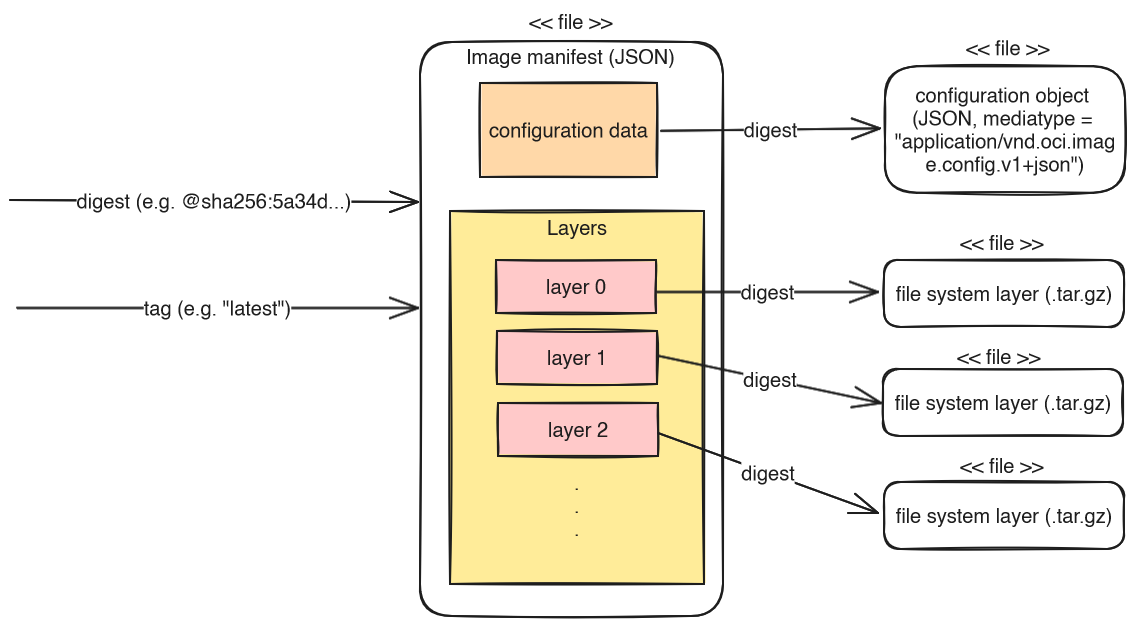
When BuildKit uploads or downloads images, it can speed up the transfer by making use of the fact that each layer is uniquely identifiable by its SHA-256 hash. Before uploading or downloading layers, BuildKit simply checks whether the respective destination already knows the layer’s hash, and if so, BuildKit skips transferring those layers.
To be fair, what I just described is an over-simplification. To learn the details about the structure of Docker images, see here.
The problem with caching
A central problem of caching is the distance between a machine that needs the cache data, and the storage location of the cache data. If the cache is on a local disk, you get great performance gains. But if the cache is remote, it first needs to be downloaded, and performance suffers if the connection speed is slow or the cache size is huge. And if you have short-lived build agents (e.g. VMs or Kubernetes Pods), not doing any remote caching is not an option either, because you would lose the local cache right after having it filled. Consequently, the optimal solution is a mixture of local and remote caching.
BuildKit’s USP (unique selling proposition)
My perspective is that BuildKit is superior to alternative solutions (such as buildah), because BuildKit can consult both its local cache and (one or more) remote caches. When deciding whether to build an image layer, BuildKit always consults its local cache first, and only on a local cache miss will it check whether any of the specified remote caches contain the layer. If there is a hit in one of the remote caches, BuildKit delays the download of that layer, until the point where it needs to build a follow-up layer (assuming there was a local+remote cache miss for that follow-up layer).
In the extreme case, this lazy cache-download-behavior makes scenarios possible where a completely freshly started BuildKit instance (whose local cache is initially empty) builds and pushes an image within 1-2 seconds, assuming that all layers of that image were already available in a remote cache. In this case, building and pushing the image finishes so quickly, because:
- BuildKit did not need to spend time pulling any of the cached image layers to its local cache,
- BuildKit only needed to assemble and upload a small image manifest that references the image layers (by their SHA-256 hash) that were already stored in targeted image registry (and therefore no time had to be spent pushing them)
BuildKit’s local vs. remote cache
As explained above, BuildKit can use both a local and remote cache. By default, remote caching is not used, but only the local one. For instance, if you run “docker build -t img .” two times in a row, the second build completes instantly, because of the locally-cached layers. BuildKit always uses local caching, and you cannot configure it whatsoever. The only way to disable local caching is to supply the argument --no-cache to either the docker or buildctl CLI.
To additionally use a remote cache, which is uploaded to a (typically) remote registry, you have to explicitly specify one or more cache exporters and configure the cache locations. If you do, make sure you always specify both a cache-import and a cache-export (because an exported cache would do no good if you never read from it). The two most common exporters are the inline and the registry exporter (see “Trick #3” below to learn how to choose between them).
As explained in part 1, I recommend that you use Buildx (or BuildKit directly via buildctl) to build images, targeting a container-based BuildKit instance. Only then you get full control over the remote cache configuration. The authoritative documentation can be found here. The names of the CLI arguments that control the remote cache are slightly different, depending on the CLI:
- With Buildx, the arguments are named
--cache-fromand--cache-to - With
buildctl, the arguments are named--import-cacheand--export-cacherespectively
However, the values you provide to these arguments are exactly the same.
Below, in section “trick #4”, you find a few concrete examples of using BuildKit’s remote cache.
BuildKit’s local cache in detail
Let’s take a more detailed look at the different kinds of things BuildKit can cache locally:
| Cache item type | Explanation |
regular | Cached image layers |
source.local | Contains files that BuildKit previously ADDed or COPYed from the build context into an image layer. Also contains Dockerfiles sent to BuildKit in previous builds |
exec.cachemount | Stores the folder content of a mounted directory (when you use RUN --mount=type=cache <command> in your Dockerfile) |
frontend | BuildKit frontend images (# syntax = user/somefrontendimage) |
internal | Helper tools internal to BuildKit |
source.git.checkout | Contains source code that BuildKit cloned because of statements like “ADD git@git.example.com:foo/bar.git /bar” in your Dockerfile (docs) |
Reminder: two typical caching approaches of BuildKit
As I’ve written in my Docker optimization guide here, building images can be accelerated using two kinds of caching mechanisms:
- 1) layer caching (cache item type:
regular), which prevents rebuilding a specific image layer, because the entire layer has been cached, - 2) mounting cache directories (cache item type:
exec.cachemount): if you need to rebuild a layer, rebuilding happens more quickly, because a cache-directory is mounted from the host into the build-container, and the host-directory’s content is persistent across different “docker build” calls. I explain some details here.
The local cache is accumulative, because it contains cache items for all images you have built with your specific BuildKit builder instance. You can inspect its size with “docker buildx du” (Buildx) or “buildctl du” (BuildKit). Adding the --verbose flag prints details about each cache item.
To avoid that the local cache size grows indefinitely, BuildKit has a garbage collection mechanism that is explained below in more detail.
BuildKit’s remote cache in detail
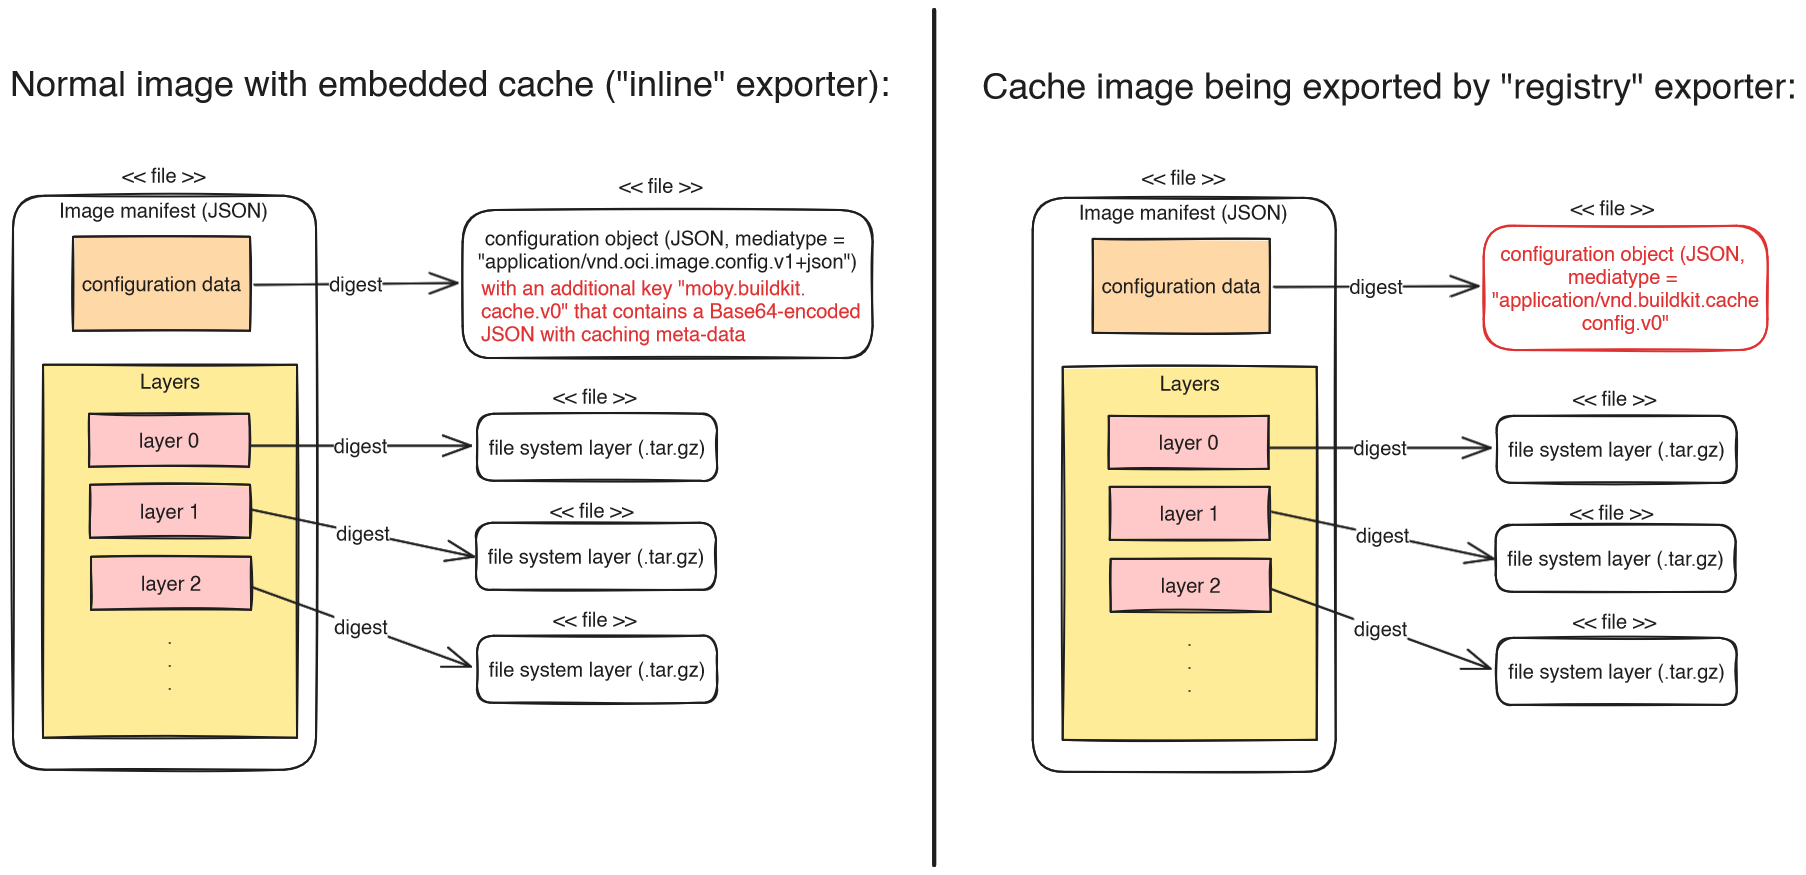
In contrast to the local cache, a remote cache (that you can import from or export to) is much more restricted. When you use --cache-to (Buildx) or --export-cache (buildctl), BuildKit only uploads local cache items of type regular to the specified remote cache location.
Two very popular remote cache types are inline and registry. As the following image illustrates, inline means that some BuildKit-proprietary caching meta-data is added to the configuration JSON file of the image you are pushing. registry means that a new, independent “cache image” is created and pushed. Note that you cannot run a cache image, because its configuration JSON media-type is “application/vnd.buildkit.cacheconfig.v0“, not the expected “application/vnd.oci.image.config.v1+json“, and thus it lacks information, such as the active working directory, or environment variables.
Let’s see what happens under the hood, when you run a build for which you configured one or more remote caches:
- BuildKit downloads the manifest JSON files of all remote caches that you are importing from. JSON files are small, so this takes only the fraction of a second. Now BuildKit knows which image layers the remote cache has to offer. But as explained above, BuildKit defers downloading the actual layer blobs until BuildKit encounters some other layer “X” that is neither cached locally nor remotely, and thus it must download all parent layers of X to be able to build layer X.
- BuildKit builds the different layers of the image, consulting its local cache first, then all of the remote caches. If BuildKit decides to download layers of the remote cache, these are copied into its local cache.
- Once all layers were built, BuildKit pushes the cache blobs and meta-data to your configured remote cache(s). However, BuildKit pushes only those cache items that were relevant for the image that was just built, not all cache items stored in the local cache.
- If you use the
registryexporter, BuildKit uploads a separate cache image manifest, overwriting any possibly-existing manifest on the remote registry.
- If you use the
- Finally, BuildKit pushes the image itself.
BuildKit garbage collection
Pruning
To mitigate that BuildKit’s locally-managed cache grows indefinitely in size, BuildKit offers a prune operation, which deletes certain items from the cache (either all of them, or just some of them). You can explicitly trigger a prune operation using the “docker buildx prune” (or buildctl prune) command. The syntax of the arguments given to buildctl vs. docker CLI varies a bit. You can find the docs for docker buildx prune here. For buildctl prune, there is no documentation, only what “buildctl prune --help” offers:
NAME:
   buildctl prune - clean up build cache

USAGE:
   buildctl prune [command options] [arguments...]

OPTIONS:
   --keep-duration value     Keep data newer than this limit (default: 0s)
   --keep-storage value      Keep data below this limit (in MB) (default: 0)
   --filter value, -f value  Filter records
   --all                     Include internal/frontend references
   --verbose, -v             Verbose output
   --format value            Format the output using the given Go template, e.g, '{{json .}}'Code language: JavaScript (javascript)
Here are some important points you should know about the prune operation
(explanations are specific to “buildctl prune“):
- If you do not specify any arguments, all cache items will be deleted, except for those of type
internal/frontend– if you also want to delete those, you also need to specify the--allargument --filterlimits the deletion to those cache items that you specify in a query (example: “buildctl prune --filter=type==regular --filter=type==source.local”). See here for the possible keys (other thantype) you could specify.--keep-durationprotects all those cache items from deletion that are younger than the provided value--keep-storageensures that the most recently used cache items whose accumulated sum of file sizes is below the provided threshold are protected from deletion- If you provide both a duration and a storage limit, then both these conditions apply. In other words, only those cache items are deleted that are both older than
--keep-durationand they exceed--keep-storage.
In pseudo-code terms, BuildKit roughly uses the following algorithm to determine which cache items it deletes (based on source):
- make a list L of all cache items
- if
--filteris set, keep only those items in L matched by--filter(remove all others) - remove those items from L younger than
--keep-duration, if set - if
--allis not provided, remove those cache items of typeinternalorfrontendfrom L - foreach item in L ordered by last_used_date (recently used items first)
if (file_size_sum(all items iterated so far) < value of--keep-storage): remove item from L
If you want to look at the local cache on the lowest level, the file system, these are the relevant locations:
- The meta-data of cache items is stored in a database, see
/var/lib/buildkit/cache.db, which is a simple key-value store based on bbolt. The database entries contain information about the type and last-used date of each cache item, which the above algorithm needs. - File system layer blobs and manifest files are stored as file/folder hierarchies, most notably in the subdirectories “
runc-overlayfs/content” and “runc-overlayfs/snapshots” below “/var/lib/buildkit/“.
Garbage collection
In BuildKit, garbage collection (GC) simply means that a background thread of the BuildKit daemon repeatedly calls prune operations.
By default, GC is disabled! To enable garbage collection, there are various methods:
- If you use the BuildKit instance that is embedded into dockerd, you enable GC via the Docker daemon configuration file (docs)
- If you use a container-based BuildKit instance:
- Add a line “
gc = true” in the BuildKit TOML configuration file (docs), or - Start
buildkitdwith the CLI argument--oci-worker-gc
- Add a line “
If GC is enabled, the BuildKit daemon runs GC on startup, and when building an image (but at most once per minute). If you want a confirmation of GC in the logs, you need to set debug = true in the buildkitd.toml configuration file. The logs then contain entries like: “gc cleaned up N bytes”.
The basic approach of BuildKit’s GC is that there are one or more configured GC policies. On each GC cycle, BuildKit runs the prune operation multiple times (once for each policy, in the order in which the policies are defined). Each GC policy configures prune-related settings, like filters or keep bytes.
If you do not explicitly specify any GC policies, BuildKit automatically generates 4 default policies for you, see the docs. For the 2nd, 3rd and 4th rule, BuildKit determines the keep bytes value as follows: “Keep Bytes defaults to 10% of the size of the disk. If the disk size cannot be determined, it uses 2GB as a fallback”. However, you can change this behavior by specifying gckeepstorage (in MB) in the buildkitd.toml file, in which case gckeepstorage is used for keep bytes instead. Alternatively to setting this value in the buildkitd.toml, you can provide the CLI argument --oci-worker-gc-keepstorage=<MB> to buildkitd. Note: if you do specify custom GC policies, the gckeepstorage configuration is not used at all, it is only used for the auto-generated GC policies.
In case you do specify your own GC policies (via the buildkitd.toml file), you can use the “buildctl debug workers --verbose” command to verify whether BuildKit properly interpreted your settings. However, that command does not show whether GC is generally enabled! Having GC policies in place does not mean that BuildKit really uses them – this only happens if you explicitly enable GC, as explained above!
Beware of inode limits
BuildKit’s pruning criteria are limited to (accumulated) file size and age of the cache items. But you may also run out of disk space (the dreaded ENOSPC error) in case your disk has run out of inodes, which BuildKit’s pruning does not account for. For instance, this may happen if you are building large Node.js projects, using the exec.cachemount feature for the cache folder of your Node package manager (typically NPM or Yarn). Node.js projects often have many dependencies, and each dependency ships with many files, so I’ve observed disk volumes run out of inodes before they run out of actual disk space.
To date, you need to manually mitigate this problem. What I’ve done is to build a simple shell script which calls
“df -i <mount-path-of-partition-that-hosts-buildkit-data>” in the BuildKit container, to get the inode usage in percent. I parse the output of df with a tool like awk, and then run a full BuildKit prune in case the volume has exceeded, say, 95% of the available inodes.
Tricks for speeding up image builds in CI
The following subsections explain tricks to improve the image build speed time in CI pipelines.
Trick #1: use a fast and persistent local cache volume
As explained above, BuildKit manages a local cache stored on the “local” file system. Make sure that this disk is fast, and persistent (meaning that the data survives a restart of buildkitd). If your BuildKit daemons are short-lived (e.g. running as Kubernetes Pods), make sure to mount a networked disk, to achieve persistency. Depending on your infrastructure provider (Public Clouds, On-Premises, etc.), make sure you choose a fast networked disk. For instance, if you use Azure Kubernetes Service (AKS), consider using Premium SSD v2 or Ultra Disks (see docs) instead of the (slower) Premium SSDs or Standard SSD/HDDs.
BuildKit does not like to share
Make sure that each concurrently-running buildkitd process is given a dedicated disk volume! BuildKit does not support multiple concurrent readers and writers to its local cache!
As an alternative to using networked disks, you can have long-running BuildKit daemons that simply use the local storage of the device they run on (which are potentially non-persistent if the node or K8s-Pod restarts).
Trick #2: Tune BuildKit’s GC policies
As shown in the docs, the default GC policies (generated by BuildKit) are not suitable for CI environments, because:
- Keep Bytes of rules 2, 3 and 4 is set to a very small value (10% of the disk’s capacity), which is simply too small
- For cache items of type
exec.cachemount, every cache folder that exceeds a size of 512 MB and is older than 2 days will be pruned. For CI/CD, this is an extremely poor choice. In practice, cache folders quickly explode in size, so the 512 MB limit is exceeded immediately. Also, 2 days is way too short: every build you do on a Monday (which follows 2 weekend days of inactivity) will be slow, because this GC policy prunes the cache folder on Monday. Note: if an item of typeexec.cachemountis pruned, BuildKit deletes the entire directory. The granularity ofexec.cachemountitems is very coarse: it does not account for when the individual files/directories in that mounted directory were created or updated.
For CI/CD environments, I instead propose the following set of GC policies:
[worker.oci]
  enabled = true
  gc = true

  [[worker.oci.gcpolicy]]
    filters = ["type==source.local", "type==exec.cachemount", "type==source.git.checkout"]
    keepBytes = 37580963840  # 35 GB, expressed in bytes

  [[worker.oci.gcpolicy]]
    all = true
    keepBytes = 64424509440  # 60 GB, expressed in bytesCode language: PHP (php)
The keepBytes values are just examples, which you need to adapt to your context. The basic idea is:
- Choose a large disk volume size that you can afford. The bigger the better. As an upper limit, 100 GB sounds reasonable to me.
- For the second policy shown in the above
buildkitd.tomlconfig, choose akeepBytesvalue that is a few GBs smaller than your disk capacity, to give BuildKit’s GC routines enough time for pruning. This avoids “no space left on device” errors. I found a 10 GB difference to be sufficient. A new image build (that finishes within 1 minute, before the next GC cycle starts) is extremely unlikely to require more than 10 GB of disk space. - For the first policy, choose
keepBytesthat is significantly smaller thankeepBytesof the second policy. The difference between the two values (here: 60 – 35 = 25 GB) defines how much space the remaining cache items (regular,frontend,internal) may consume.
Trick #3: use the inline or registry cache exporter (targeting the same registry)
The main disadvantage of remote caching is the incurred transfer time, required to upload or download the cache data. To reduce this transfer time to a minimum, you should push the cached image layers to the same image registry to which you push your image. This happens automatically if you use the inline cache exporter.
In case you choose the registry exporter, you should also use the same registry host name in the --export-cache type=registry,ref=… argument like the one you used in --output (buildctl) or -t (Buildx). When BuildKit uploads layers for the cache, followed by uploading the same layers of the built image, it automatically deduplicates the uploads. As explained above in section “Refresher: what are images”, the BuildKit client and the registry server always first compare SHA-256 hashes before uploading anything. The image layers pushed to the cache-image have the same hashes as the layers pushed for the tagged output-image.
Third party cache exporters
BuildKit also supports various third party cache backends (AWS S3, Azure Blob storage or GitHub Actions cache) for the registry exporter. You should only use them if:
- a) their connection speed is faster than the connection to your image registry server
- b) you are building multi-stage images (with
mode=max), where you only push the final stage to your image registry (as regular image), and all other previous stages you want only uploaded as cache image to one of these third party cache backends
If you wonder how to choose between the registry and inline cache exporter, I recommend that you use the inline cache exporter, unless you have a multi-stage Dockerfile. In this case you should prefer the registry exporter (docs) with “mode=max” and “image-manifest=true“. The image-manifest option has been added in Buildkit v0.12 and it tells BuildKit to use a different meta-data format for the cache-image, which is compatible with all image registries. Without setting image-manifest, BuildKit would (by default) use a proprietary meta-data format that is (even today) rejected by many image registry implementations (e.g. Harbor). See here and here for details.
Trick #4: efficient remote caching for branch-based flows
Many teams have a development workflow where they use separate (temporary) branches in which they implement bug-fixes or features. There are branch pipelines and/or PR pipelines that build Docker images for each branch, and potentially run these images (e.g. during automated tests). Typically, a single BuildKit instance would not be powerful and fast enough, thus the team runs multiple BuildKit daemons (possibly even elastically scaling them). Each daemon has a different local cache. Without a remote cache, when builder instance #A builds and pushes an image, builder instance #B would still have rebuild the image, even when the source code between the two builds has not changed, because #B’s local cache is initially empty.
Thanks to BuildKit’s remote cache, you can avoid rebuilding those layers in builder instance #B. Unfortunately, it is easy to get the --cache-from and --cache-to CLI arguments wrong, such that the caching simply does not work as expected, resulting in poor build speeds.
Let’s look at an example scenario where we have a CI pipeline that first tests a Node.js-based application (running yarn test), and only if the tests pass, the app is built (yarn build).
# syntax=docker/dockerfile:1
FROM node:20 AS dependencies

WORKDIR /app
COPY package.json yarn.lock ./
RUN --mount=type=cache,target=/root/.yarn,id=yarn_cache yarn install --frozen-lockfile --cache-folder /root/.yarn
COPY . .

#######################################
FROM dependencies AS build

RUN yarn buildCode language: Dockerfile (dockerfile)
The Dockerfile is split into two stages: the first stage, dependencies, prepares the app’s source code and installs all the dependencies (creating the node_modules folder), so that the resulting image has everything it needs to execute “yarn test”. The second stage simply creates the build.
Suppose your pipeline has 3 jobs that run in sequence:
- 1) Build source image with dependencies:
docker build -t user/app:build-stage --target dependencies --push \--cache-from=type=registry,ref=user/app:cache \--cache-to=type=registry,ref=user/app:cache,mode=max,image-manifest=true
- 2) Run tests:
docker run --rm --entrypoint="/bin/bash" user/app:build-stage yarn test
- 3) Build final app image
docker build -t user/app:latest --push \--cache-from=type=registry,ref=user/app:cache \--cache-to=type=registry,ref=user/app:cache,mode=max,image-manifest=true
While this pipeline looks correct at first glance, its caching is actually broken, because we always use the same cache image in both jobs that build an image. Let’s step through the pipeline like a debugger, to understand what is going wrong:
- When the pipeline executes for the very first time, every layer and every stage must be built from scratch anyway, so caching does not come into play yet. At the end of job #3, the
user/app:cacheimage contains the cache layers of bothDockerfilestages. - Suppose a second pipeline instance starts (without any relevant code changes – e.g. only the README file has changed, which is filtered out via
.dockerignore). Suppose that job #1 and #3 are executed by fresh BuildKit instances whose local cache is empty. Still, thanks the exported/imported cache, no layers should be rebuilt. But contrary to our expectations, job #3 does build the second stage of theDockerfileagain. What went wrong?- Job #1 imported the
user/app:cacheimage, found that it did not need to rebuild any layers, and then it overwrote theuser/app:cachecache image, so that it only stores the layers of thedependenciesstage! As I explained above: “BuildKit pushes only those cache items that were relevant for the image that was just built” - When job #3 runs, it does not need to rebuild the
dependenciesstage (because BuildKit finds the respective layer inuser/app:cache), but it needs to rebuild thebuildstage, because the manifest of the importeduser/app:cacheimage no longer contains the respective information.
- Job #1 imported the
Before I propose an improved solution, you should be aware of the following BuildKit features, regarding its CLI argument processing:
- You can repeat the
--export-cache(alias--cache-to) argument as many times you want, with different destinations - The same applies to
--import-cache(alias--cache-from) - If a cache-image referenced by
--import-cache(alias--cache-from) is missing in the registry, BuildKit won’t exit with error, but gracefully continue with the build - You can push to multiple images in parallel. It is not necessary to repeat building the same image multiple times (each time with a different tag). This is especially useful if you use the
inlinecache exporter and you want to push the image to a “normal” tag and a cache-tag. The CLI arguments depend on your client:- If you use “
docker build” (Buildx), just repeat the “-t” argument - For
buildctl, see https://github.com/moby/buildkit/issues/797 – example:--output type=image,\"name=test/repo:tag1,test/repo:tag2\",push=true
- If you use “
Given this knowledge, let’s update the pipeline jobs. Let’s assume that the CI system provides the currently processed branch in the environment variable named BRANCH_NAME. Assume that we can “sanitize” the branch name so that it can be used as a Docker image version tag (which has various restrictions regarding the set of allowed characters, see docs). Pick any sanitation approach you like, e.g. from here, and store the sanitized branch name in environment variable BRANCH_NAME_CLEAN.
The new pipeline jobs look as follows (job #2 is unchanged):
- Job 1) Build source image with dependencies:
if [ "$BRANCH_NAME" != "main" ]; thenEXTRA_CACHE_IMPORT="--cache-from=type=registry,ref=user/app:cache-deps-$BRANCH_NAME_CLEAN"fidocker build -t user/app:build-stage-$BRANCH_NAME_CLEAN--target dependencies--push \--cache-from=type=registry,ref=user/app:cache-deps-main \$EXTRA_CACHE_IMPORT \--cache-to=type=registry,ref=user/app:cache-deps-$BRANCH_NAME_CLEAN,mode=max,image-manifest=true
- Job 3) Build final app image:
if [ "$BRANCH_NAME" != "main" ]; thenEXTRA_CACHE_IMPORT="--cache-from=type=registry,ref=user/app:cache-deps-$BRANCH_NAME_CLEAN --cache-from=type=registry,ref=user/app:cache-final-$BRANCH_NAME_CLEAN"fidocker build -t user/app:$BRANCH_NAME_CLEAN --push \--cache-from=type=registry,ref=user/app:cache-deps-main \--cache-from=type=registry,ref=user/app:cache-final-main \$EXTRA_CACHE_IMPORT \--cache-to=type=registry,ref=user/app:cache-final-$BRANCH_NAME_CLEAN,mode=max,image-manifest=true
A visual representation would look like this:
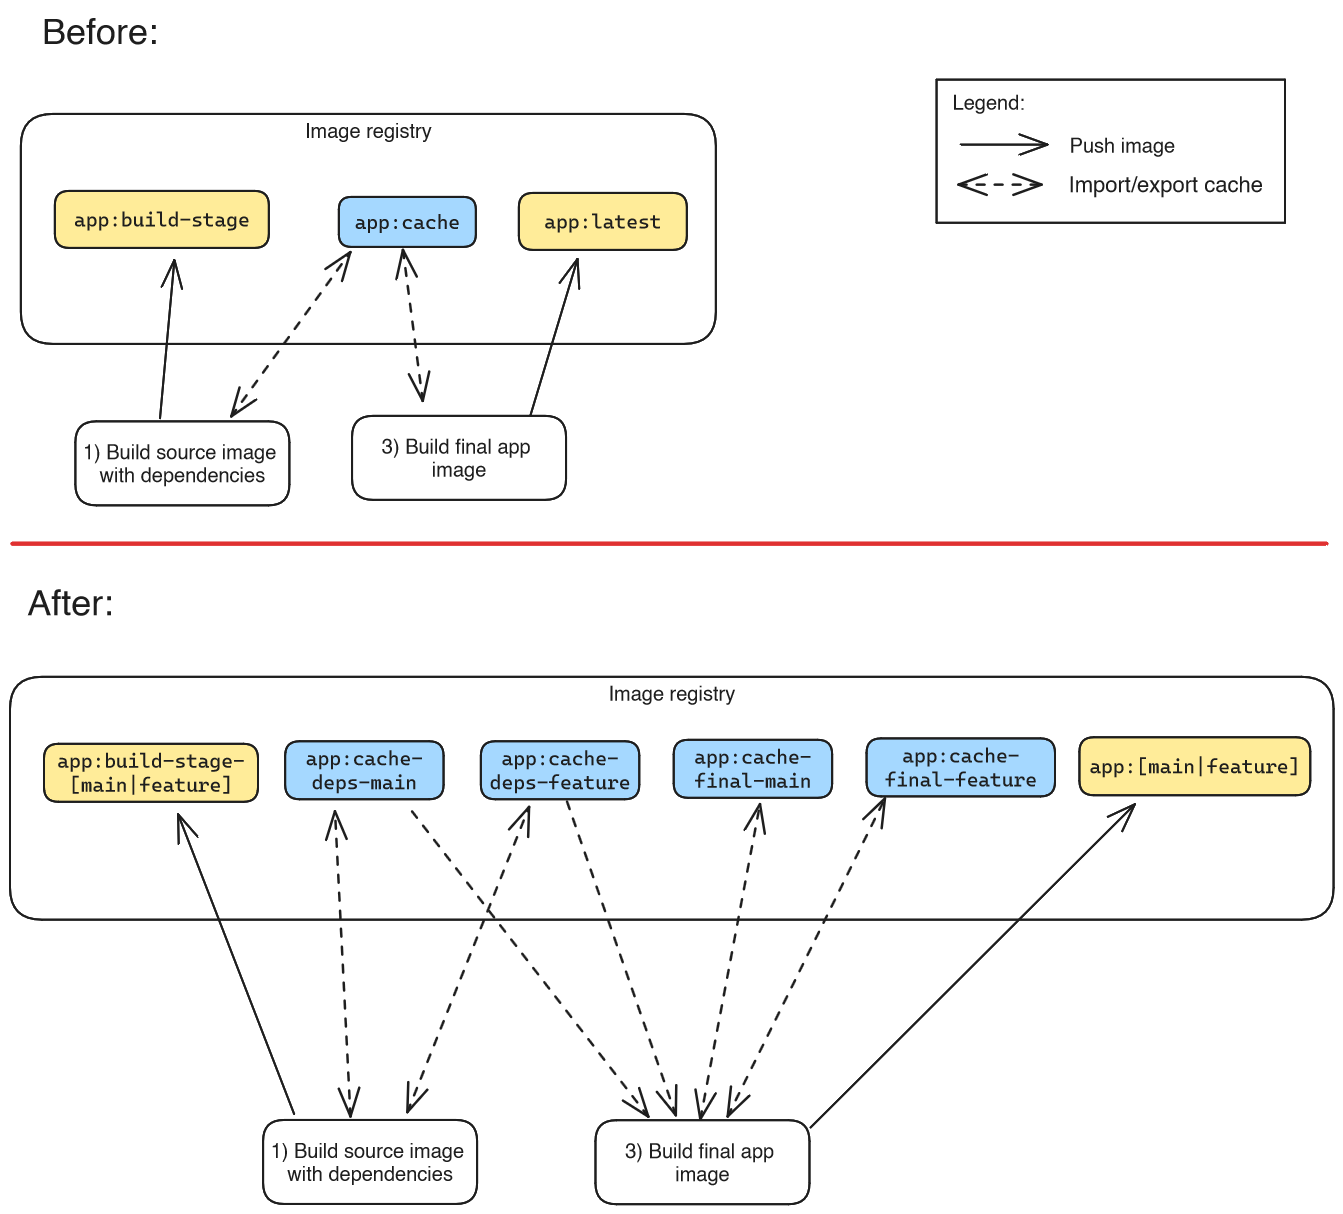
The changes are:
- We now include the sanitized branch name in the image tag we push to (
-t), and in the version-tags of the cache images (--cache-to,--cache-from). - When we export the cache, we make a difference between the two
Dockerfilestages: job #1 exports to “…app:cache-deps-…”, job #3 exports to “…app:cache-final-…”). This avoids that job #1 overwrites the (more complete) cache image of job #3 (that job #3 uploaded in a previous pipeline run). - When we import the cache, job #1 not only imports from the active (feature) branch, but also from
main, as a fallback: if job #1 of a feature branch runs for the very first time, this trick achieves that the build completes very quickly, in case the feature branch did not change thepackage.jsonfile, so the “RUN yarn install” layer can be used from theuser/app:cache-deps-maincache image. - When job #3 imports the cache, it imports the caches from (potentially) both branches and both stages (deps + final), to improve the chance of a cache hit. So there could be as many as four
--cache-fromimports.
To avoid that your image registry fills up with cache images, I generally recommend that you configure some kind of image retention policy in your container image registry, which automatically deletes cache-images, e.g. if they have not been pulled for a week or two.
Trick #5: correct use of directory cache mounts
Consider the following Dockerfile that builds a Java application with Gradle, making use of BuildKit’s directory cache mount feature in line 8:
# syntax=docker/dockerfile:1
FROM ibm-semeru-runtimes:open-17-jdk
WORKDIR /app
COPY build.gradle.kts gradlew settings.gradle.kts ./
RUN mkdir gradle && mkdir src
COPY gradle ./gradle  # the "gradle" folder only contains "gradle-wrapper.jar" and "gradle-wrapper.properties", not Gradle itself
# Download Gradle and all jars/dependencies
RUN --mount=type=cache,id=gradle-cache,target=/root/.gradle ./gradlew --write-verification-metadata sha256 help --no-daemon
# build application (without running tests)
COPY src ./src
RUN ./gradlew build --no-daemon -x test
Code language: Dockerfile (dockerfile)
Can you spot the mistake? It’s very subtle: in line 11, we forgot to add the --mount option, thus Gradle has to download all the dependencies to “/root/.gradle” again. Keep in mind that the target folder specified in --mount is only mounted during its respective RUN statement.
Is this always a problem?
This problem only exists for tools like Gradle, that download the dependencies only to the cache folder. This is not the case for all tools. For instance, had this been a Node.js application, a command like “yarn install” would have downloaded the dependencies to both the cache folder and to the node_modules folder that is part of the image. In this case, there would not be a problem, because a command like “yarn build” only needs the node_modules folder (Yarn’s cache folder somewhere below /root is irrelevant at this point). If in doubt, use tools such as strace (e.g. “strace -e trace=openat,read,write -f <command>“, which tracks all syscalls that open files, even for subprocesses started by <command>).
There are two solutions to fix this Gradle-specific problem:
- A: Use the
--mountoption in everyRUNstatement that calls Gradle - B: Use the
--mountoption only in theRUNstatement of line 8, but then insert the following statement right after that line, which simply copies the Gradle cache into the image:RUN --mount=type=cache,id=gradle-cache,target=/.gradle cp -r /.gradle /root
Let’s discuss the pros and cons of solution #B:
- Cons:
- The image size increases considerably (in case of Gradle it could be 400 MB or more). This slows down the image build, because the large layer needs to be uploaded to the image registry, either because you push the image itself, or because you use the
registrycache exporter - The space consumption of your local cache increases, because it effectively needs to store the same Gradle-related files both in the
exec.cachemountcache item and in theregularcache item
- The image size increases considerably (in case of Gradle it could be 400 MB or more). This slows down the image build, because the large layer needs to be uploaded to the image registry, either because you push the image itself, or because you use the
- Pros
- Improved remote caching: if you use the
inlineorregistrycache exporter, a different BuildKit builder instance can import the Gradle cache from your image registry
- Improved remote caching: if you use the
In the end, you need to measure which of the two solutions are faster in your case. Solution #B may be faster if the connection speed between BuildKit and your image registry is very good, compared to solution #A where Gradle downloads hundreds of jar files individually over the internet.
Unexpected re-downloading of Gradle dependencies
If you use solution #A, and you rebuild the image after changing only some java files (→ line 11 needs to be rebuilt), it can happen that Gradle unexpectedly re-downloads all jar files in line 11, even though BuildKit shows line 8 as “CACHED”. The reason is that when BuildKit builds line 8, it actually creates/updates two cache items:
- One of type
exec.cachemountthat stores the Gradle cache - One of type
regularthat stores the file system changes in that layer (affecting all file system paths except the mounted “/root/.gradle“)
At some point, BuildKit’s garbage collection cycle may prune the exec.cachemount entry, but keep the regular cache entry of line 8, and that’s why Gradle re-downloads the jar files in line 11. This problem cannot occur with solution #B.
By the way, from experimentation, it seems that the pruning algorithm for exec.cachemount entries has an odd way of accounting for the “least recently used” (LRU) date: if line 8 is not really built (because of its regular cache item), BuildKit does not update the LRU date of the corresponding exec.cachemount entry. BuildKit only updates the LRU date of exec.cachemount entries when the corresponding RUN statement (line 8 or 11) is really built. In other words, when the cache mount is being written to. This means that if you have a GC policy where you set a keepDuration value for exec.cachemount entries, these cache items might be pruned faster than you would expect! This is why we did not specify any keepDuration values in trick #2.
Conclusion
Speeding up CI/CD pipelines should be one of the priorities of your platform team which handles the CI/CD infrastructure. Image build times typically contribute significantly to the CI/CD pipeline run time, and caching is a great approach to reduce the build time. With the detailed knowledge from this article, you should be capable to tune your caching to a maximum. As I explain in this post, you can even apply Docker caching to other steps in your pipeline that compute something, but are (originally) not meant to be published as Docker image.
In case you still encounter many unexpected cache misses, check out my other post, which explains common reasons for cache misses.
While this article is BuildKit-specific, some of the points I made may also apply to other builder tools, such as kaniko or buildah, but your mileage may vary.
Hi Marius, This is quite a lecture! Thanks for the effort you put into writing such a nice and detailed article, it helped a lot to understand the buildkit internals.
The only question I have is: is there any special case I may be missing as to why you chose the branch name instead of the HEAD’s commit hash for the image label?
Thanks again,
Hi Osmar, glad to hear that the article is helping you. Regarding your question: the version tag of the image (that you set with
-t) can be anything you want, e.g. the commit hash, it does not need to be the branch name. However, the image names/tags for the cache images (that you set with--cache-fromor--cache-to) should be the branch names.Love this article buddy. Thank you for taking the time.
Wow Marius – that is an amazing writeup. Thanks !
I hope you can point me in the right direction regarding caching.
We are current building multiple application images ( primary based on mcr.microsoft.com/dotnet/sdk:8.x.x ) in gitlab with 2 buildkitd services running in kubernetes ( load balanced ). I am using those servers with ‘docker buildx create –name remote –driver remote tcp://buildkitd:1234 –use’
That means that 50% of the time, I am hitting a buildkit server that does not have cached image layers. So I guess I need external caching 🙂
As an experiment, I configured caching like this :
–cache-from=type=registry,ref=”${CACHE_NAME}” –cache-to=type=registry,ref=”${CACHE_NAME}”,mode=max
Where CACHE_NAME is registry.xx.xx/apps/:buildcache
I am using an in-house nexus3 service as a registry, btw.
That means all build ( including the ones from MRs ) are sharing the same cache. I know this is against you recommendations and I was on my way to change that. But then I realized 2 things :
1) My initial build time has increased, since the cache registry writes are taking quite a long time initially.
2) I has to increase the max size of the nginx proxy in front of nexus from 1G to 10G
3) The caching is per-application.
I can live with (1) and (2) – but (3) made me wonder :
Since most of the applications are sharing the same base images, I guess it would make sense to share an external cache for all of them ?
Can that be accomplished ? Or perhaps I should just scale down to only 1 buildkit server and then have the caching there.
Any suggestions are very welcome. Thanks again 🙂
BR Tom
Hi Tom, whether the different apps share the same base image is not that relevant. What you are implying is that there is a waste of disk space (and time, the time it takes to transfer cache-layers over the network), because the apps are all similar (.NET apps). I guess that the problem is that, inside the build container, NuGet downloads many dependencies that take up a lot of disk space? And each app might have slightly different dependencies.
Assuming that your container-based BuildKit instances (that run in K8s) are not completely ephemeral (but you keep them running, at least for a few hours/days/weeks at a time), you might be better off with not pushing remote cache layers, but instead use the
RUN --mount=type=cachetrick (also elaborated in the article) instead.Typo:
CACHE_NAME is either egistry.xx.xx/apps/app1:buildcache, registry.xx.xx/apps/app2:buildcache, registry.xx.xx/apps/app3:buildcache
Thank you for this incredibly detailed and helpful article! I learned a lot about buildkit caching thanks to this writeup.