This article explains how Docker builds images with BuildKit, via buildx. It discusses the advantages of BuildKit over Docker’s legacy image builder, and then elaborates on three approaches for calling BuildKit in Docker: 1) using the embedded BuildKit library managed by the Docker daemon, 2) using a BuildKit container managed by buildx, and 3) using a containerized BuildKit instance directly via buildctl. Finally, all three approaches are compared, with recommendations for different use cases.
Introduction
In today’s times, Docker is just one of many container engines that you can use to run your workloads. For software developers, however, Docker Engine is probably still the most-used container engine running on their laptop, in particular in combination with Docker Desktop, which is now even available on Linux.
I observed that many people have misconceptions about how building images with Docker (Desktop) works. They think that Docker Engine builds the image. And while this used to be true, today Linux containers are built with BuildKit, which is shipped with Docker Engine, but also usable as a stand-alone tool. Knowing this is especially useful if you want to give your CI/CD pipelines the capability to build images.
In this article you will learn what BuildKit is, its advantages over Docker’s legacy image builder, and three approaches for calling it. In this follow-up post, I take a detailed look at BuildKit’s caching feature.
Introduction to BuildKit
BuildKit is a general-purpose build tool that produces OCI/container/Docker images as output. As input, it supports all kinds of human-readable formats, most famously a Dockerfile (or named differently, e.g. Containerfile). But there are many other supported formats, e.g. Earthfile (Earthly) or Cloud-Native Build Packs. See here for a complete list.
BuildKit refers to these input formats as “frontends” (the terminology stems from compiler theory). The job of a frontend implementation is to translate the human-readable input file into an intermediate format that is then processed by the backend (BuildKit). In this case, the intermediate format (called “LLB”) is a dependency graph whose nodes are low-level instructions (see here for details) like running shell commands, retrieving data from local directories or Git, etc. This post also has a few more details and further links, if you’re interested.
Historically, BuildKit was spun out of the Docker Engine code base (into a separate Git repository) about 5 years ago, so that it can evolve independently from Docker Engine, allowing for more frequent releases. Since Docker Engine v18.09, Docker had a switch so that the “docker build” command uses a BuildKit instance embedded into the Docker Engine. There were multiple variants of that switch, such as:
- Setting the
DOCKER_BUILDKITenvironment variable to 1 - Setting
features → buildkit: truein the Docker Engine’sdaemon.json - Using the
docker buildx buildcommand instead ofdocker build
Today, this switch is obsolete, because since Docker Engine version 23, docker build uses the embedded BuildKit (via docker buildx build) by default, even if DOCKER_BUILDKIT is not set. What I just explained refers to the Docker Engine which only works on Linux! Docker Desktop on macOS and Windows already used BuildKit by default much earlier than version 23, by setting the features → buildkit: true value in the Docker Engine’s daemon.json.
Advantages and limitations
At the time of writing, you could still use the legacy builder of Docker engine, by setting DOCKER_BUILDKIT=0. See also Docker’s deprecation roadmap. Or you could choose to use a completely different builder (like kaniko or buildah). However, I recommend that you use BuildKit. Let’s take a look at its advantages and limitations:
Advantages:
- Very high build speed, thanks to many implementations tricks. For instance:
- BuildKit builds multiple stages (that you defined in your
Dockerfile) in parallel (unless they depend on each other) - Instead of sending the entire build context (the directory that hosts your
Dockerfileand source code) to the build engine (as done by the the legacy builder), BuildKit pulls (from the client) only those files and folders that it really needs (because of yourADD/COPYstatements), and BuildKit only requests those files that it has not already cached.
- BuildKit builds multiple stages (that you defined in your
- Support for many remote cache backends, e.g. GitHub Actions or AWS S3, and support for reading from both a local and remote cache (more details in this follow-up article)
- Support for various input file formats (a.k.a. BuildKit’s frontends) as alternative to
Dockerfile
The main limitation of BuildKit is that it does not yet support building Windows-containers (tracked in this GitHub ticket). Windows images are still built by Docker’s legacy builder.
Docker’s distributed architecture
Before I explain how Docker and BuildKit interact with each other, it is important that you understand the distributed architecture of Docker. When you run “docker ...” commands, you are just using the Docker CLI, which is a client that sends these commands (via the gRPC protocol) to some server, which is a permanently-running “daemon” process. This is true for both:
- Building images: for “
docker build” commands, theDockerfileand the files youCOPY/ADDin thatDockerfileare sent to a possibly remote BuildKit daemon instance - Interacting with containers: “
docker run” commands are sent to a possibly remote Docker daemon. The same is true for other commands that somehow interact with containers, e.g. stopping/deleting them, listing them, retrieving logs, etc.
Naturally, if you install Docker (Desktop) on your developer machine, both the Docker CLI (client) and the server (daemon process) are installed, with the docker CLI being configured to use the locally-running daemon. But you could change this, e.g. because you might want to access multiple Docker daemons over time. Just imagine a scenario where you work on multiple projects that each run on a different Docker server. The Docker CLI supports configuring multiple daemons in parallel, via Docker Contexts. If you don’t want to configure multiple contexts, you can still (temporarily) change the used daemon to some remote daemon:
- You could set the
DOCKER_HOSTvariable (e.g. to “tcp://174.17.0.1:2376”) - You could set a custom host via “
docker --host …“
The remote daemon instance must be reachable via a TCP socket, or a UNIX socket (that is either on the local filesystem, or remotely reachable via SSH). See the docs for details.
Introduction to Docker buildx
Today, BuildKit is basically a stand-alone builder with its own client CLI (called buildctl) and server daemon (buildkitd). This means that you can use BuildKit completely independently from Docker Engine.
BuildKit is probably the most powerful builder (compared to other builders such as kaniko or buildah), but it is also the most complex one to use, with many unintuitive CLI arguments. This is one of the reasons why the Docker team created an abstraction layer that sits between the docker CLI and BuildKit, called buildx. Buildx is a plugin for the docker CLI which simplifies the creation, management and usage of containerized BuildKit instances. Buildx lets users (who are familiar with the “traditional” docker build command) use BuildKit, translating the CLI-arguments given to “docker build” into arguments understood by BuiltKit.
Buildx supports managing multiple builder instances in parallel, each with a different configuration. You can see them via “docker buildx ls”. When you create or configure a builder instance, you have to use one of the supported buildx drivers (docs):
- With the
docker-containerorkubernetesdriver, buildx creates a BuildKit container. That container runs either in your configured Docker Engine (driver=docker-container) or in the currently-configured Kubernetes cluster (driver=kubernetes). - The
remotedriver sets up a connection to an already-running BuildKit daemon that is externally managed
3 approaches to call BuildKit via Docker
The way I see it, there are three different approaches for building images with BuildKit, assuming that you use Docker Engine/Desktop:
- BuildKit managed by the Docker Engine daemon (this is typically used by default if you run “
docker build”) - BuildKit container managed by buildx (that you manually created/configured)
- Using BuildKit’s CLI (
buildctl) directly, which connects to a manually-started BuildKit daemon instance
Let’s take a detailed look at each approach and how they differ.
1) BuildKit managed by Docker Engine
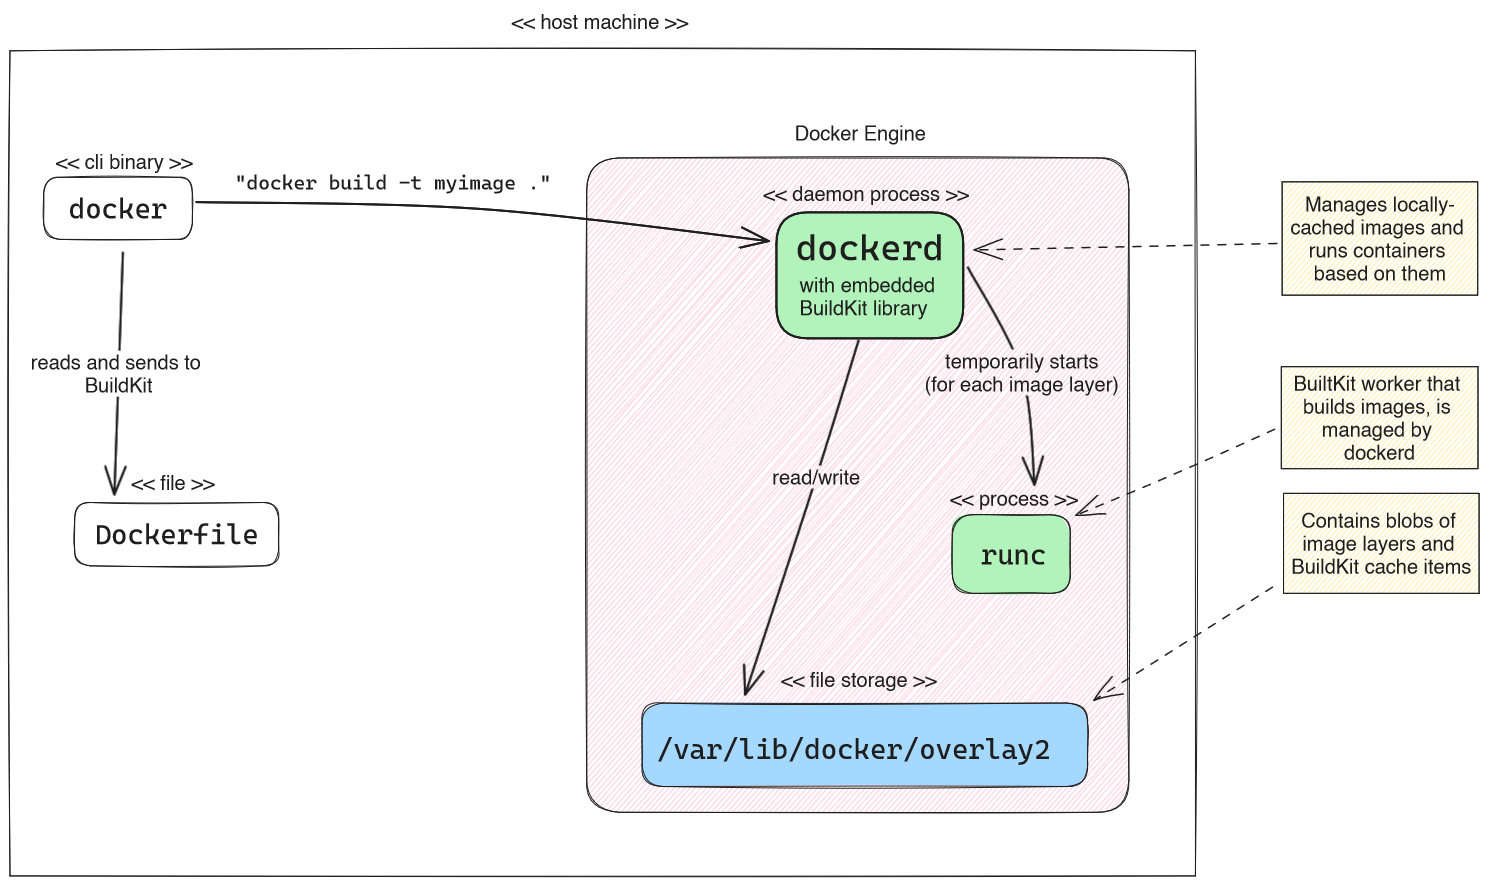
By default, when you run a command such as “docker build -t myimage .”, the Docker daemon uses an embedded BuildKit instance, which is (presumably) embedded into dockerd as library (you won’t find a buildkit binary on disk, nor a separately running buildkitd process). BuildKit basically executes each individual step (of the LLB dependency tree derived from your Dockerfile) in a temporary container started using runc, which is a low-level tool to run containers.
This embedded BuildKit instance is also under buildx-management, and it uses buildx’s docker driver. This driver has several limitations, as shown in the table in the docs. The most notable disadvantages are:
- This instance cannot be configured/customized, except for garbage collection aspects (see docs). Other drivers allow for configuration (e.g. with a
buildkitd.tomlfile, see docs). - This instance cannot build multi-platform images (images where a single Docker image version tag like “
postgres:12” points to multiple different images, each suited for a specific CPU architecture).
The main advantage of the embedded BuildKit instance, however, is that images built by it are automatically “loaded” into the Docker daemon. “Loaded” images refer to the locally-cached images managed by the Docker daemon (stored in /var/lib/docker/overlay2) which you can then run with Docker (without having to pull them from a registry first). In this case, image loading has no overhead, because the Docker Daemon and the embedded BuildKit share the same file storage (/var/lib/docker/overlay2). Note that loading images to the Docker daemon is also supported by the other two approaches presented in the next sections, but it is slower (see below).
2) Buildx-managed containerized BuildKit
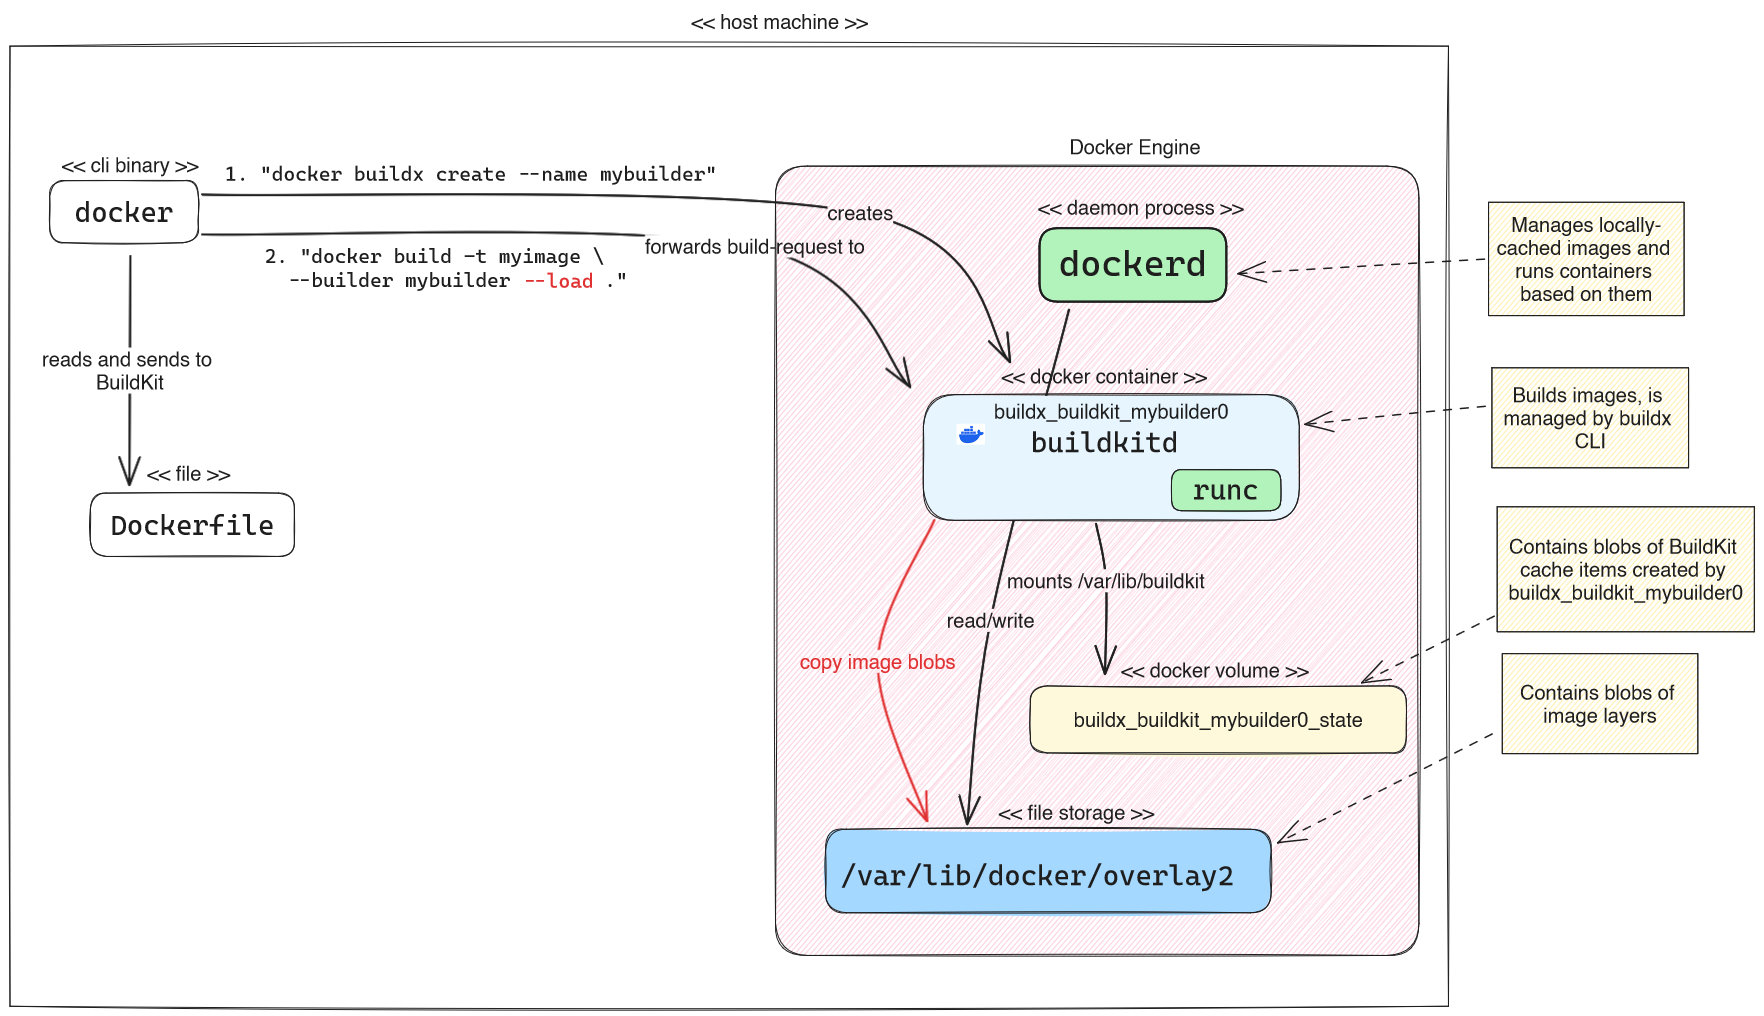
If you want to use a containerized BuildKit instance that is managed by buildx, you first have to create such an instance, and you may also tell buildx to use it by default whenever you run docker build. You do this using the docker buildx create command (docs). Example for a full command:
docker buildx create --driver docker-container --name mybuilder --use --bootstrap
You could also omit all of the optional arguments (and run just “docker buildx create”), due to the following default behavior:
--driverusesdocker-containerby default, so you only need to specify a driver if you want to create akubernetes-driven instance, or configure aremoteinstance--namecan be omitted, in this case buildx generates a name for you (e.g. “reverent_wilbur”)--usecan be omitted, but then you need to run another command (docker buildx use mybuilder) afterwards to use this builder, unless you always specify the builder explicitly as part of the build command (“docker build … --builder mybuilder“)--bootstraptells buildx to immediately create and start the Docker container for the BuildKit instance. Otherwise, the container is created/bootstrapped “lazily” the first time you build an image
In this example, Buildx creates a container-based BuildKit daemon (container name = buildx_buildkit_mybuilder0), and buildx automatically configures a Docker volume for it. That volume stores the builder’s data, most notably the BuildKit cache blobs. Using BuildKit via buildx, you have full configuration flexibility: you can provide a buildkitd.toml configuration file (docs), provide buildkitd flags (docs), or set additional driver-specific options (docs).
To build an image using the builder you just created, you either have to explicitly provide the instance name of the builder to the build command (as shown in the above figure: --builder mybuilder), or tell buildx to use your new instance by default (e.g. “docker buildx use mybuilder“, or creating the instance with docker buildx create … --use).
By default, images built by BuildKit instances using the docker-container/kubernetes/remote driver are neither pushed to the registry, nor “loaded” to the Docker daemon’s local image cache. Effectively, the built image is unusable because it is inaccessible. To make it accessible, you have the following two options:
- To push the image to a registry, you need to specify
--push(docs) - To load the image to the Docker daemon’s local image cache, you need to specify
--load(as we did in the above figure), see docs. Loading may take time, because it happens rather inefficiently (see issue): BuildKit builds a (potentially huge) tarball of all image layers, which it then sends to the daemon.
Setting up an alias for docker buildx build
The manual here claims the following: “In newer versions of Docker Desktop and Docker Engine, you’re using Buildx by default when you invoke the docker build command. In earlier versions, to build using Buildx you would use the docker buildx build command”.
In my experiments, at the time of writing (Oct. 2023), this was not entirely true. While it is true that docker build (docs) forwards all CLI arguments to docker buildx build (docs), docker build does not use the custom buildx builder instance you may have explicitly configured (via docker buildx use mybuilder). Instead, “docker build” always uses the embedded BuildKit instance by default. To change this, you can run “docker buildx install” (docs), which you only need to do once on your machine. This installs a proper alias (which you can also undo, via “docker buildx uninstall”). From now on, docker build is really an alias for docker buildx build.
3) Direct BuildKit usage using buildctl
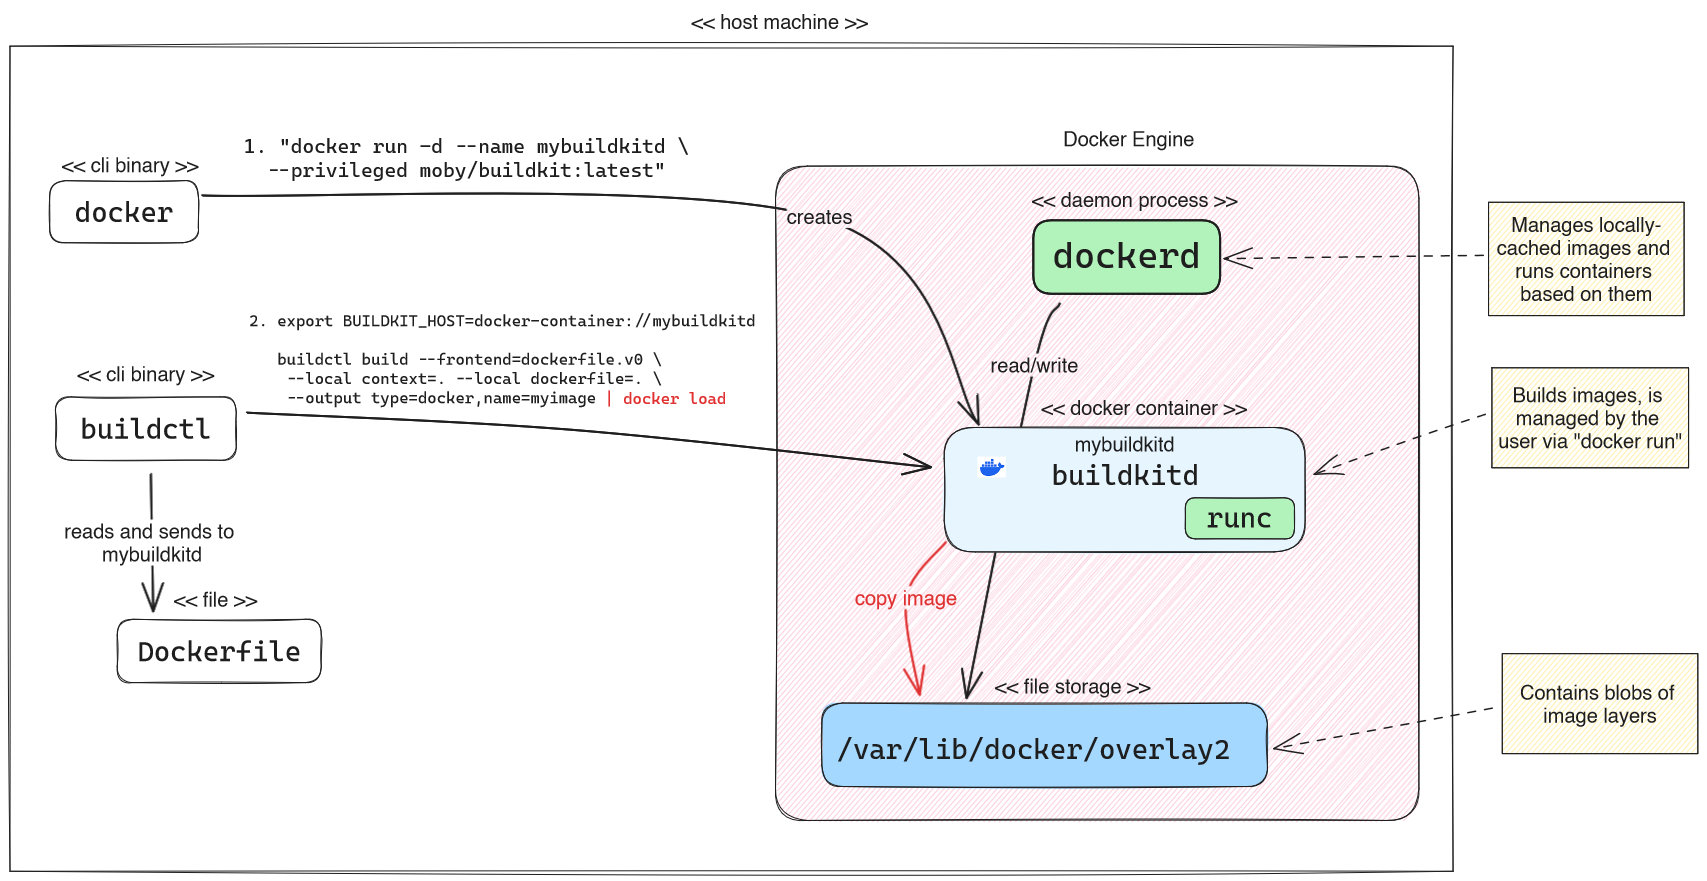
While the first two approaches use the Docker CLI (“docker build …“) to build images, you can also manually download BuildKit’s buildctl client CLI from their GitHub releases and use it directly. Just download the binary for your operating system, make it executable (on UNIX-based systems via “chmod +x“) and call it (“./buildctl <args>“).
Because you also need a running BuildKit daemon that buildctl talks to, you have several options to get it:
- If you run UNIX on your host operating system, you could download BuildKit’s source code and build the binary yourself and run it directly. However, it is much easier to choose one of the options below!
- Run a BuildKit daemon container manually, e.g. in Docker or Kubernetes (docs). The above figure shows the variant of running BuildKit as Docker container. If you want persistency of the cache blobs, you would have to manually specify a directory or Docker volume mount to the “
docker run” command, e.g. “-v my_buildkit_cache:/var/lib/buildkit” - Use buildx to create a BuildKit container, as explained in approach #2
Let’s now look at the buildctl client. By default, it tries to connect to a locally-running BuildKit daemon. To change that, you need to set the BUILDKIT_HOST environment variable (e.g. to “docker-container://buildkitd“, as explained in the BuildKit docs). Here is an example for how to build an image, where you want your current working directory to be used as context and it contains a Dockerfile at the root level:
buildctl build --frontend dockerfile.v0 --local context=. --local dockerfile=.
Because the official documentation is quite poor, let’s take apart the different arguments:
--frontend dockerfile.v0tells BuildKit which frontend to use by default, in case the input file (here: ourDockerfile) does not specify a custom frontend implementation. As explained e.g. in theDockerfilefrontend docs, input files can (optionally) specify a reference to a Docker image that contains the frontend-implementation, by having the first line look like this:#syntax=<frontend-image-reference>, e.g.#syntax=r2d4/mocker. “dockerfile.v0” is aDockerfilefrontend implementation embedded into BuildKit, which may be rather outdated (see here for the latest versions of theDockerfilefrontend). Anyways, if the input file specifies a custom image (#syntax=…), that custom frontend takes precedence over thedockerfile.v0fallback.--local context=<absolute-or-relative-path>tells BuildKit the absolute or relative path to a local directory that is treated as the default context. So whenever you write something like “COPY foo bar” in yourDockerfile,foomust be a relative path within the context directory. Using “.” is a common UNIX/shell shorthand for using the current working directory.- Note: if you want to instead use remote contexts (as explained in the
docker builddocs), you would provide an argument such as “--opt context=https://github.com/moby/moby.git”
- Note: if you want to instead use remote contexts (as explained in the
--local dockerfile=<absolute-or-relative-path>is the absolute or relative path to a local directory that contains the input file (as immediate child). By default, theDockerfilefrontend assumes that this file is named “Dockerfile”. If your file has a different name, e.g. “Containerfile”, you need to specify an additional argument, such as “--opt filename=Containerfile”, where the value is a relative path to the file (relative to the path you specified in “--local dockerfile”)
Here are some additional remarks regarding the advanced usage of buildctl arguments:
--opt <key>=<value>arguments can be repeated multiple times. The key-value-pairs are not explained in the BuildKit docs, because they are frontend-specific. For theDockerfilefrontend, you would typically set the following ones:- Build arguments (docs), e.g. “
--opt build-arg:SOME_ARG=some-value” - For multi-stage images, the target stage you want to build, e.g. “
--opt target=some-target” - The name of the input file, as explained above, e.g. “
--opt filename=Containerfile” --opt image-resolve-mode=pullachieves the same behavior as “docker build --pull” (docs), forcing the builder to check locally-cached base images for newer versions and pull them, if there are newer versions. However, the devil is in the details: you only need to provide this CLI argument if BuildKit uses a “containerd worker”. Unless, you explicitly configure BuildKit to use the containerd worker, BuildKit will use the “OCI worker” by default. In OCI-worker-mode, BuildKit manages images and temporary containers (using runc) by itself, instead of delegating these tasks to a containerd daemon. Because the OCI worker always checks remote images for updates, the--opt image-resolve-mode=pullargument is typically not necessary (source).
- Build arguments (docs), e.g. “
- Like approach #2, builds created with
buildctlare not automatically pushed to a registry, nor loaded to a Docker daemon. To specify the tag of the image (including the registry host name) and push it, provide an argument such as
“--output type=image,name=docker.io/username/image,push=true“ - Normally, only one context is provided to BuildKit. However, BuildKit supports providing multiple contexts. This blog post explains motivational examples and what CLI arguments you would need to provide to “
docker [buildx] build“. To achieve the same with BuildKit, add arguments such as “--local myothercontext=<path-to-context> --opt context:nameOfContext=local:myothercontext” (source), wherenameOfContextis what you use in theCOPYstatements of yourDockerfile. - Apart from
dockerfile.v0there is another--frontendcalledgateway.v0, which you only need to specify in case you want to use a custom frontend, but the input file does not specify it (via#syntax=…). Just add the CLI args
“--frontend=gateway.v0 --opt source=<frontend-image-ref>” to overwrite the frontend implementation.
Conclusion
We have seen three ways of invoking BuildKit with the help of Docker. The following table summarizes the findings:
| Feature | 1) Docker-managed BuildKit | 2) Buildx-managed BuildKit | 3) Direct BuildKit usage (buildctl) |
| Docker image load behavior | Automatic & fast | Manual & slow | Manual & slow |
| Configuration flexibility | Only garbage collection aspects | Full | Full |
| Client CLIs | docker | docker, buildctl | buildctl, docker |
| Cache persistency | Stored on host file system | Stored in automatically-maintained Docker volume | None, unless you explicitly mount a volume |
| BuildKit rootless/rootful | rootful | rootful for docker-container driver, kubernetes driver supports optional --rootless argument | rootful or rootless, you choose the image |
| Build multi-platform images | ❌ | ✅ | ✅ |
| Supported cache exporters | Inline cache exporter only | All exporters supported by BuildKit | All exporters supported by BuildKit |
Feature-wise, variant 2 and 3 are more or less the same. I recommend the following variants, depending on the use case:
- Use variant #1 for your local development workflow, where you build images locally so that you can (immediately) run them locally. In this scenario, the downsides of approach #1 are irrelevant (e.g. lack of support for multi-platform images or many cache-exporters), because you should never push locally-built images, but instead have a CI/CD pipeline build and push them.
- Use variant #2 in CI/CD systems where a) the hosting environment of your CI/CD agents/runners is based on Docker Engine or Kubernetes, and b) the CI/CD platform supports an easy setup of the Docker CLI + buildx client binaries. One example for such a platform is GitHub Actions: their Ubuntu-based cloud runner VMs come with a Docker daemon + CLI preinstalled, and there are many GitHub actions that ship the right client CLIs, with a nice abstraction layer (such as buildx), see docs. Also, if you choose to self-host your GitHub Actions runners with ARC in your Kubernetes cluster, Docker Engine pods can be added with a few lines of YAML (docs).
- Use variant #3 for CI/CD pipelines where you self-host your runners and where you do not need the entire Docker Engine, but just BuildKit, and you want full control over all aspects of how BuildKit is run (including security). Accessing BuildKit (via
buildctl) is easily achievable on any CI/CD platform, because you only need to download thebuildctlbinary from BuildKit’s GitHub Release page, as explained above.
What has your experience been with using BuildKit? Please let me know in the comments!
Great read. I really enjoyed how well explained everything is while always keeping on topic and not digressing at any point.
Thanks for sharing.