Starting from an overview of frequent causes for slow pipelines, I derive 5 tips to speed up GitLab CI pipelines. These include choosing the appropriate runner infrastructure, choosing the right caching approach (Docker vs. GitLab), DAG pipelines, mixing GitLab’s caches and artifacts, and optimizing individual jobs (e.g. via parallelization).
Introduction
As I already explained in the CI/CD Basics article, the core idea of CI/CD is to save you money when developing software, by automating tasks, such as building, testing or packaging your application. However, if your pipelines are slow and take, say, 15 minutes or longer, your productivity as developer is negatively affected. You have to wait for the pipeline to finish before you can really declare a current work item as “done”, which might happen by merging a feature branch.
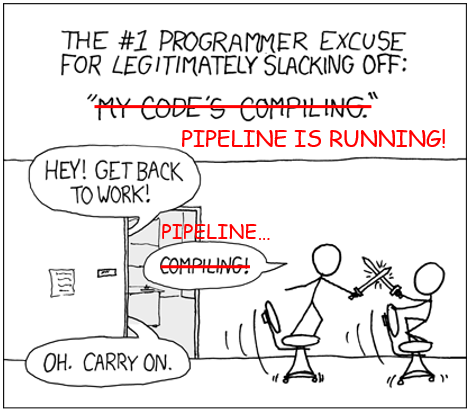
What should a developer do while the pipeline is running? For very slow pipelines (running for hours), developers will naturally work on multiple tasks in parallel, but this demands for context switching, which is mentally exhausting. If the pipeline is only “somewhat” slow (say, 15-30 minutes), switching to another task is not really worth it, and this XKCD meme applies.
Developers often use the waiting time to do administrative tasks, or answer emails. For this reason, there is the common advice to keep the pipeline execution time as short as possible, ideally below 10 minutes, as stated in CircleCI’s 2022 State of Software Delivery report.
In this article, I will present five tips for speeding up GitLab CI/CD pipelines. But first, let’s see why pipelines are often slow (which alludes to how we can speed them up), and find concrete ways to measure how slow they are.
Frequent causes for slow pipelines
There are a few broad categories why pipelines are slow:
- Inappropriate runner infrastructure:
- Slow runners, e.g. being provisioned with too little RAM, vCPUs, or slow disks → job execution takes longer
- Too few runners → jobs are queuing up, being “Pending” for long time periods
- Slow provisioning of runners, e.g. if you need to wait for a VM to be booted for a job every time a job starts
- Poor job optimization:
- Jobs are executed that are not (always) needed, e.g. building a Docker image when only the README changed
- Jobs are not tuned, e.g. with caching → jobs do a lot of repetitive work
- Poor job parallelization:
- “Fat” jobs that run (parallelizable) tasks in sequence
- Heavy use of GitLab
stages, which causes some jobs (in a later stage) having to wait unnecessarily - Over-excessive use of
resource_group, which hinders job parallelization
Pipeline analysis
Before applying any of the optimization tips presented below, you should always measure first, to determine whether you have a problem at all, and if so, where exactly. You can look in various places. For instance, you can open the list of pipelines in the GitLab web UI and (manually) look at their execution times. If you find a slow one, drill down to see why it is slow.
A useful tool is the Pipeline Success and duration chart (docs), such as shown in the following image.
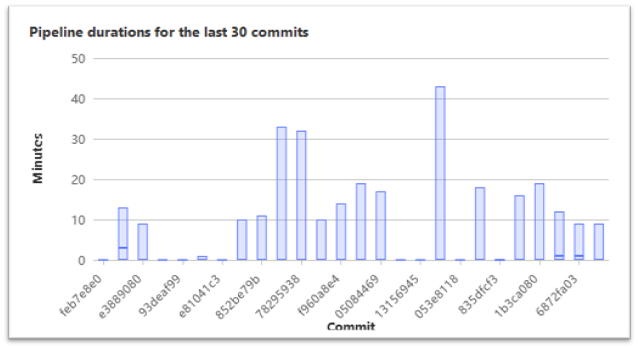
It does not really help you to drill down into details, but it offers a nice overview of the last 30 pipeline execution times. You can then open <project root URL>/-/commit/<commit SHA> in your browser, using the commit SHA identified in the above graph. From that commit page, you can navigate to the pipeline(s) for that commit, and look at its jobs to understand why the pipeline is so slow.
If you are familiar with Prometheus, a more detailed approach is to monitor your pipelines using Prometheus metrics with the GitLab CI Pipelines Exporter, as explained here. You can do the same for your runners (e.g. using the Prometheus Node exporter) and then try to find correlations between slow pipelines and the load on your runners. The main advantage is that you can use tools like Grafana with PromQL queries that extract any kind of insights and put them into dashboards (or send alerts). Prometheus collects metrics for as long as your configured retention period (while the Pipeline Success and duration chart only analyzes the last 30 commits). Thanks to the labels attached to the stored metrics data, you can build any kind of complex queries, e.g. limiting an analysis to only specific jobs or runners.
One more tip: if you use DAG pipelines (where you explicitly declare the needs keyword in your jobs), the GitLab web UI lets you visualize the dependencies, which often facilitates the discovery of bottlenecks (docs).
Many of the above tips were taken from the official Pipeline efficiency docs.
Tips to speed up GitLab CI pipelines
Choose the right runner infrastructure
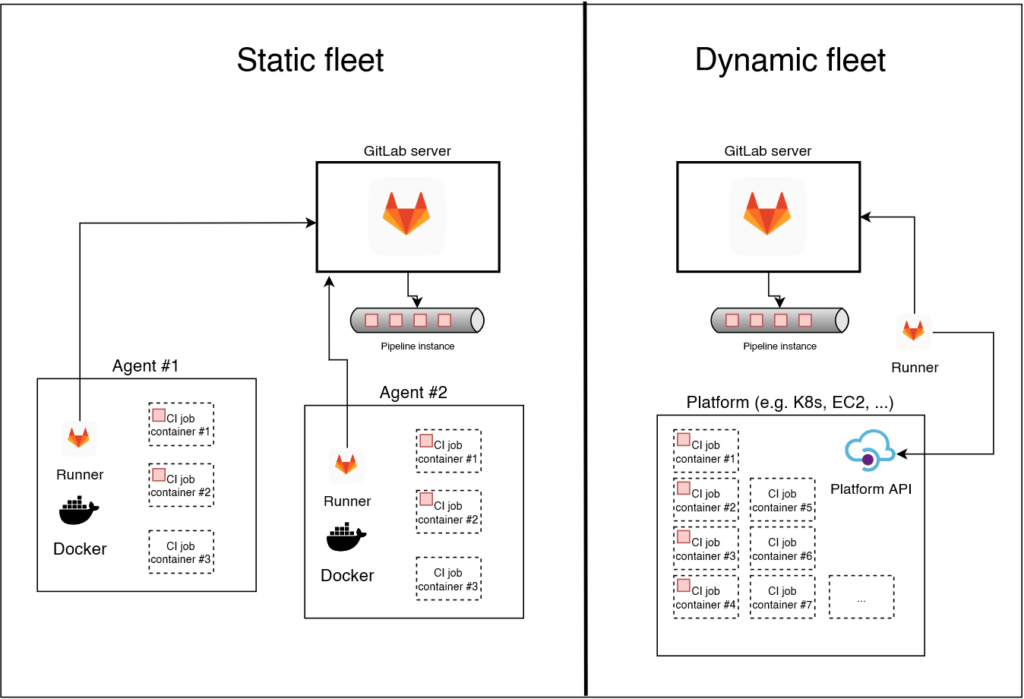
Because a big part of the pipeline performance depends on how many runners you have (and how performant they are), you need to choose an appropriate type of infrastructure for your runners. The following two types are common:
- Static fleet of self-hosted runners: you set up a static (i.e., fixed) number of runners, e.g. as I described in the article Operating a self-hosted GitLab runner with Docker, on virtual or physical machines of your choice. The basic requirement is that you have knowledgeable admins who know how to set up these machines, and maintain them over time (e.g. installing updates).
- Dynamically-provisioned fleet of runners: a scalable approach where short-lived CI job execution environments (e.g. VMs or Kubernetes pods) are provisioned as needed. There are multiple concrete implementations, e.g. using GitLab’s SaaS runners, dynamically scaling runners on AWS, or using the Kubernetes executor.
Let’s see how they compare:
| Static fleet of runners | Dynamically-provisioned runners | |
|---|---|---|
| Costs | Predictable fees (server costs per month), but unpredictable maintenance costs (predictability increases over time, as you gain experience) | No maintenance costs, but unpredictable fees, which depend on the number of pipelines executions, which depends on the commit frequency |
| Per-job performance | Completely under your control. Can be very high when installing GitLab runners on a fast bare-metal server. Also, there is no waiting time until a runner is dynamically provisioned | Depends on the provider and provisioning type. If you use the GitLab SaaS runners, performance is rather low and not under your control (see e.g. here, where GitLab explains that each instance has only 3.75 GB and 1 vCPU); additionally, you have to wait between 15-60 seconds for the execution environment (Kubernetes Pod or VM) to become ready/provisioned |
| Cache persistence | Good: because runners are static, cache files remain on the runner’s local disk; you don’t need GitLab’s distributed cache. Docker’s local build cache also works efficiently | Poor: each environment is “fresh”; (build) caches need to be downloaded & uploaded to a server |
| Adaptability to high workloads | Poor, because the number of runners is fixed: if there are suddenly an excessive number of concurrent pipelines, they are queuing up | Good, because the GitLab runner dynamically provisions as many execution environments as requested |
The table should help you make qualified decisions. Exemplary:
- If you don’t have anyone with admin skills who can take care of self-hosted runners, you must resort to managed, dynamically-provisioned runners.
- If you have great variations in the workloads of your pipeline (such that queued pipelines would become a serious problem with a static fleet of runners), dynamically-provisioned runners are your only option.
If the two above “Ifs” don’t apply to you, you might want to favor the static fleet of runners, because their cache persistence (and non-existent provisioning time) allows for faster pipelines in general. Prefer having fewer (more powerful) GitLab runner machines (at least 2 for improved availability) over having many smaller, less powerful machines, because of better cache locality and reduced maintenance efforts.
You can also think about combining both approaches, e.g. having a “just large enough” fleet of static runners, extending them with a second fleet of dynamic runners. Use tags in the .gitlab-ci.yml file to differentiate which jobs you want to run by the static fleet and which ones by the dynamic one. Unfortunately, it is not yet possible to “soft-assign” jobs to runners, that is, tell GitLab to prefer your static runners over the dynamic ones (see open ticket).
Choose the right caching strategy
You can choose between two caching mechanisms:
- GitLab CI/CD caching, where you define
cachekeys for the jobs of your.gitlab-ci.ymlfile - Docker build cache (using BuildKit’s build backend)
I present this optimization technique in detail in the article GitLab CI/CD: GitLab vs. Docker caching, including a demo project that illustrates both approaches for a Node.js application.
In a nutshell, for static runner fleets, Docker’s build cache is usually the better choice, for dynamically-provisioned runners, the distributed GitLab CI/CD cache is better.
Optimize your job graph (DAG pipelines)
Pipelines are often slow because of the way the jobs are structured. On a high level, there are three improvements you can apply:
- Break up big jobs
- A “big” job is a job whose
scriptsection contains multiple (independent) commands which don’t need to be run in a sequence, but can be run in parallel. - For instance, you might have have a “linting” job that runs several linters, one after another. Instead, you can break such big jobs up into multiple smaller jobs, which are then executed in parallel by your runners, therefore completing faster.
- A “big” job is a job whose
- Run jobs only when necessary
- Sometimes, it is not necessary to run jobs on every Git push. The greatest optimization of all is to not run a job at all. Using the
ruleskeyword, you can configure that jobs are skipped (or must be triggered manually). - There are many use cases, e.g.
- Only build a Docker image of your application if the
Dockerfileor the application code has changed. After all, what’s the point of rebuilding it if someone just changed the README file, or adapted the tests (that are not part of the image)? - Skip backend tests when only frontend code has been changed.
- Only run long-running tasks (e.g. excessive integration tests / system tests) if the commit message explicitly contains a certain keyword, or only on certain branches, or only in scheduled pipelines (running at night).
- Only build a Docker image of your application if the
- In addition to using
rules, you should also consider parent-child-pipelines, e.g. for mono repos (docs)
- Sometimes, it is not necessary to run jobs on every Git push. The greatest optimization of all is to not run a job at all. Using the
- Use DAG pipelines
- DAG pipelines (docs) avoid unnecessary waiting at the
stagebarrier. While GitLab’s concept of stages is generally helpful to structure the jobs of a pipeline, it can also slow down your pipeline. Often, a job in a particular stage waits for the previous stage to complete only for semantic reasons – it could already run in parallel from a purely technical perspective. - For instance, semantically it makes sense that first all linter jobs complete successfully, before you start the jobs in the build stage. But technically, there is no big harm if you simply run building and linting in parallel.
- Make sure to carefully read the official docs section for
needs(docs). Also, you almost always want to setoptional: truein theneedsblock (docs), to avoid failing pipelines (see also this article for details).
- DAG pipelines (docs) avoid unnecessary waiting at the
Replace caches with artifacts
In the .gitlab-ci.yml file, you can define both the cache and artifacts keyword in your jobs. Although the official GitLab docs do explain the differences between caching and artifacts here, the following table might help you clarify a few things:
| Cache | Artifacts | |
|---|---|---|
| Is reliable | ❌ | ✅ |
| Files are available across pipeline runs | ✅ | ❌ |
| Files are available across runners | ❌ (default) ✅ (with distributed caching) | ✅ |
Row #1 – reliability: refers to whether GitLab can guarantee that the files stored in the cache or artifact are available to the runner whenever the runner starts the job. With GitLab artifacts, this is usually the case, because the artifacts are uploaded to (and downloaded from) the GitLab server. GitLab’s cache, however, is just a best-efforts cache. The commands in the script-section of your job must not rely on the files in the cache to be present. Instead, you must design the commands in the script-section such that they definitely work, even if the cache is empty or out of date. The only exception to this rule is if you only have a single (static) runner to which all jobs are always assigned.
Row #2 – availability across pipeline runs: any artifacts created in some specific pipeline run / instance can only be downloaded by jobs of that very same pipeline run / instance. Caches, however, do “survive” pipeline runs.
Row #3 – files are available across runners: if you have many runners (which are maybe even provisioned dynamically), a cache becomes less useful if it is only available locally per runner, because GitLab randomly distributes the jobs to different runners. For instance, if GitLab runs a cache-warming job in the first stage on runner #1 and then runs a build job in the second stage on runner #2, the build job would not have access to the warmed cache. If you are using self-hosted runners, this local caching mode is the default configuration! However, the runner admin can configure distributed caching (docs, more details in the article GitLab CI/CD: GitLab vs. Docker caching), and distributed caching is also configured for the shared GitLab.com SaaS runners.
It is possible to combine the advantages of caches and artifacts, by declaring both keywords in the same job. For instance, you can have a cache warming job that makes use of the fact that caches are persistent across multiple pipeline runs. That very same job also declares an artifact (for the same paths as the cache) to reliably transport the files to other jobs (which only need to read these files anyway). Keep in mind, though, that the GitLab runner creates two zip files, one for the cache, one for the artifact, even though they will have the exact same content in this scenario. Thus, the the reliability feature of the artifact incurs extra costs: storage and (compression) time.
Optimize jobs
Even with an optimally-structured pipeline, that (seemingly) contain only minimal jobs, some of these jobs may still be slow. Examples include jobs that compile sources, or run test suites, which become a bottleneck in your pipeline. Therefore, you should try to optimize these slow jobs.
If you have no idea how to do that, why not try a Internet search for “speed up <brief job description>”, e.g. “speed up rust compile time”? Two techniques that will often come up are caching and parallelization.
- Caching: many toolsets (e.g. for creating builds or running tests) have internal caches that you can integrate into your GitLab or Docker-based caching mechanism. For instance, you can speed up Angular builds via caching tremendously (>3x). See the official Angular docs which explain what configuration options you need to change to configure a build cache folder (
.angular/cacheby default) in CI, which you can then upload/download to or from your GitLab CI/CD (or Docker) cache. - Parallelization: many tools support a “divide and conquer” approach, which splits a job into multiple smaller jobs (executed in parallel), merging their results. There are two parallelization variants:
- Within a single runner: here you instruct the tool you run in your GitLab job to make use of multiple CPU cores. Examples are “
make -j 4“, or speeding up Python tests with pytest-xdist. However, this only works well if the execution environment created by your runner/executor has multiple CPU cores assigned to it. Be careful not to overload your runners with too many compute-intensive jobs, as this will result in a poor pipeline performance. - Across runners: here you split the task into multiple GitLab jobs. Take a look at these GitLab docs for an example in Ruby, or try tools such as pytest-split for pytest-based tests. You can also search for “split <task> multiple [gitlab] jobs” with your favorite internet search engine.
- Within a single runner: here you instruct the tool you run in your GitLab job to make use of multiple CPU cores. Examples are “
Conclusion
Optimizing the execution time of your pipeline will boost your team’s development productivity. But it needs to be done with care. You should only optimize those parts that promise a good cost-benefit ratio. And don’t fall victim to premature optimization. Instead, get your pipelines to work first. Parallelizing jobs and optimizing them with caching are usually the two most promising techniques.
As for the costs and maintainability, there is unfortunately no silver bullet. Faster pipelines will usually cost more money, because higher levels of parallelization require more runners (CPU, memory), and caching requires more storage. Also, optimized pipeline definitions are usually harder to read than simple (unoptimized) pipelines.
Finally, you should always measure, before and after applying an optimization. Don’t blindly believe benchmarks made by others, but collect your own measurements. It also helps to document both successful and failed optimization attempts, to avoid that you and your team repeat approaches that don’t work, and instead implement those that do work.