Microsoft 365 groups are the foundation for managing users and permissions in many other applications, such as Teams and SharePoint. This article introduces the group’s other functionalities, group inbox and calendar, how to access them, and why they are sometimes difficult to find. I also explain different options that simplify scheduling of events in Outlook, using the group inbox as attendee.
Introduction
As introduced in part 1 of this series, Microsoft 365 groups are the backbone for managing users and their permissions, so that other applications don’t need to handle this, such as Teams or SharePoint. Apart from managing a list of users and their roles in the group, each group has its own email inbox and a group calendar, accessible from Outlook. Groups also have a privacy setting which I explained in part 3, where public groups can be discovered and joined by anyone in your organization, whereas private groups require non-members to request to join, and group owners to grant that request.
In this article, I will first take a detailed look at the functionalities groups offer. Next, I will explain why these functionalities are sometimes hard to find, and how to access them, even if they are hidden. Finally, you will learn how to more easily schedule events, by using the group’s email inbox to distribute the invitation email.
Functionalities of Microsoft 365 groups
Let’s now take a close look of each of the group’s functionalities.
Membership management
Conceptually, the membership management feature of a group is like a table with two columns named user and role. Each row is references a user’s Microsoft account and designates a role, which is either owner, member, or guest. Each role can do different things, as explained by the official documentation.
To add members, the team’s privacy setting is important, which I discussed in part 3. A public team is visible to anyone, and they can simply join without confirmation. But if the team’s privacy is set to private, only users who have the owner role in a team can add other users to the group. Microsoft made some arbitrary restrictions regarding which roles you can assign to users:
- If the user you want to add belongs to the same organization as the group itself, you can assign them either the owner or member role (but not the guest role).
- User from a different organization can only have the guest role.
Users who have the member (not owner) role in a team can propose other user accounts to be added to the group as members, but this request still has to be confirmed by a team owner.
Note that users which were added this way are not first asked whether they actually want to join. They have no option to decline, but they are simply added. If they did not want to be added, they would have to leave the group afterwards, manually.
To take away the burden from your team owners to always handle adding new members, it is also possible to provide information to non-members so that they can request to join (or: join without confirmation) themselves:
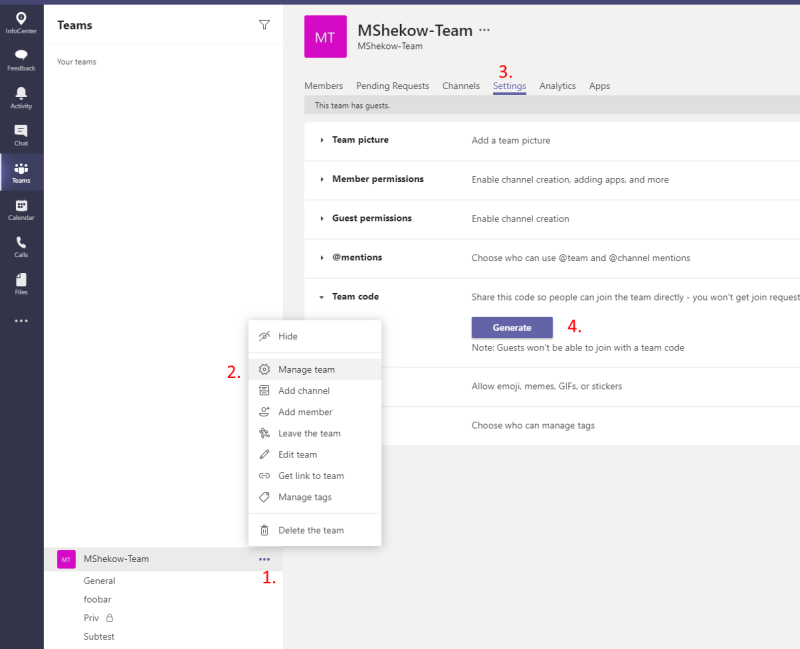
- Provide a team code: see the 4-step-sequence in the screen shot below, for how to get that code. The joining member needs to provide the code after clicking on “Join or create a team” in the bottom left corner of the Teams app. Once the code was entered, the user has joined the group immediately – team owners do not need to approve it!
- Provide non-members a link to the team: This lets the user request to join the team, which has to be approved by one of the team owners. To get this link, see the screen shot below: “Get link to team” in the menu that opens at step 1.
Email inbox
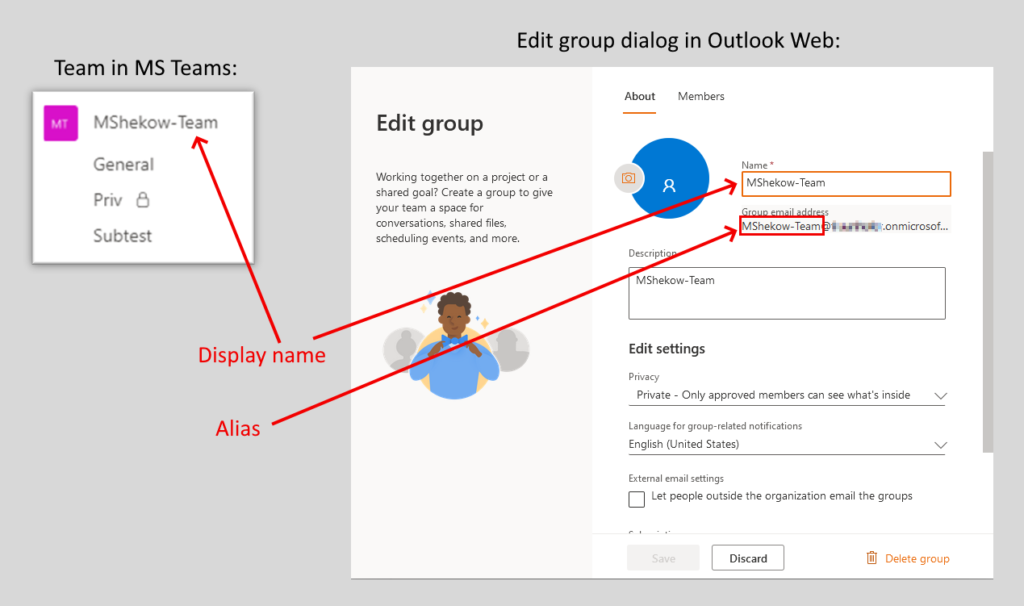
Every group has its own email inbox that stores emails sent to<alias>@<your organization>.onmicrosoft.com.
What is this alias, you wonder? Well, every group has two identifiers: a display name and an alphanumeric alias. The display name is “visually pleasing” because it can contain any character, including spaces or special characters, whereas the alphanumeric alias is limited to a small set of characters.
The alias is automatically determined from the display name by the system when you create a team in Teams (or create a new group in Outlook or a new SharePoint team site in SharePoint). The system will automatically strip any special characters from the display name, such as @ or space, so that only allowed characters remain. The alias is immutable, which means that it is set at creation time and can never be changed. You can still change the display name later, though. The following image illustrates the display name and alias:
To figure out the alias (and hence, the email address) of a team or SharePoint site, you have two options:
- If the group’s email inbox is visible in Outlook (details see below), open the Manage groups page in Outlook’s web application in your browser, select the group (you may have to switch from Owner to Member if you don’t see the desired group) and hover over the “Send email” button to see the alias.
- If the group’s email inbox is not visible in Outlook, then you can use the trick that, by default, the system will use the same alias for the SharePoint site URL and group. Thus, all you need to do is to open the Teams’s SharePoint site (as I described in part 3) in the browser. The URL structure reveals the alias:
https://<your organization>.sharepoint.com/sites/<alias>/....
One feature you should also know is the Follow inbox function. If it is enabled, all messages that arrive in the group’s inbox (from now on) are copied to your personal inbox automatically. You and all other members of a group can individually enable/disable this function, by opening the group’s settings page athttps://outlook.office.com/people/group/<your organization>.onmicrosoft.com/<alias>
and then clicking the Follow button, as shown below:

This is particularly useful if the group inbox is not visible in Outlook by default. Without following the inbox, group members would simply not know when new emails arrive.
Additionally, group owners can force-enable the follow inbox function for all members by clicking Edit on the group’s settings page, and clicking the check box under Subscription, as shown below:
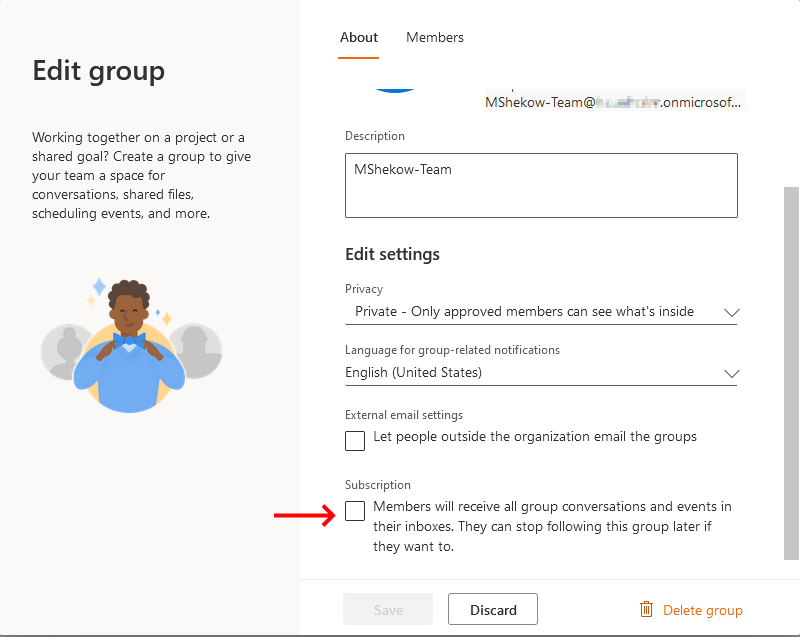
Note that you should give the system a few minutes to apply the setting, so do not send a test email immediately after having changed this setting!
Calendar
A group calendar is useful to coordinate events that affect all members of a team. It contains events that were either manually put there by group members, as well as events for scheduled meetings (which a member scheduled from the Teams app or Outlook). More details about scheduling are found below.
Group visibility
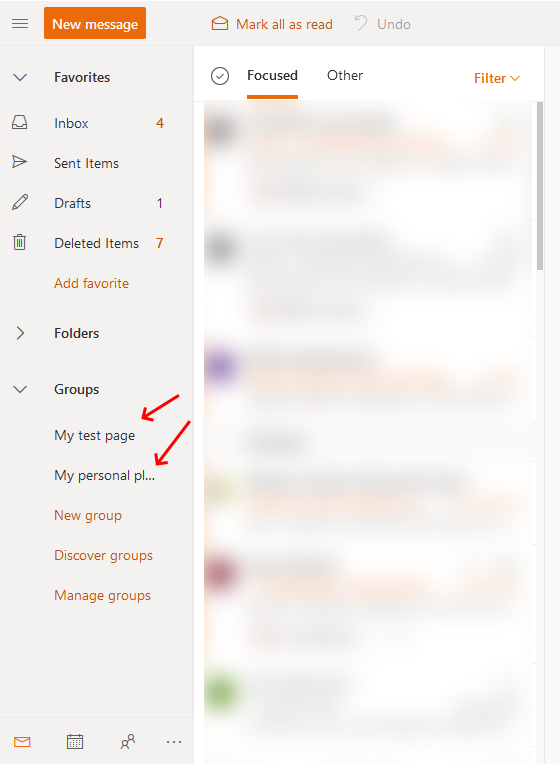
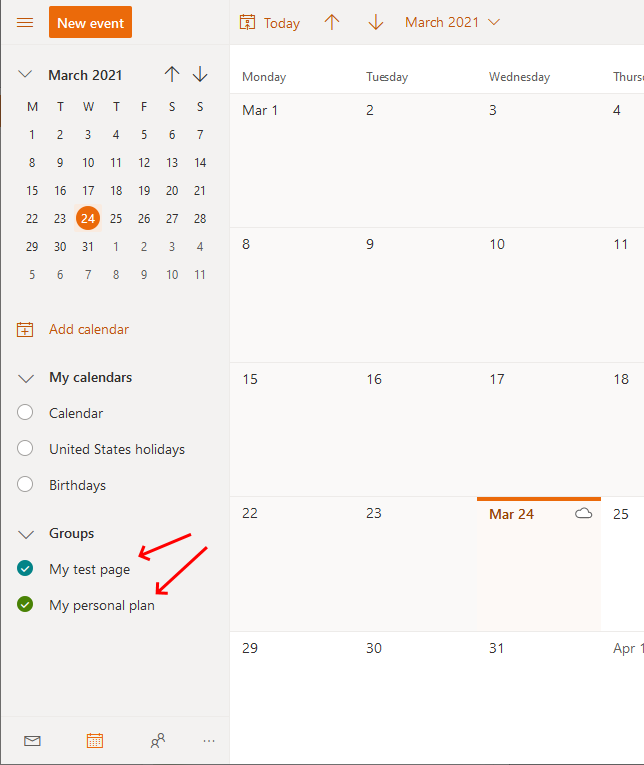
For each group there is a visibility setting that configures whether the group’s email inbox and calendar is accessible to its members from Outlook. The following screen shots illustrate what it means if a group or calendar is visible.
This visibility setting can be changed after creation, but only by tenant administrators. If you can get a hold of them, this page should point them in the right direction for changing the setting (essentially the HiddenFromExchangeClientsEnabled setting has to be set to false in the Exchange PowerShell using the Set-UnifiedGroup cmdlet). But if that does not work out, the only method you have to practically influence the visibility is to create the group in the right way, as this setting’s default value depends on how the group was created:
- If you created the Team/Group/SharePoint from Teams (by creating a new team in the Teams app), then the group is not visible!
- If you created the group from Outlook or SharePoint, then the group is visible in Outlook!
Accessing group features
The method to access a group feature, such as the settings page (on which owners can manage the group members or edit the group settings, including the group’s display name), group inbox, or calendar, depends on whether the group is visible in Outlook:
- Access the group’s settings page:
- If the group is visible: open Outlook on the web, click on Manage groups at the bottom left
- If the group is not visible: open
https://outlook.office.com/people/group/<your organization>.onmicrosoft.com/<alias>
in the browser, replacing the<organization>and<alias>first.
- Access the group’s inbox:
- If the group is visible, just click on the group in the email view/tab
- If the group is not visible: open
https://outlook.office.com/mail/group/<your organization>.onmicrosoft.com/<alias>/email
in the browser, replacing the<organization>and<alias>first.
- Access the group’s calendar:
- If the group is visible, just click on the group in the calendar view
- If the group is not visible:
- Open the calendar view in Outlook’s web interface
- Click “Add calendar” → “Add from directory”
- Try entering the group’s display name first – if there are no results, type
<alias>@<your organization>.onmicrosoft.com
instead. Even though the dialog will say “No results found”, click on “Use this address: …”. The icon of the group should appear, and when you click on the email address again, a new dialog should pop up which shows details about the group. - Click Add to complete the process. You can then rename the calendar if you want.
Scheduling events
Traditionally, people schedule events by creating the event in their personal Outlook calendar, inviting other users manually, by adding their mail addresses one by one. When you save the event, Outlook automatically sends invitation mails to these invitees, which causes their email client (Outlook and others) to add the event to their personal calendar as well.
If you already have a Microsoft 365 group that contains all those people who should attend an event, it makes sense to use the group calendar or the group’s email address to simplify the invitation process, so that you no longer have to manually add these users when creating an event. Note that there are two caveats:
- To ensure that your group members really receive event invitation mails, make sure that they all use the Follow inbox functionality, as described above.
- The approach described below only works for real groups, not virtual sub-groups that are created for private channels of a team in Teams. I discussed this (and other) caveats of private channels in part 3.
There are a few approaches to schedule a meeting for a group:
- Option 1: create event directly in the group‘s calendar in Outlook: you should only do this if the group calendar is visible and activated in Outlook for all your members, otherwise they would not get notified about the creation of the event. To create the event in the group calendar, follow these steps:
- If you use the Outlook desktop app, activate the calendar first (click the checkbox next to its name), then right-click on the appropriate day/time in that calendar, and select “New appointment”.
- If you use the web interface, click “New event”. Select the group calendar in the (barely visible) drop-down menu that is located right above the event’s title field.
- Option 2: create the event in your personal calendar and invite the group email as attendee. This will cause your Outlook (or other client) to send the invitation email to your group’s inbox, which then distributes it to all its members. It also creates the event in the group calendar. Since your own name and email address is used for event’s organizer field, you will receive accept or decline messages in your personal inbox, as group members accept or decline your invitation.
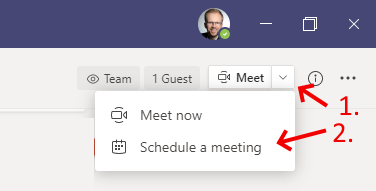
- Option 3: schedule a meeting in the Teams app, in one of the public channels of the respective team:
- In Teams, in a public channel, click “Schedule a meeting” as indicated in the screen shot below.
- Once you created the scheduled event, a few things happen in the background:
- 1) The event appears as regular post (message) in Teams in the corresponding channel.
- 2) The system creates an event invitation email sent to the group inbox. Compared to option 2, however, the organizer is not your personal email address, but the group’s email address. Consequently, accept or decline responses will not be sent to your personal inbox. Instead, open the event in Teams to see accepts & declines.
- 3) Due to the event invitation email, the event also appears in the group calendar.
In general, option 1 is rather useless, because you cannot be certain if your group members really activated the group’s calendar. However, option 1 can be useful for events that do not need reminders, but where on-demand access suffices, such as a birthday calendar.
If you choose option 3, I recommend that you pick a good meeting title, because the channel-context gets lost in the invitation email. This makes the invitation imprecise for the receiver. For instance, suppose you create a meeting in the “Accounting” channel and set the title of the event to “Regular meetup”. It is obvious to any user who sees this event as post in the Teams app that this is the “Regular accounting meeting”, because the channel provides this context. However, the invitation mail your group members receive in their inbox will invite them to an event “Regular meetup” (with the channel name missing), thus it is not perfectly clear that this event targets accounting.
Conclusion
As this article demonstrated, Microsoft 365 groups have a lot more to offer than managing a list of users. Its inbox, combined with using the Follow inbox functionality, effectively provides you with a mailing list, which rids you from having to implement a traditional mailing list using some other system. Using the mailing-list-like inbox to distribute event invitation mails simplifies the event creation process in Outlook, because you no longer have to invite users individually. The fact that groups are invisible in Outlook when you create a team in Teams is a nuisance , but I’ve demonstrated ways how you can still access the group’s inbox or the calendar.
Over time you will notice that groups are used by several other Microsoft 365 cloud apps (not just Teams and SharePoint) for membership and access management, such as Tasks by Planner. Thus, setting your groups up properly will simplify your life when managing such applications.