This article discusses 8 selection criteria for container images, why they matter, and how to evaluate them. It explains why the minimal image criterion implicitly satisfies all other 7 criteria. Finally, the selection criteria are applied to a concrete example to find the best NGINX image.
Container image security series
This article is part of a multi-part series:
- Part 1: Fallacies of image scanners: explains how scanners work and which false positives/negatives they produce. Also available in German on heise online.
- Part 2: Minimal container images: provides a list of off-the-shelf, free (and paid) minimal images for bare Linux, PHP, Python, Java, C#, and Node.js. Also available in German on heise online.
- Part 3: Building custom minimal container images: how to build your own minimal images based on Chainguard/WolfiOS, Ubuntu Chiseled, and Azure Linux. Also available in German on heise online.
- Part 4: Choosing the best container image (this article): discusses 8 selection criteria for images, describing what they are, why they matter, and how to evaluate them
Introduction
When building software, many teams are aware that they need to carefully choose and vet the libraries and frameworks on which they develop their application. For instance, a team working on a Java-based backend service will (hopefully) choose actively maintained libraries, such as Spring Boot or Quarkus, which regularly receive security patches.
However, once teams package their code as a (Docker) container image, they often use the next best Docker image they can find during a quick internet search, recommended in a random person’s blog post. They use such images without any selection criteria or researching different alternatives.
In the long run, such poorly chosen container images cause headaches because they likely contain exploitable components (which could have been avoided by omitting unused components and updating the ones you need to the newest version), and because image security scanners will find many potential vulnerabilities that teams might be obliged to fix (due to company policy).
This article discusses 8 selection criteria for Docker images, describing what they are, why they matter, and how to evaluate them. Then, the selection criteria are applied to a concrete example to find the best NGINX image.
Evaluation criteria
Image size
What: The sum of the file size of all image layers, which should be as small as possible.
Why: The smaller an image, the faster a container runtime can download and extract it, which shortens the start-up time of the container (or speeds up building images, when pulling small base images). And if you store images in your own registries (which charge for consumed storage space), smaller images save costs.
Evaluation approach: On Docker Hub, the “Tags” page of an image displays the image sizes for the different CPU architectures. For other registries (which might lack a web UI), see here for a Bash function that computes the image size, using the docker and jq CLIs under the hood.
Be aware that in both cases, the image size is the compressed size. After your container runtime pulls (and decompresses) the layers, the image may consume potentially much more space on disk (up to 2-3 times the compressed size)!
Minimality of contained components
What: Minimal images are images that only contain those components needed to run the software. Part 2 of this series explains this in detail. They lack other components, such as a Linux shell or package manager. Note: This criterion correlates with the image size criterion and the number/severity of vulnerabilities criterion (discussed next), meaning that a minimal image typically has a small image size and comes with few vulnerabilities.
Why: the fewer components an image has, the lower the attack surface for a hacker, reducing the chance that you can be hacked. Also, vulnerability scanners like Trivy will report fewer findings, thus your team will have less work evaluating the correctness of the findings of the scanner (“false positives”).
Evaluation approach: Images coming from minimal image vendors (such as Ubuntu Chiseled or Chainguard) are minimal by design, so no manual evaluation is necessary. See the previous article that goes into detail about minimal images.
For any other image, use a tool such as Docker Scout (included in Docker Desktop) or the Syft CLI to get a list of all components of an image. If the list includes a package manager (e.g., apt or apk), a shell (e.g., Busybox or Bash), or other unrelated tools (e.g., curl or wget), then the image is not minimal.
Number and severity of vulnerabilities affecting the image
What: The number of potentially vulnerable components found in an image by a vulnerability scanner such as Trivy or Grype (and their low/medium/high/critical severity). The fewer vulnerabilities, the better.
Why: Images with many reported vulnerabilities have a higher chance that some of these vulnerabilities are actually exploitable in practice. Also, a large vulnerability count (e.g., 10 or above) significantly increases the triage work for your development team, which needs to look at each vulnerability, analyzing its exploitability.
Evaluation approach: Use a vulnerability scanner such as Trivy, Grype, or Docker Scout to scan the image for vulnerabilities.
Non-root user
What: The image should include a non-root user (typically with a uid ≥ 1000) and ideally be configured such that the main process of the container is started with that user by default.
Why: Running a containerized process as the root user allows for specialized attacks where the container can take over the entire host machine. While these kinds of attacks are (nowadays) very rare and hard to do in practice (because they require an outdated and vulnerable container runtime or Linux host kernel to succeed), it is still a good practice to use a non-root user by default. Also, while it is technically possible to enforce running a root-only image with a non-root user ID (not listed in the /etc/passwd file), e.g. via “docker run --user <id> …” or via a Kubernetes Security Context, this may result in permission-related problems. For instance, the enforced non-root user might fail to read or write to files in the container’s file system whose folders are all owned by “root”.
Evaluation approach: Run “docker pull <image>” to pull the image, then “docker image inspect <image>” to get the details of the image. In the inspect command’s output, look for the “User” key inside the “Config” object. If the “User” line is missing, no user is configured by default, but the image might still have a non-root user defined in /etc/passwd. If “User” has an empty string value (or value “0”), the image runs as root user by default. If “User” is a number > 0, it contains a non-root user that is used by default.
Frequency of image rebuilds
What: How often (and for how long into the past) is a specific version tag of an image rebuilt? Avoid images that are only built and pushed once and never updated afterwards. Non-minimal images (with many components) should ideally be rebuilt weekly or more often.
Why: In an image, many “support components” get out of date (and vulnerable) at a faster pace than the version increments of the main image component. Take the Debian-variant of the postgres image as an example: its main component is the PostgreSQL engine, but it also contains over 200 other (supporting) Linux components. If you look at PostgreSQL’s release frequency, 17.3 was released almost 3 months after 17.2. During that time period, dozens of those basic Linux components became vulnerable. “Fixing” most of these vulnerabilities is done by simply rebuilding the image, making sure that the most recent Debian packages are installed. If the image vendor does not do that during such time periods, Trivy and other scanners will report many potential vulnerabilities that your dev team needs to analyze, which is unnecessary work.
Evaluation approach: To determine how often a specific image version tag is overwritten, search for the image on the Docker Tag Monitor, a free web tool created by the author of this article. This information is not available on Docker Hub or other registries, which only tell you when the uploader most recently overwrote the tag. See this blog post to learn more about Docker Tag Monitor and how to use it.
Continued support of the image
What: Verify that the image (and e.g. Helm charts) is being maintained continuously for the foreseeable future, which is, e.g., the case if the same people who maintain the corresponding software also maintain the Docker image. It is also the case for paid images from a third-party vendor like Chainguard.
Why: If the image is not officially supported (e.g., because it is built by a hobbyist individual who is unaffiliated with the project), there is an increased risk that the image might become unmaintained at any time, without prior notice. Consequently, the image might no longer be (re) built, or no new versions might be pushed, and you will need to invest time to find an alternative.
Evaluation approach: For images on Docker Hub that have a badge such as “Docker Official Image”, “Verified Publisher”, or “Sponsored OSS”, that badge is a clear indication that the image is built by either the official maintainer or by an entity that has a low risk of disappearing unexpectedly. For images that lack such a badge, you need to assess the risk that the image publisher might abandon it. Typically, the activity (and code quality) of the corresponding GitHub/GitLab repository (that contains the Dockerfile the publisher uses to build the image) is a good indicator for that risk. You should look for that source repository, e.g., via a Google search. Use your best judgment whether the code quality is solid, whether the code is frequently updated, has been maintained for a while (see GitHub’s Insights → Contributors tab), and whether there are regularly-triggered build pipelines that rebuild and push the image.
Image signatures
What: Verify that the image is published with a cryptographically verifiable signature, created with, say, Notation or Cosign.
Why: Image verification is an important step to prevent supply-chain attacks. The verification ensures that the image was definitely built by the official producer and has not been modified by an attacker.
Evaluation approach: To determine whether a Notation or Cosign signature exists, install the Notation and Cosign CLIs and run commands such as “notation ls <registry_host/image:tag>” (to list existing Notation signatures) or “cosign verify <image:tag> --certificate-identity=any@thing.com --certificate-oidc-issuer=https://anything.com” to determine whether signatures exist. For Cosign, you will either see the message “Error: no signatures found” or that the OIDC issuer and certificate identity mismatch, printing the existing signatures.
If the image you are evaluating lacks signatures and it is an open source image, consider creating a PR for the project to add Cosign signatures. See here for a blog series that explains this topic in depth, including how you, the image consumer, can configure automated verification of a signed image in Kubernetes.
SBOMs and VEX data
What: Verify that the image either comes with an SBOM officially provided by the image maintainers, or manually check that the generated SBOM (produced by a tool like Trivy) appears complete. A complete SBOM includes the main software and its version, e.g., the SBOM of a Python image should contain Python (in the correct version) along with all other base components, such as OpenSSL.
Why: An SBOM (Software Bill of Materials) is an exhaustive list of all components of an image, including their license (e.g., “Apache 2.0” or “LGPL v3”). As a consumer of the image, having a complete SBOM allows you to detect license violations (e.g., “do we accidentally use components with a copyleft license?”) or vulnerabilities (by scanning the SBOM for vulnerable components). If the image publisher does not officially provide an SBOM, you need to rely on generated SBOMs from tools like Trivy. These generated SBOMs are often incomplete in practice. For instance, as part 1 of this article series explains, important components may be missing entirely in the SBOM (a.k.a. “false negatives”), which makes your image vulnerable without your knowledge.
In addition to an SBOM (which does not change after creating it for a specific image), image maintainers can provide (and continuously update) VEX files that include triage information for specific vulnerabilities (found by scanners like Trivy). In these machine-readable VEX files, maintainers specify which scanner-reported vulnerabilities are truly exploitable (or not), or whether the exploitability is still under investigation. Having such VEX information further reduces unnecessary triage work for your development teams, shifting that work to the image publisher.
Evaluation approach: In 2025, it is still rare that image publishers provide official SBOMs or VEX files. If they do, they typically prominently mention it in their documentation. In particular, third-party image providers (with a focus on security) provide such SBOMs, e.g., Bitnami or Chainguard.
To store and retrieve a container image SBOM, 3 approaches exist:
- An SBOM can be “attached” to an image, meaning that there is an additional OCI artifact in the registry, with a version tag named “
sha265-<digest-of-image>.sbom”. An attached SBOM is not cryptographically verifiable! - The SBOM is part of a cryptographically verifiable Cosign attestation, stored in the registry in an extra version tag named “
sha265-<digest-of-image>.att”. - The SBOM is embedded in the image’s file system. This approach is implemented by Bitnami. Tools like Trivy or Syft/Grype come with Bitnami-specific parser code to support these embedded Bitnami SBOMs.
If the image publisher does not provide an official SBOM, you need to manually check whether the SBOM generated by the most popular scanners (like Trivy) is complete, and whether the scanner finds vulnerabilities. Part 1 of this series (section “Mitigation options for false negatives”) explains the detailed steps.
VEX data can either:
- Be encoded as separate JSON files, formatted using OpenVEX or CSAF standard
- Be embedded into a CycloneDX / SPDX SBOM file
- Be represented by “security advisory feeds” for Linux distro packages (see here for Trivy)
Example evaluation: NGINX image
In principle, choosing the best Docker image involves these steps:
- Choose the top selection criteria that are most important to you. The above criteria list does not have a particular order, so you need to choose an order that makes sense for your circumstances. You can also decide to drop one or more criteria.
- Create a decision matrix, i.e., a table with your chosen criteria as columns. Do a broad search to find several potential image candidates, placing each candidate as a row in that table.
- Find the most suitable version tags of each image. Then, evaluate each criterion for each tag. To save time, evaluate the left-most criteria columns first. If a specific image tag does not satisfy your most important criteria, it is not useful to further evaluate the other columns.
Let’s apply this approach to finding the best image for the NGINX web server.
Step 1: Choosing the top selection criteria
Suppose you work in a corporate environment with strict compliance rules. They dictate that all vulnerabilities reported by scanners like Trivy need to be analyzed and handled, either by patching them or declaring them as false positives. Failing to comply would result in fines or even systems being forced to shut down. Thus, the Number and severity of vulnerabilities criterion is important to keep the triage work to a minimum.
In addition, the compliance department wants traceability of the used components (since the “traumatic Log4shell incident”). They also want you to ensure the supply-chain security for the used images. Thus, the criteria SBOM and VEX data as well as Image signatures are also relevant.
While we could build a decision table, using the 3 mentioned criteria, there is actually a better criterion: using minimal images. Parts 2 and 3 of this series discuss minimal images in detail and present several products. Minimal image vendors focus on the security of their images. Consequently, not only do they address the criterion Minimality of container components, but they also positively influence all seven other criteria:
- Image size: minimal images are typically small because they contain fewer components
- Number and severity of vulnerabilities: fewer components mean fewer CVEs. Also, minimal image vendors produce images that are free of False Negatives. Some vendors (like Chainguard) apply security patches (and rebuild the image) as quickly as possible.
- Non-root user: minimal images typically come with a non-root user
- Frequency of image rebuilds: minimal image vendors keep track of fixed vulnerabilities and rebuild their images whenever such fixes are available
- Continued support of the image: minimal image vendors are not some hobbyists, but a business. However, if the provider is a venture-capital-backed start-up, there is a chance for it to disappear.
- Image signatures and SBOMs and VEX data: many (but not all) minimal image vendors sign their images or produce SBOMs
Consequently, the criteria order is:
- Minimality, for reasons discussed above
- Number and severity of vulnerabilities: we still need to verify that the concrete minimal images have few CVEs
- SBOMs and VEX data + Image signatures, because they were explicitly requested by corporate policy
- The other criteria are nice-to-have
Step 2: Set up the decision table
To find potentially suitable images, start with querying a search engine (like Google) with terms such as “official nginx image” (or “best …”, or “secure …”). This yields the official nginx image (whose Docker Hub page references the nginxinc/nginx-unprivileged image).
Searching for “nginx” on Docker Hub Search additionally uncovers the following images that seem to be actively maintained and have thousands (or more) weekly pulls: ubuntu/nginx, linuxserver/nginx, paketobuildpacks/nginx.
Also, Chainguard, who build minimal images, offers a free nginx image.
This is the resulting table:
| Image | Most suitable tag(s) | Minimality | # vulnerabilities | SBOM | Image signatures |
| nginx | |||||
| nginxinc/nginx-unprivileged | |||||
| ubuntu/nginx | |||||
| paketobuildpacks/nginx | |||||
| linuxserver/nginx | |||||
| Azure Linux nginx | |||||
| Chainguard nginx | |||||
| Docker Hardened Images nginx |
Step 3: Research and evaluate image tags
For each image, select the most suitable version tag. Since images usually have many tags, a basic understanding of the tag terminology is helpful. An image version tag does not just include the version of the main component (here: the NGINX server version), but can additionally include other aspects, such as:
- The name (and version) of the underlying Linux distro, e.g., “alpine”, “alpine3.18” or “debian-12”, or code names such as “bookworm” or “trixie” (of Debian) or “focal”, “jammy”, “noble”, “oracular”, “plucky” (of Ubuntu).
- Variants that indicate additional components that are installed into the image, e.g., a Perl interpreter or the OTel collector module, for the official NGINX image. To illustrate this with another example, the tags of the Temurin image (which is a Java distribution) indicate whether the image is a (run-time) JRE or a (compile-time) JDK variant.
- The name of the CPU architecture, e.g., “arm64” or “amd64”
- The specificity of the semantic versions: for instance, if there is a “1.27.5” tag, there are often also tags “1.27” and “1”, which allow for relaxed version pinning.
To choose the most suitable tag, follow this general advice:
- Pin the most concrete semantic version (tags of the form “x.y.z” instead of “x.y”). Use tools like Renovate Bot or Dependabot to automatically detect tag updates.
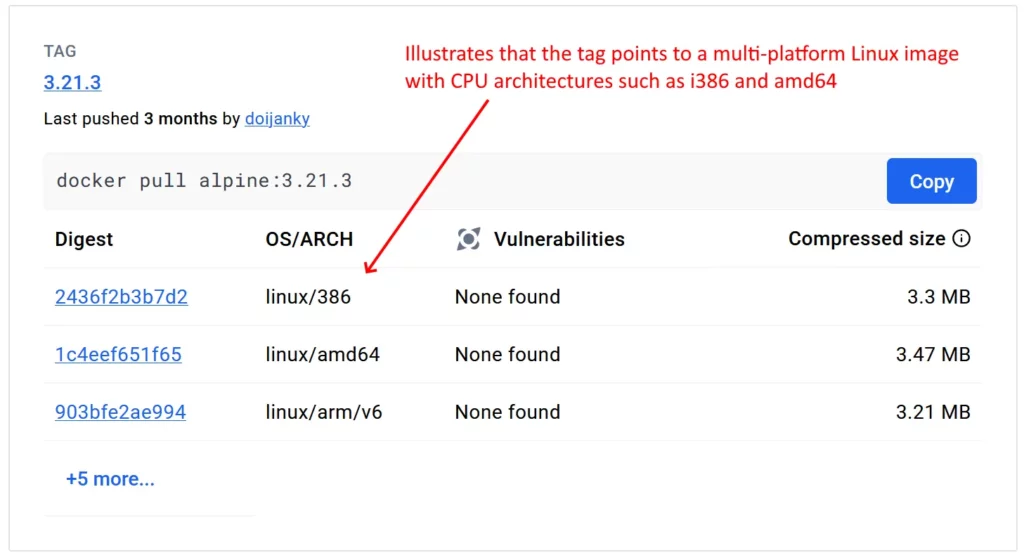
- Do not use tags that include the CPU architecture. There should be other tags (without the CPU architecture) that are multi-platform images, as indicated in the figure below.
- If you have the choice between the Alpine and Debian/Ubuntu tags, Alpine tags will be smaller in size and have fewer CVEs. Thus, they produce fewer vulnerability scanner findings. Pinning against “alpine” is recommended over pinning against “alpine3.18” to reduce maintenance work. However, Alpine images use the “musl” C library, which can be problematic (with known bugs or performance issues) in very specific scenarios.
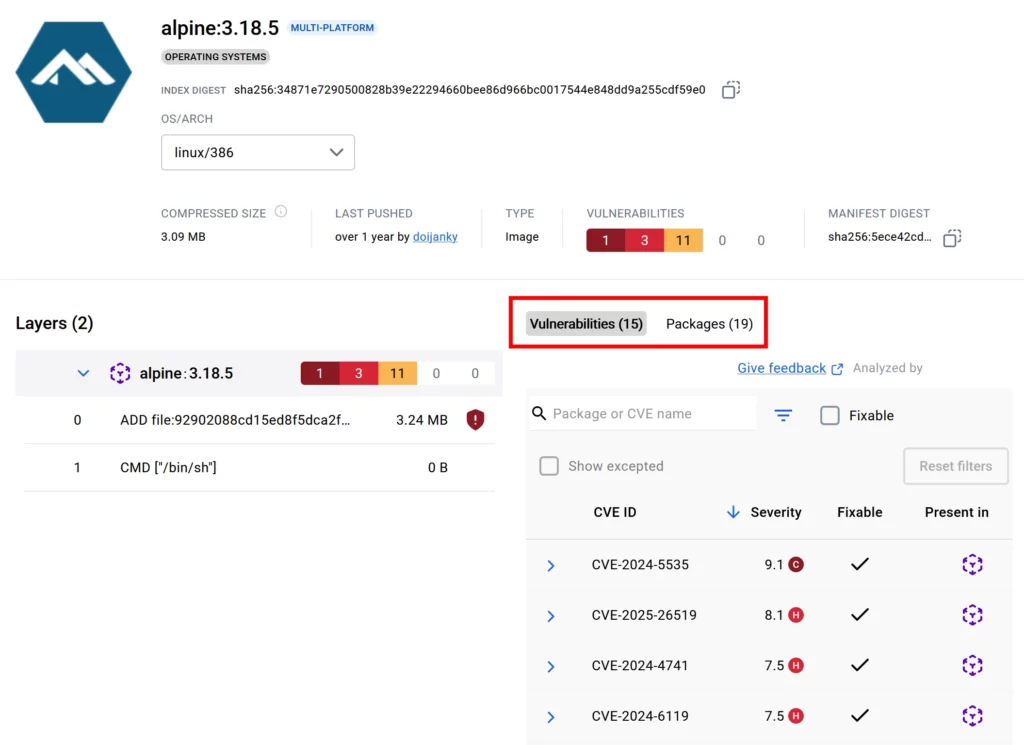
To determine the minimality of each image, a quick look at the tag on Docker Hub can already be enough: Docker Hub scans many (but not all) images on Docker Hub with its Docker Scout tool. If this is the case, clicking on a tag shows the components of that image tag and the reported vulnerabilities, as shown in the figure below.
For those images where this is not the case, use the Syft CLI to get a list of all components, and Grype to determine the vulnerabilities.
Having analyzed the minimality of all images of the above table, we learn that only the Chainguard nginx image satisfies this criterion. Thus, the Chaingard image is the first choice. As the Chainguard documentation explains, it offers Cosign-attested SBOMs, and scanners like Trivy or Grype can retrieve VEX information from the Chainguard-maintained vulnerability feeds.
| Image | Most suitable tag(s) | Minimality | # vulnerabilities | SBOM | Image signatures |
| nginx | x.y.z-alpine, x.y.z-alpine-slim | ❌ (contains Busybox and apk package manager) | 0 – few | ❌ | ❌ |
| nginxinc/nginx-unprivileged | x.y.z-alpine, x.y.z-alpine-slim | ❌ (contains Busybox and apk package manager) | 0 – few | ❌ | ❌ |
| ubuntu/nginx | 1.26-24.10_beta | ❌ (contains Bash, apt package manager, and more) | |||
| paketobuildpacks/nginx | — | — | |||
| linuxserver/nginx | x.y.z | ❌ (contains apk-tools, Bash and more) | |||
| Azure Linux nginx | 1.25 | ❌ (contains Bash and tdnf package manager) | 0 | ✅* | ✅ (Notation) |
| Chainguard nginx | latest | ✅ | 0 | ✅ | ✅ (Cosign) |
| Docker Hardened Images nginx | x.y.z | ✅ | 0 | ✅ | ✅ (Docker Scout) |
Note: Many cells in the above table are empty on purpose. In the interest of productivity, you should stop evaluating less important criteria once you have determined that a specific tag does not satisfy one of the highest-ranked criteria anyway.
Remarks for each image:
- nginx: Alpine tags have ~80 components, Debian tags have > 200 components. The most recent NGINX versions are available.
- nginxinc/nginx-unprivileged: Alpine tags have ~75 components, Debian tags have > 150 components. The most recent NGINX versions are available.
- ubuntu/nginx: Only older NGINX versions are available.
- paketobuildpacks/nginx: This image is not meant to be run as a standalone NGINX server
- linuxserver/nginx: Only older NGINX versions are available. Contains various other components, e.g., PHP and Perl.
- Azure Linux nginx: Only offers an old NGINX 1.25 from 02/2024, but Microsoft continuously rebuilds the image and provides backports that fix CVEs. Image does not come with pre-generated SBOMs, but generating one with scanners like Syft or Trivy yields a correct and complete component list that includes NGINX as well, avoiding false negatives
- Chainguard nginx: Only the “latest” tag is freely available, but older versions can be built with apko. See part 3 of this article series for instructions.
- Docker Hardened Images nginx: Offers the most recent NGINX versions, as Debian (glibc) or Alpine (musl) variants. However, the Alpine-based variants include a shell (Debian-based ones do not). Note that DHIs require a (free) Docker Hub account to access them.
Should, for some reason, the images from DHI or Chainguard image not work in your environment, consider the Azure Linux NGINX image. If the NGINX version of Azure Linux is too old for you, take a look at nginxinc/nginx-unprivileged:x.y.z-alpine[-slim] as an alternative. Note that Nginx Inc. regularly rebuilds only the supported branches 1.28.x and 1.29.x. Consequently, only those version tags contain fixes for vulnerabilities (of NGINX itself, and the underlying Alpine packages).
Conclusion
As demonstrated by the above example, there is no “one size fits all” evaluation method to choose the best image. It requires a customized approach tailored to your context. The core benefit of a properly executed evaluation is to minimize evaluation time. With practice, image evaluation for a specific product (like NGINX) takes up to an hour, but saves dozens or hundreds of hours of vulnerability triage work over the coming years.
The above example prioritized minimal images for compliance reasons. But even in the absence of such regulations, minimal images offer many advantages and are often the best choice. Part 2 of this article series provides more details about potential disadvantages and how to address them.