
This Git guide is for software developers who already know the most basic Git commands. After reading it, you can confidently clean the past commit history with an interactive rebase, revert commits, reset branches, merge branches, force push, or recover orphaned commits. This guide only contains the most necessary bits, to avoid mental overload.
Introduction
Almost every software developer today uses Git for version control. Unfortunately, Git is extremely powerful and rather difficult to use, in part because it is a distributed Version Control System (VCS). I have frequently observed how my peers use it incorrectly, or inefficiently. For instance, I have observed messy branch structures, that should have been cleaned up with an interactive rebase before pushing them. I’ve also witnessed people “merging” conflicting changes by saving the conflicted files with the file manager somewhere else on disk, deleting their entire working directory, cloning it again, then manually merging the backed-up files – simply because they did not understand (or “fear”) Git’s merge process.
I have written this guide to help developers, getting their Git understanding to the next level. It is written for every developer who has a basic familiarity with Git and its commands. I assume that you have used the CLI commands (or GUI equivalents) of Git clone, branch, pull, fetch, add, commit, push, or log. The goal is that, after reading this guide, you are fully comfortable with Git, such that you can confidently solve tasks that (until now) seemed “advanced” to you, e.g. cleaning the past commit history with an interactive rebase, reverting commits, or resetting branches. The goal is not to teach you everything, but only the necessary bits, to avoid mental overload.
I start with the basics, and then go into various topics, the largest one being how to fix past commits
Basics
Let’s start with the very basic concepts that you should understand, before we go into more complex commands such as “git reset” or interactive rebase.
Working directory vs. staging area vs. commits
With Git, there are three different kinds of file systems (=files & directories organized in a tree-like hierarchy) that represent the state of your project, at specific points of time:

Let’s look at each file system type in more detail:
- Commits: each commit is stored inside the “.git/objects” folder of the working directory. A commit does not describe which files were changed. Instead, each commit stores the entire (virtual) file system state of the repository, as shown in the gray boxes. To keep the file size of the “.git” folder small, the virtual file systems of the commits are not stored as “normal” file and folder hierarchies (that you could look at with your file manager), but they are stored using a very space-efficient technique, in a so-called “content addressable storage”, which handles de-duplication of files and folders, and compresses them. If you want to know more about the storage, see here for the implementation details.
- Index (a.k.a. staging area): the index is another virtual file system, stored in the “.git” folder. The index is like a “shadow copy” of your working directory. Just like with commits, the index stores the entire file system state, not just changes. Whenever you run “
git commit -m some message“, Git does not commit the changes you made to your working directory, but it takes the index‘s file system state and creates a commit from it. Any change you make in your working directory finds its way into a commit only via the index. Therefore, you first have to “stage” changed/moved/deleted files to the index, via “git add|rm|mv” commands. You may sometimes want the index to be different than your working directory, e.g. when you only want to commits certain parts of the changes you made to your working directory (e.g. commit only one of the several files you changed). - Working directory: this is the root folder of the repository on your local machine, which you can inspect and work on with your file system oriented tools, e.g. your file manager or your IDE. It contains all your project’s files and folders, as well as the “.git” folder. At any point of time, there is one specific commit checked out, but you are free to change (e.g. delete, move, or create) any of the files and directories.
One common misunderstanding is that Git is efficient because the commits only contain deltas. While this is kind of true on the lowest (physical) implementation level, conceptually, there are no deltas in Git. Conceptually, the commits and the index contain the entire file system, but the CLI and GUI tools only display the deltas, to provide you a better overview. Any delta-style information (e.g. “1 added folder”, or “file X was moved to Y”, etc.) is computed, on-the-fly, by your IDE or Git CLI (e.g. git status or git diff).
What happens if I move a file?
Here is a fun fact regarding move operations: Git does not know about (or store) move operations internally. Yet, GUI tools do show “moved files”. How does that work?
When you look at a commit (the diff of that commit to its previous commit), Git applies heuristic algorithms that compare all files of the two commits you are diffing. That algorithm identifies files that are of similar or equal content, but located at different paths, and then simply guesses / assumes that they were moved. But Git does not store move operations internally! The “git mv <old-path> <new-path>” command is (conceptually) a shorthand for:
“mv <old-path> <new-path>” (move the object “physically” in the working directory)
+ “git add <new-path>” (update the Git index)
+ “git rm <old-path>” (update the Git index)
To ensure that your commits contain the right changes, you should use graphical tools that make it obvious what the differences between working directory, index, and checked-out commit are. A tool can do that by offering a separate section or window for the changes made to the index, showing how the index differs from the checked-out commit. Your editor should also be configured to not automatically stage changes you made in your working directory, but force you to explicitly trigger the staging of a file by a single click. While this is a bit more work, you get more control. A good example is VS Code:
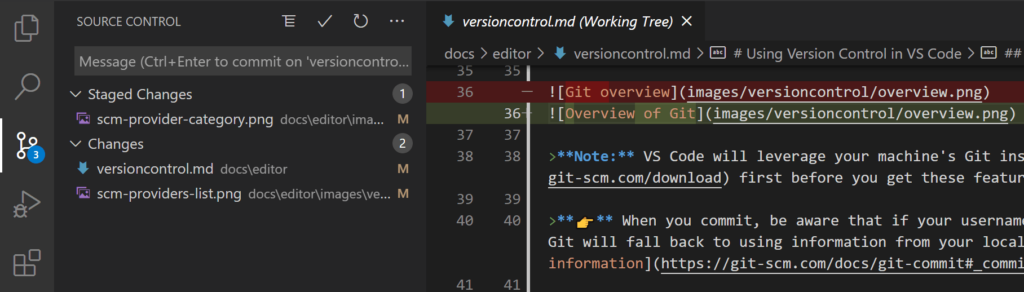
In the Staged Changes section, it shows the difference between index and commit, and in the Changes section it shows the difference between working directory and index (showing files you plan to leave out of the next commit).
If you prefer to use the git CLI, you can inspect the diffs as follows:

Git Branches and HEAD
A Git branch is a mutable (=modifiable) pointer to some commit (in contrast to a Git tag, which is immutable and should not be changed after its creation).
HEAD is a special pointer that Git manages for you, on your local disk (there is no HEAD on the remote side). It points to the branch, tag, or commit hash that you have currently checked out in your working directory. If you explicitly checked out a commit hash or tag, HEAD points to that commit hash/tag, and Git calls this “detached HEAD” mode. Otherwise, if you checked out a branch, you are in “normal” (attached) HEAD mode.
In normal/attached mode, whenever you make a commit, Git will automatically forward the branch pointer (and HEAD) to that new commit. In detached HEAD mode, however, Git still allows you to create new commits, but won’t automatically attach/forward any (branch) pointers to it, so every commit you create is “orphaned” and could soon be deleted by Git’s garbage collection (which is discussed below in more detail).
If HEAD points to a tag or branch (which themselves are pointers), HEAD is basically a pointer to a pointer, and if HEAD points to a commit hash, it’s just a (direct) pointer.
You never modify HEAD directly. Instead, git checkout <ref> does that for you. If you want to know what is currently checked out, with the Git CLI, just run git status. Its first output line will show something like “HEAD detached at <commit hash>” or “On branch <some branch name>”.
Cherry-picking
Cherry-picking is a Git command that copies selected commits from some other branch to your current branch.
As an example, consider the following scenario (first focus on the left half of the following image):

In this example, you are working on the main branch (C5). The work on the feature branch has been discontinued (feature is no longer needed), but you still want to incorporate (cherry-pick) the changes made in C3 (and ignore C4), such that your Git history then looks like in the right half in the above image. The command git cherry-pick C3 achieves that, assuming that you replace C3 with the actual commit hash of C3.
Conceptually, git cherry-pick C3 does the following:
- Create a temporary patch file that contains the changes made in C3, relative to its direct predecessor commit, C2 in this case. The patch file includes e.g. the modification or addition of specific files.
- Temporarily stash all uncommitted changes in your index
- Attempt to apply the patch file (created in step 1) to your index
- If there are merge conflicts, Git prompts you to resolve them.
- Run
git commit, reusing C3’s existing meta-data, such as the author, author date, or commit message. Note that Git adds additional meta-data for the committer name (and date). See here to learn how author and committer are different - Unstash any potential changes (from step 2)
Cherry-picking also lets you select multiple commits at once, in which case it applies the above procedure to every selected commit, in the order in which they were committed: you can either explicitly list a space-delimited list of commits (e.g. “git cherry-pick C3 C4“), or specify a range (e.g. “git cherry-pick C3~1..C4” – where the first commit has to be the “older” one, and it is excluded by default, which is why you should use the <ref>~1 syntax so that <ref> is included).
The cherry-pick command also has an --edit switch that lets you modify the commit message, or the --no-commit switch that omits step 4 above, letting you modify the index manually before you create the commit yourself.
Rebasing
Rebasing refers to taking a sequence of commits (typically those contained in a branch), moving them to a different base commit. Let’s look at a concrete example:

The idea is that you want to move the commits in the purple topic branch (shown in the left half), such that they are no longer based on C1, but on main (C3), as shown in the right half.
The command to use is “git rebase <new base reference> <branch to be rebased>“, here: “git rebase main topic“. In case you already checked out the branch you want to rebase (here: topic), you can omit the last argument, and just run “git rebase main“.
What Git basically does is to cherry pick all those commits in topic that are not already in main. To determine these commits, Git simply backtracks from <branch to be rebased> (here: C7) until it finds a commit that is already contained in <new base reference> (here: C1). Consequently, Git basically performs cherry-picking of C4, C5, C6 and C7, resulting in new commits (C4′, C5′, C6′, C7′), and moves the branch pointer (topic) to the last cherry-picked commit. The process is fully automated, and only stops on merge conflicts.
As you would expect from the mechanics of the cherry-pick command, the new commits (C4′, C5′, …) have the same meta-data (e.g. author, authoring date, commit message) as the old commits (C4, C5, …), but with the adapted file contents. The old commits still exist on your local disk, but they are now orphaned.
The git rebase command has various optional arguments. One of them is --interactive, which will be explained further below. Another one is --onto, which lets you limit the number of commits Git will backtrack, when determining which commits to rebase/cherry-pick. Let’s look at an example:

In this example, featureB is based on featureA accidentally (this could e.g. happen if a developer was on featureA when creating featureB, but actually meant to create featureB based on main). Suppose that the code changes made in both feature branches are independent of each other, and therefore you would like to rebase featureB on main. However, if you just ran “git rebase main featureB“, Git’s backtracking would determine that both featureB‘s and featureA‘s commits need to be rebased, which is not what you want. To exclude all those green commits of featureA, you must use the --onto argument for git rebase. The syntax changes, when using --onto! It is now “git rebase --onto <new base reference> <exclude-ref-from-here> [<branch to be rebased>]“.
Here we need “git rebase --onto main C6 featureB“. Again, the last argument is optional, and only required if you don’t have already checked out the branch you want to rebase. In this example we set <exclude-ref-from-here> to “C6”, because it is the first ref we want Git to ignore (and stop backtracking from here).
This is a prime example of how convoluted and horrific the Git commands can be, and why many developers only use the very basic Git commands. Someone from the Git team thought (?) that it would a good idea to design two similar-looking commands (git rebase, and git rebase --onto), where the unnamed parameters (in contrast to named parameters, such as --onto) have different meaning in each version of the command.
Merging
Merging is a cornerstone feature of version control systems like Git. Thanks to merging, you can work on a topic (e.g. a feature, or bug fix) in a separate branch (isolated from other branches and people), followed by merging the topic branch back into your main line, once you are ready. As we explained above in the “Working directory vs. staging area vs. commits” section, you now know that commits store the entire file system, not just deltas. Consequently, it makes sense to revisit what merging does, under the hood.
Let’s assume that you have checked out the “main” branch (a.k.a. the target branch) and want to merge the branch “topic” (the source branch) as shown in the following scenario.

The command git merge topic then conceptually does the following:
- Determine a list L of all commits that are not yet in the target
mainbranch. Here,L=[C2, C3]. - Create a temporary patch file that contains the changes of all commits in
Lcombined (as if Git would have squashed them first, then determined the diff) - Apply that patch to the target branch (in the index), resulting in an updated index.
- Create a new commit from the index that has two parents: the commit that the target branch pointed to until now (C5 in this case), and the commit that the source branch pointed (here: C3)
Note: during steps 2 and 3, the merge algorithm is smart enough to detect if your target branch already contains some of the changes of the source branch applied. For instance, in the above example, suppose you already had cherry-picked specific individual commits of the topic branch to main earlier (e.g. C2), and then attempted to merge topic into main: this works without issues.
Advanced topics
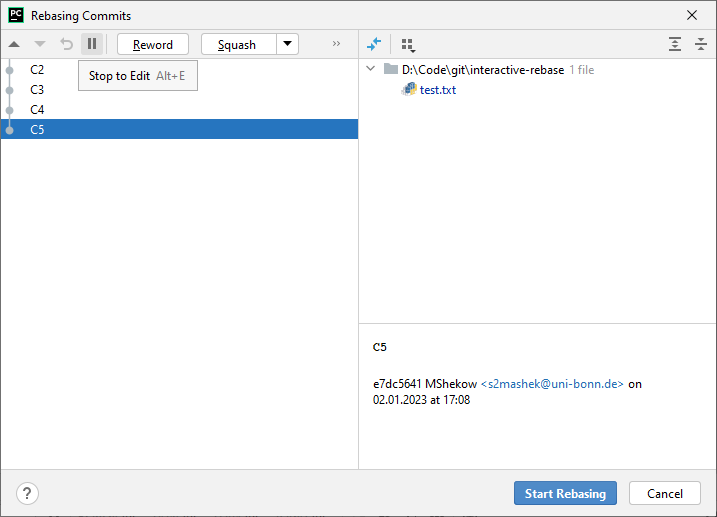
Interactive rebase
The interactive rebase command is like a “normal” rebase (as explained above), but it first presents you with a “rebase dialog” that lists the commits you want rebased, asking you what to do with these commits. Popular available options include:
- Drop a commit
- Change the commit message (or stop the rebase process, to let you change the index, thus changing the commit’s content)
- Squash a commit into the previous one
- Change the order of commits
How this list is presented (and how you manipulate it) depends on how you invoke the command. Here are two examples:
Note: the Git authors (for inexplicable reasons) decided that the rebase-dialog should show the oldest commit at the top, while all other representations, e.g. the git (ref)log, show the newest commit at the top instead. Who needs consistency anyway…. *sigh*
Interactive rebase is commonly used in two modes:
- Rebasing a topic branch onto some other branch: this is what I explained above for the normal/non-interactive rebase. The only difference when adding the
--interactiveflag is that Git first opens the rebase-dialog, before proceeding with the rebase. - Rebasing a topic branch onto itself (not actually changing the base): the purpose is to rewrite the commit history of the current branch, e.g. to clean up a messy commit history. The syntax is:
git rebase --interactive <exclude-ref-from-here> [<branch to be rebased>] . The last argument, again, can usually be omitted, assuming that you already have the branch checked out whose commits you want to rewrite. The value of<exclude-ref-from-here>is either a commit on your active branch, or the old base commit this branch is already based on.
Interestingly, from personal observation, when you talk to other people, the term “interactive rebase” typically refers to the second mode: rewriting history.
Let’s see an example of rewriting history:

Suppose you wanted to clean up the commits in your feature branch prior to merging it into main, e.g. you wanted to squash C2 and C3, and also squash C4 and C5 respectively. While feature is checked out, run git rebase --interactive C1 and the rebase dialog pops up. Change “pick” to “squash” for those commits you want squashed (here: C3 and C5), save and close the file. Another editor window opens that prompts you for the new commit messages for the squashed commits. Once you provided the message (and saved+closed the editor windows), git rebase will squash your commits.
Git reset
git reset can do many things. For the sake of simplicity, let’s only consider two general formats of git reset, one works with a file path, one with a Git reference:
- Discard local changes (in your index) that you previously staged with
git add, usually because you no longer want to commit them (e.g. you accidentally added them to the index). The command isgit reset <relative path>- Note: if you want to discard local changes you made to specific files in your working directory (not the index), use
git checkout <relative path>
- Note: if you want to discard local changes you made to specific files in your working directory (not the index), use
- Manipulate the pointer of the currently checked-out branch, with the goal to change the commit history. A typical example is to drop the N most recent commits, by bending the current branch pointer to an older commit.
- The command is
git reset [--mixed|--hard|–soft] <ref> <ref>can be any kind of Git reference, e.g. some branch name, or a relative reference such asHEAD~1which points to the ancestor commit ofHEAD, whileHEAD~NgoesNsteps into the past starting fromHEAD.- After
git resethas completed, the current branch pointer (HEAD) will point to<ref>. - The mode flag (–mixed, –hard or –soft) controls whether/how
git resetmodifies the index and/or working directory:--hard:git resetmakes the contents of the index and the working directory exactly match the<ref>commit’s content. Any of your local changes will be lost!--mixed:git resetmakes the content of the index exactly match the<ref>commit’s content. Any (other) changes you made to your working directory are left intact. This is the default mode if you don’t specify any mode. This mode is much less destructive than--hard, because it gives you the opportunity to stage and commit any local working directory changes afterwards.--soft:git resetleaves the index and working directory unchanged.
- The command is
What about “git reset” (without any arguments)?
“git reset” is the same as “git reset HEAD“, or “git reset --mixed HEAD“. HEAD is a reference, and consequently, this resets your local index so that it matches your currently checked-out commit, leaving your working directory untouched. If you want to discard all local index and working directory changes, usegit reset --hard
Caveats when rewriting already-pushed history (force-push)
Whenever you use git reset or git rebase, you typically rewrite the commit history. This means that some commits are deleted and replaced by new commits (that have a different hash). If those deleted commits have never been pushed, rewriting the history is a safe operation, because you would be pushing the rewritten history for the first time. Nothing bad can happen, like conflicts with commits made by other members of your team.
However, if the rewritten commits had already been pushed (prior to rewriting the commit history), you have to be very careful! Git will reject a normal “git push” operation, because it detects that the local and remote commit history has diverged in an irreconcilable way.
It is possible to force-push a rewritten history anyway. There are two commands for this:
git push --force- This overrides the remote commit history with your local one, without doing any further “precaution” checks. The main disadvantage is that you may (accidentally) overwrite changes made by other members of your team (or changes you pushed yourself from another device).
git push --force-with-lease- This only overrides the remote commit history if no one else has pushed any changes to that remote branch in the meantime (since you last pushed/pulled from it). To achieve this, Git compares the current remote branch’s commit hash (retrieving it from the server) with the locally-cached commit hash of
origin/<checked-out-branch>(that was stored the last time you rangit fetch|pull). - See also this article for more information about the
--force-with-leaseflag. - Interestingly, when you click the “Force push” button in IDEs such as IntelliJ or VS Code, they actually use the force-with-lease option, for precautionary reasons.
- This only overrides the remote commit history if no one else has pushed any changes to that remote branch in the meantime (since you last pushed/pulled from it). To achieve this, Git compares the current remote branch’s commit hash (retrieving it from the server) with the locally-cached commit hash of
Unfortunately, the --force-with-lease option is not a silver bullet. It can still cause some confusion in your team. Consider the following scenario:

- At time 0, the commit histories (locally for Bob and Alice, and remote) are in sync
- At time 1:
- Bob rewrites the history, squashing C1 and C2, creating a new commit “C1+2”
- Alice creates a new commit, C3, that is based on C2
- At time 2, Bob force-pushes his rewritten history, being unaware that Alice has concurrently created new commits.
git push --force-with-leasedoes not show any errors for Bob, because the changes made by Alice are not known to the server yet - At time 3, Alice tries to push her changes, but they are rejected.
- At time 4, Alice tries to pull (to merge the remote changes). Git is forced to create a merge commit (C4) that references both her most recent local work (C3), and Bob’s most recent commit (“C1+2”). This merge commit makes the history harder to understand.
Consequently, there are two options for rewriting already-pushed history:
- Use
git push --force-with-leasebut make sure you first communicate with your team whether this is OK! - Rewrite the history in a new branch:
- First, create a new branch and switch to it, e.g. via
git checkout -b <topic-branch-name>-cleaned - Rewrite the history in that new branch
- Push that new branch
- Inform your team about the new branch, possibly create a new corresponding Pull Request and deprecate the old PR/branch
- First, create a new branch and switch to it, e.g. via
With option 2, team members (like Alice) that did create new features in <topic-branch-name> can still cherry-pick them into <topic-branch-name>-cleaned, and you will end up with a cleaner commit history.
Garbage collection and recovery with the Git ref log
Introduction to garbage collection
Commits can become “orphaned”. Orphaned commits are commits that are not (transitively) reachable by another (permanent) pointer, such as a Git tag or branch. Commits could e.g. become orphaned if you delete a branch that only existed locally (that was never pushed).
Whenever you run commands such as git pull/merge/rebase/commit, Git internally calls the “git gc” garbage collection command (docs). This command performs maintenance in your local “.git” folder, deleting objects that have not been used for some time (such as orphaned commits), with the goal to reclaim disk space or to improve performance. Because garbage collection can take quite some time, Git does not always run it, but uses thresholds (gc.auto, see docs) to determine whether garbage-collection should really be executed. git gc does little work itself, but internally delegates the actual work to other commands, such as git pack-refs, git reflog expire or git prune. More details about these sub-commands are explained here.
Git’s garbage collection does not delete unused objects immediately, but only those that have not been used for some time. By default, Git does so after 30 days (see gc.reflogExpireUnreachable setting), so you basically have one month to recover orphaned commits.
For recovery, you use the git reflog command (docs). “reflog” stands for “reference log”. The command helps you find the hashes of orphaned commits, so that you can “recover” them, simply by assigning a (permanent) branch or tag to it (or resetting an existing branch to point to it).
Before looking at an example, you need to understand that Git tracks two things in your local “.git” folder: the commit history (the logical order of when and how your files have changed), and additionally a chronological order (-> the reflog) of when you changed the pointers of branches and other references in your local repository. And since creating a commit automatically advances the corresponding branch pointer, commits are also recorded in the reflog. Basically, git reflog helps you trace what you did in the recent past on your machine, in case you have difficulties remembering.
In contrast to git log, git reflog also shows commits that are not (or: no longer) referenced by any other commit or branch/tag. This lets you “restore” them, by creating a tag, creating a new branch or bending an existing branch using “git reset” to point to that orphaned commit.
Recovering orphaned commits: an example
Let’s look at an example. Suppose the following happened:
- You created a local branch called “
feature” - You made two commits to it
- You then switched back to
mainand deleted “feature” accidentally. You now want to recover it.
The output of git reflog --date=iso (where --date=iso prints when you did an action) shows something like this:
3f5fde7 (HEAD -> main) HEAD@{2023-01-02 20:11:31 +0100}: checkout: moving from feature to main
aa5bb00 HEAD@{2023-01-02 20:11:27 +0100}: commit: implement feature part 2/2
e40a746 HEAD@{2023-01-02 20:11:19 +0100}: commit: implement feature part 1/2
3f5fde7 (HEAD -> main) HEAD@{2023-01-02 20:11:02 +0100}: checkout: moving from main to feature
3f5fde7 (HEAD -> main) HEAD@{2023-01-02 20:10:57 +0100}: commit: some changes
872144d HEAD@{2023-01-02 20:10:35 +0100}: commit (initial): first commitCode language: plaintext (plaintext)
In general, the newest reflog entries are shown at the top. The first column (e.g. 3f5fde7) shows the shortened commit hash, the other columns (e.g. “HEAD@{2023-01-02 20:11:27 +0100}“) contain references you can check out, and commit messages. When you provide --date=iso these include date/timestamps, otherwise they contain integers (e.g. “HEAD@{2}“) where the number indicates how many moves ago the operation happened.
To determine the hash of the most recent commit:
- Start at the bottom, finding the line where you most recently switched to the (now-deleted) branch (here: “
3f5fde7 (HEAD -> main) HEAD@{2023-01-02 20:11:02 +0100}: checkout: moving from main to feature”. - From there, move upward in the reflog, tracing any newer commits you made to that branch (here:
e40a746andaa5bb00). - Run
git checkout <newest-commit-hash>(here:aa5bb00), followed bygit checkout -b <branch-name>to restore the local branch.
Side note: the shorthand git reflog is the same as “git reflog show HEAD“, which is essentially the same as “git log --walk-reflogs --abbrev-commit --pretty=oneline HEAD“
Git tags
Introduction to tags
A tag is a permanent pointer to a specific commit, that you explicitly create, with a name of your choice. Semantically speaking, tags should be “immutable”, but technically, you can still bend tags after creating them (even though you should not do so).
In fact, there are two kinds of tags in Git: lightweight and annotated.
- Lightweight tags are simple pointers. They are like a permanent, discoverable alias for a (hard-to-remember) commit hash. According to the documentation, they should only be used for private or temporary purposes.
- Annotated tags contain additional meta-data, similar to the meta-data of a commit. An annotated tag stores the tag author’s name & email address, a tagging date, and a custom tag message. This meta-data can be different to the meta-data of the commit the tag points to. Annotated tags can also be cryptographically signed. According to the documentation, annotated tags should be used for public releases of your software, where it is of public interest to know who created the release tag (best signed with a cryptographic signature), and when.
The general developer community seems to slowly have adopted annotated tags. Sure, many GUI-based Git tools still do not let you create annotated tags, nor do they display whether a tag is annotated (or its meta-data). However, VCS platforms such as GitHub have good support for them, letting you create annotated tags, and they show the annotated tag’s meta-data (and message) when you look at a tag on VCS platform’s web interface.
Managing tags
You create a lightweight tag via the Git CLI as follows: git tag <name-of-tag> [optional-hash(default=HEAD)]
Git stores it under “.git/refs/tags/<name-of-tag>”.
To create an annotated tag: git tag -a <name-of-tag> [optional-hash--defaults-to-HEAD]
This opens a dialog prompting you for the tag’s message. If you wanted to override the tag’s date, see “backdating tags” on the git tag docs. Once you provided the tag message, Git first creates a separate tag object somewhere in “.git/objects”. This object has its own hash, and it stores the tag’s meta-data (and the hash of the commit the tag will point to). Next, Git creates a lightweight tag (in “.git/refs/tags/<name-of-tag>”) that points to the just-created tag object.
To determine the type and (potential) meta-data of a specific tag, run git show <name-of-tag>: if the first printed line says “commit <commit-hash>”, it is a lightweight tag. Otherwise, git show will first print all details of the annotated tag (its name, tagger name+email, tagging date and message), followed by the details of the commit it points to.
Once you created a tag (annotated or lightweight), it only exists locally. Because git push does not push tags by default, you have to manually push tags:
- To push only a specific tag:
git push origin <name-of-tag> - To push all local tags:
git push origin --tags
If you want to delete a tag, you have to delete it locally first (git tag -d <name-of-tag>) followed by deleting it remotely (git push origin --delete <name-of-tag>).
You can also rewrite / change a local tag, by using the same command you would use to create a tag, and add “-f” as argument at the end (to enforce overwriting the existing tag). You need to first determine whether the tag you are about to rewrite is an annotated or lightweight one (see the command explained right above), ootherwise you might accidentally convert an annotated tag into a lightweight one (or vice versa):
- To rewrite an annotated tag, use
git tag -a <name-of-tag> <updated-commit-hash> -f - To rewrite a lightweight tag, use
git tag <name-of-tag> <updated-commit-hash> -f
You then need to force-push the rewritten tag (which was only changed locally), via git push origin <name-of-tag> -f
Naming conventions for tags
Your team will benefit if you define some naming conventions for your tags: technically, Git allows you to use many different kinds of characters, including forward slashes and other “special” characters. However, since Continuous Delivery pipelines often create a new release for a Git tag and embeds the tag’s name into the produced release-artifact(s), you should carefully choose the characters you use in the Git tag, because often these release artifacts only allow a limited set of characters. For instance, the version tag of a Docker image reference (e.g. postgres:<version>) may only contain a-z, 0-9 and the special characters minus, underscore and dot.
Consequently, it is good practice to limit tags as follows:
- Keep it short (e.g. less than 50 characters)
- Allow only lowercase alphanumeric characters (a-z, 0-9), as well as ‘-‘ or ‘.’
- Let a tag start (and end) with an alphanumeric character
Conclusion
This guide is the attempt to convey the most essential pieces of knowledge (beyond the “absolute beginner” level) you need to work with Git efficiently. I recommend you bookmark this guide, for future reference. It is also a good idea to try the features out yourself, e.g. in a toy example project.
In this follow-up article, I look at real-world example problems and how to solve then, reusing the knowledge I presented here.