This guides provides ideas and techniques for using your digital (software) tools more efficiently (via keyboard shortcuts) and effectively (by discovering useful features). I present a 3-step process that starts with collecting the digital tools you use, then researching efficiency/effectivity tricks, and finally adopting them in daily life.
Introduction
Knowledge work today makes heavy use of digital tools. No matter whether you work in IT, in HR, as a chemist, or in some other industry or department, you most likely use a computer/laptop on a daily basis. From personal observation, most people use the software and devices rather ineffectively and inefficiently:
- ineffectively, because they don’t know that the currently-used tool has features that let you achieve your work much better/faster,
- inefficiently, because they don’t know about (keyboard) shortcuts to a (known) feature, and slowly trigger features using the mouse.
And the most interesting part: people do not even realize this! If I point it out to them, they often won’t believe the performance improvements they could achieve. Also, some “lash out” and claim that their mode of working is already optimized, while admitting they have not actually researched or tested any alternatives in years.
The basic idea of this article is to build awareness that you can save a lot of time and (even more importantly) nerves when using digital tools in your day-to-day operations. This applies to both your professional and private life. I want to give hints how to achieve this, which boils down to two steps:
- Learn and make use of the keyboard shortcuts (or other kinds of shortcuts) of your tools. They trigger functionality that is either not available graphically (as buttons), or is “expensive” to use, because you need to continuously switch between mouse and keyboard. This improves efficiency (as in: “doing something the right way”).
- Learn about functionality of the tool that you did not know before (or: discover whether there are add-ons or plug-ins that extend the tool). This improves effectiveness (as in: “doing the right thing”).
This piece is an expansion of a previous article I wrote about boosting software development productivity with keyboard shortcuts, see here. You may find that article helpful to learn about concrete shortcuts and features a developer can profit from. I realized that the learned lessons apply to any field, not just software development, which is why this article presents a more generalized view on digital tool competency.
To achieve digital tool efficiency and effectiveness, this article is structured as follows:
- Build a map (or list) of digital tools you use on a daily basis
- Build a repertoire of new features and keyboard shortcuts for all those tools discovered in step 1.
- Find the best way to practice / adopt your repertoire – the problem is that just having a repertoire won’t achieve anything: you won’t recall that there are features or shortcuts you would like to use! It takes time and practice to drill these into your “muscle memory”.
The following figure illustrates my digital tool efficiency process. You may want to keep it opened on a separate screen to orient yourself while reading this (rather long) piece:

Step 1: A map of digital tools
From a high level perspective, a knowledge worker uses the following digital tools frequently:
- Operating system and common system tools, e.g. the terminal, or a file manager
- Communication tools, e.g. an email client, Microsoft Teams, or Slack
- Editors of some form. For instance, software developers use an IDE, people in controlling might use SAP, creatives use software like the Adobe creative suite, architects use some kind of 3D / CAD tool, and most workers also use some office product (Word/Excel/PowerPoint/Keynote), etc.
There are probably many other examples that are specific to your field. Maybe you work with customized hardware & software, e.g. a custom tablet that controls surveying equipment which measures distances and angles in the real world.
What are your digital tools?
Please stop for a moment and think about what hardware or software is part of your daily routine, and keep these in mind when reading the remainder of this piece. You can limit the list to those you spend a considerable amount of time with (but still include those that are annoying to use, even if you spend little time with them).
Step 2: Build your repertoire
Effectiveness and efficiency are a very personal matter. If you compared the day-to-day activities of any two knowledge workers, you would find a lot of differences. Not only are their duties and official roles different that they have in their organization, but also everyone (rightfully) chooses their own ways of how to complete their tasks. Consequently, you have to build your own repertoire of software/hardware features and (keyboard) shortcuts you want to use. Just blindly copying things from someone else does not make sense!
Building a repertoire consists two activities, researching, and documenting, which are presented in more detail in the following subsections. The researching activity can be guided by pain (that you have with some hard- or software), or it is unguided research, which is why I explain them separately. They are not mutually exclusive, though, meaning that you should do both pain-guided and unguided research, if time permits.
Pain-guided research
When using applications, you often encounter pains, or “nuisances”. I hope you can relate to the following train of thought I had:
- “man, I will have to duplicate this row in Excel another 20 times, this is so annoying” or “I’m sick of always having to navigating these nested sub-menus to trigger the Git commit every time”
- “I should really look up how to do this better!”
And then I actually did not do anything about it. The next day, the same thoughts come up, and so on.
I was thinking and (not) acting the same way, not doing the research for these reasons:
- When working on that annoying task, my goal is to complete that task (now). I know that if I diverted my efforts and instead started looking for a better solution (e.g. a keyboard shortcut), this would take time, and it would delay completing the current task, which is a goal conflict.
- The anger about these pains quickly fades away. A few hours later, they are no longer top of mind (other things are more important, e.g., “what should I eat next?”).
- I never reflect upon the accumulated costs of doing things inefficiently. I do not realize that spending 20 minutes of research once will save me hours of work in the coming years.
This is what I do to get out of this vicious circle, which you can try out as well:
- Set up frequent, regular reminders that prompt you multiple times per day. When triggered, spend just one minute to reflect if any software/hardware pains came up recently, and quickly document them in some list (any list will do, on paper, your To-Do app, etc.). To implement the reminder, I prefer some digital tool, such as a smartphone app.
- Set up (less frequent) regular reminders that prompt you to look at the list of pains, and research solutions. This could be every 1-2 weeks, or any other interval you like. If you do this at work, you could implement this as regular 30 minute appointment with yourself that you put into your calendar.
This approach may seem rather complicated and contrived. The reason why I recommend using reminders is because establishing regular habits is extremely difficult. You may think: “I’ll just remember writing down the pains when I encounter them”, but unfortunately this is just wishful thinking. (Calendar) appointments and reminders solve this via brute force. It’s not nice or effortless, but it works.
Of course, if you experience a pain and do realize it in that moment, you should document the pain in your list right away. There is no conflict with your goal (completing the actual task), because writing something down just takes a few seconds. But you won’t always have this clarity of mind, therefore having an additional regular reminder still helps.
Of course, you can use any other technique that works better for you. For instance, I use digital reminders only at work – in private life, I use the Pomodoro technique (25 minutes of work, 5 minutes break), and in each break, I reflect on whether there were any pains in the last 25 minutes.
Unguided research
“Unguided” research means that you are looking for efficiency or effectiveness tricks, but you do not have any idea where to start, or which tricks there are. It is about learning about things you did not even know existed – discovering your unknown unknowns.
These are steps you can do:
- Search the Internet for tricks. This approach follows the 80-20 rule. It yields the largest (initial) benefit at minimal research costs, but it lacks completeness and the results are rather subjective. Examples are:
- Use a search engine with search queries such as:
- “Best shortcuts for <tool>”
- “hidden|best features for <tool>”
- “<tool> productivity hacks”
- “<tool> cheat sheet”
- “best <tool> plugins”
- Look for YouTube channels or blogs dedicated to <tool>. The added bonus is that if you subscribe to them, you will get notified automatically about tricks added to <tool> in the future.
- Use a search engine with search queries such as:
- If you have time (doing the extra 80% effort for 20% gain): go through the tool’s official list of keyboard shortcuts and its manual to discover unknown features that would be useful to you. Although it most likely takes hours to make it through these resources, there is a big benefit: discovering features and shortcuts quickly becomes exhilarating, and time will fly by! You’ll feel like a gold digger who keeps finding nuggets. Tricks that you learn this way are more likely to stick, because you spent a lot of effort discovering them.
- If you are a power user, there are designated efficiency tools, which may come with the operating system, or from a third party. Examples include:
- Launchers: a launcher is a third-party application that shows a small search box (triggered by a keyboard shortcut) which lets you launch programs, open a browser bookmark, open system settings, calculate a mathematical formula, and much more. Examples are https://github.com/Flow-Launcher/Flow.Launcher (Windows only), https://github.com/cerebroapp/cerebro (Cross-Platform), https://github.com/oliverschwendener/ueli (Win+Mac), https://github.com/microsoft/PowerToys (Win only), https://www.raycast.com/ (macOS only). See the below video for an example of the Flow Launcher.
- Clipboard history: being able to copy multiple pieces of text and then choose from them when pasting is a great efficiency trick. Some operating systems (e.g. Windows 10 or 11) have this feature built in. Others (like macOS) need a separate tool, e.g. Jumpcut or Maccy (or you use the clipboard history plug-in for the Raycast launcher). Note: you must verify that credentials (e.g. passwords) copied into the clipboard by a password manager do not end up in the clipboard history.
- Tools to change keys or key combinations of your applications. The details depend on the operating system:
- On Microsoft Windows, there is no “standard” way to change keyboard shortcuts of an application (or global shortcuts): some app developers build dialogs that let manage them (e.g. most IDEs), but you cannot rely on that. The third-party tool PowerToys lets you redefine (global) shortcuts, though.
- On macOS, the macOS accessibility feature (whose APIs are implemented by many app developers) let you centrally customize keyboard shortcuts, in the system-wide settings dialog, see here. I found it difficult to define custom shortcuts this way, because you have to manually type the labels of the menu items. Fortunately, the third-party tool CustomShortcuts simplifies this, by offering auto-completion. The mechanism is also limited to customizing keyboard shortcuts for menu items, but an app may have many other predefined shortcuts that trigger features that are not covered by a menu item (e.g. the “Expand compose box” for MS Teams, see here). To redefine keyboard shortcuts globally, you can try Karabiner Elements. Like PowerToys for Windows, it is useful to change uncomfortable key combinations to ones that you like.
- Scripting tools that let you build macros which let you script almost “arbitrary” automations, including interacting with running applications. Some scripting tools use graphical building blocks (“low code”), others require you to write actual code. The macros can typically be triggered by a keyboard shortcuts. Examples are:
- macOS: free & pre-installed Automator or Shortcuts apps made by Apple, but there are also third-party tools, such as Alfred (“Alfred workflows” that are part of the non-free Alfred Powerpack) or Hammerspoon (free).
- Windows: AutoHotKey, or AutoIt. There is also FastKeys, which is not free, though.
- Some applications offer their own, internal macros, e.g. Microsoft Office (written in Visual Basic).

Documentation
Once you discovered a great new feature or keyboard shortcut (or once you installed an efficiency tool and e.g. used it to set up a new keyboard shortcut or trigger a macro), it is time to document it. It is likely that your documentation will grow over time, and the goal of the documentation is that you can quickly search in your collected efficiency tricks collection in a central place.
Having documentation is crucial, because your memory will become fuzzy about the details of a feature or shortcut. What will most likely happen is that you find a trick, then you forget about its details, and a week later you run into the “pain” (missing a feature/shortcut), vaguely remember that you already solved this, and then you want to spend as little time as possible to find out the details again. Think of the documentation as your personal cheat sheet. Yes, it is quite a bit of work to create it. But you are much more likely to remember and use shortcuts (and the related functionality) that you put some work into, in particular to document it. That spent work connects you to those tricks emotionally. You will be more likely to remember them, and be more motivated to use them, because using them is the pay-off for the work you did to find and document them.
Nowadays, I documenting everything in a single Microsoft Word (or LibreOffice Writer, etc.) document, structured roughly as follows:
- Features
- <name of app 1>
- <name of app 2>
- …
- Each app-specific section contains a list of features I like and did not know about, described using my own words!
- Keyboard shortcuts: just a big table with 3 columns:
- Application name (e.g. “Teams” or “PyCharm”)
- Shortcut (key combination, e.g. Cmd+Shift+F)
- Description: describing what the feature triggered by the shortcut does, using my own words! I also put any optional remarks in here, e.g. the name of the shortcut as presented in the app’s shortcut dialog, or any caveats of the feature, or whether I have customized this shortcut in some way, or whether it is a custom macro I built, or whether the feature is only available in a manually-installable plugin, etc.
Of course you can structure it in many different ways, e.g. have one section per application, each with subsections for the features and keyboard shortcuts.
Here is an example:
Beware of the cheat sheets you find on the Internet
Those typical cheat sheets you find on the Internet use pretty colors and fonts, arranged in a neat layout that fits everything onto a single page. I urge you to use a normal document instead as described above, which is “ugly” in comparison. The disadvantage of pretty single-page cheat sheets is that their layout will break immediately once you add or remove entries, or change the wording!
Sharing is caring
If you collected all these shortcuts and features, why don’t you share them with your peers? Chances are that they will profit from those, too. You could, for instance, start an intranet wiki page that you and your colleagues contribute to. Just remember: whenever you adopt an efficiency trick added by a colleague, adapt it to your circumstances first, e.g. by rephrasing it with your own words.
Step 3: Adoption
Researching and documenting efficiency tricks only makes sense if you actually use/adopt/practice them in daily life. I found several ways of doing so, each having their up- and downsides.
On-demand look-up
On-demand look-up means that you do not actively practice the execution of the collected tricks, but rely on your memory that kicks in and tells you “hang on, I think there is a feature I recently found that is more efficient” or “hang on, did I not recently find a shortcut to do this faster?”. You then open your personal documentation (described above) and use the (fuzzy) search to find the feature or shortcut, and then apply it.
The advantage of this approach is that it means the least work, compared to the deliberate practice approach presented next. The disadvantage is the reduced chance of recalling all your beloved efficiency tricks.
Deliberate practice
Deliberate practice means that you regularly pick a few of your efficiency tricks and then switch to the corresponding app and practice them there, to get them into muscle memory.
There are many ways to implement this. Here are a few examples:
You configure a weekly reminder (e.g. with Outlook or some To-Do app) that asks you to randomly select some feature or shortcut from your documentation, and practice it. For keyboard shortcuts, you can “hide” the solution (the concrete shortcut) by changing the shortcut’s text color to white, so that it blends with the document’s background.
Advantage: requires little preparation effort in advance.
Disadvantage: over time, it becomes more difficult to decide which features or shortcuts to practice. Skimming through your efficiency-tricks document regularly (to identify those tricks you do not master yet) may become an arduous task, and it is likely that you will eventually stop doing so.
Use a generic spaced repetition software (SRS), such as Anki (free), to learn new features or trigger practicing shortcuts. Spaced repetition is a technique that drills knowledge into your head via brute-force repetition. Think of it as learning with index cards / flash cards, where the SRS decides which ones to show, and how often to repeat them over time. You might want to configure some kind of reminder mechanism so that you don’t forget to use the SRS on a regular basis (e.g. Outlook reminder, or put the SRS into your auto-start list).
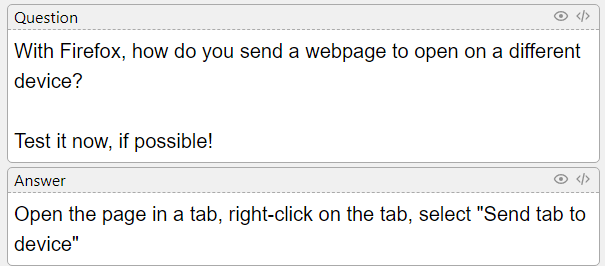
A SRS shows flash cards that you create yourself. They typically have a question and answer side. At training time, you could type in an answer for a given question, but you don’t have to! You can also just recall the answer (visualizing it in your mind), then uncover the solution, and finally you give yourself a grade that indicates how well your recall has matched. See the below image for an example. I personally use Anki which has many features. For instance, it lets you configure a limit of shown cards per day (which means that I use it every day and just practice 1-2 cards to keep it short).
Advantage: ensures that you regularly practice the features and shortcuts, while minimizing practice time.
Disadvantage: requires preparation effort to copy features or shortcuts from your central documentation into the SRS. But you could also use the SRS as a central place of documentation instead.
You can use a keyboard shortcut training application, such as KeyCombiner or ShortcutFoo, which you configure to launch whenever your computer starts (which reminds you to use them). These trainer apps are also spaced-repetition software (see the other tab). They query you only for those shortcuts that you have not practiced yet, or which you did not remember correctly in the past. They are only useful for learning shortcuts, not to adopt features. While these trainer apps typically come with large pre-made shortcut libraries (that cover many applications), I never use these for practicing, for several reasons:
- a) they contain way too many shortcuts, I do not care about most of them
- b) they use the application vendor’s description (and not my own) for the shortcuts, which I often don’t understand
- c) they are sometimes out of date
Instead, I recommend you create your own collection and practice it. I personally only tried KeyCombiner and use it since over a year. Apart from practicing shortcuts, it comes with a desktop app that offers an overlay popup window with a fuzzy search for shortcuts in my personal shortcut collection. That search is even dependent on the context, so it would only show shortcuts of app <X> if <X> is the active application while I press the shortcut that triggers KeyCombiner’s overlay popup window. The following video shows how a training session in KeyCombiner looks like:
Advantage: providing the answer by pressing a shortcut is more natural and haptic than using a generic SRS app like Anki and just recalling (but not pressing) the shortcut.
Disadvantage: these trainers do not teach you the triggering situation in which the shortcut comes in handy. For instance, KeyCombiner will condition your muscle memory such that if a self-written textual prompt is shown (e.g. “copy content to clipboard without formatting”), you immediately recall the shortcut. However, this textual prompt won’t be shown in daily life. The trigger is more likely something like “I’m currently copying text from tool <X> to tool <Y> and I need to copy the content without formatting”. By deliberating staging this situation, you are more likely to actually use the shortcut.
Staying up to date
Since your digital tools get updated constantly, it is obvious that researching / documenting / adopting efficiency tricks only once is a bad idea. Over time, your used tools will change – and for those tools that you keep using, their features and shortcuts will change, too. Sharpening your skills is a life-long exercise.
Here are two tips:
First, regularly re-evaluate your tools. This does not need to happen often, maybe once or twice per year. Set it up, now, e.g. as recurring calendar reminder!
Second, whenever a digital tool prompts you to install an update, make use of the opportunity! Most people I know are just annoyed by updates. Instead, why don’t you use that time to read the change log of that application? It will tell you what new features the application offers. The main challenge is to find the change log. I recommend researching the location (e.g. a Google search for “
Handling applications without auto-update prompts
Some applications won’t show automatic update prompts on your device. Some apps simply don’t come with an auto-updater, or the app might run in the cloud and is not even installed locally. I still research the change logs location for these applications, and then automate the discovery of updates as presented next.
If possible, automate the discovery of new features or updates. One example is to subscribe to YouTube channels of power users of an application, who regularly post new videos of features, see e.g. here or here for Microsoft 365. You can also research the address of the change log website of the tool and have a service such as PageCrawl.io notify you via email whenever there have been updates to the change log. When it comes to downloadable releases of software hosted on e.g. GitHub, GitLab, or some package registry (e.g. NPM), services like NewReleases.io have you covered.
Conclusion
In this piece I have shown many tips for how to use digital tools more effectively and efficiently. This is a lot of material, and I urge you to take it slowly! Changing habits is very difficult, and you will lose the fun or interest if you overburden yourself with too many steps at once. Personally, I just reserve about 30-45 minutes each Monday morning, where I research cool features (unguided research), or update the material in the trainer apps (such as Anki or KeyCombiner).
My techniques that use regular appointments and reminders may seem quite over-engineered. It surely won’t work for everyone. That’s fine! Use those bits that make sense for you. The reason why I explained these brute-force methods is because they were the only approach that worked for me. Without such constant reminders and practicing, the efforts have always grinded to a halt.
I would also like to point out that becoming more effective or efficient is not about squeezing the last 10% of performance out of you. Not everything needs to done efficiently. It is perfectly fine to consciously do certain things in an inefficient / ineffective way, e.g. because it is meditative and helps you relax. The goal of this article is to help you automate or accelerate only the mundane/boring/annoying tasks – to remove the brakes inflicted upon you by your input devices, in those scenarios where they cannot keep up with your (faster) mind and thoughts.
Please share your experiences with improving your digital tool usage, I’m eager to hear your thoughts and ideas!