This article explains how you can build your own minimal images using the CLI tools apko (Chainguard/WolfiOS), Chisel CLI (Ubuntu Chiseled), and Marinara (Azure Linux).
Container image security series
This article is part of a multi-part series:
- Part 1: Fallacies of image scanners: explains how scanners work and which false positives/negatives they produce. Also available in German on heise online.
- Part 2: Minimal container images: provides a list of off-the-shelf, free (and paid) minimal images for bare Linux, PHP, Python, Java, C#, and Node.js. Also available in German on heise online.
- Part 3: Building custom minimal container images (this article): how to build your own minimal images based on Chainguard/WolfiOS, Ubuntu Chiseled, and Azure Linux. Also available in German on heise online.
- Part 4: Choosing the best container image: discusses 8 selection criteria for images, describing what they are, why they matter, and how to evaluate them
Introduction
Minimal container images are images that omit components such as shells or package managers, which are typically not needed at runtime. These images are also known as “distroless” or “chiseled” images. They significantly reduce the attack surface, thereby enhancing security. The fewer components that exist in an image, the fewer potential vulnerabilities there are.
Part 2 of this article series presented existing, prebuilt images for a bare Linux and the languages PHP, Python, Java, C#, and Node.js. However, sometimes the existing images are a bad fit, making it necessary to create your own images. This article discusses how to build your own minimal images based on Chainguard/WolfiOS, Ubuntu Chiseled, and Azure Linux.
The following table provides a broad comparison of the 3 minimal image vendors:
| Criterion | Ubuntu chiseled | WolfiOS / Chainguard | Azure Linux |
|---|---|---|---|
| Available packages | ~500 | ~3000 | ~3000 |
| Documentation quality/ease-of-use | ➕➕ | ➕➕➕ | ➕ |
| Adoption speed of new upstream package versions | Slow | Fast | Medium |
| Reproducible image builds / Support to pin package versions | ❌ | ✅ | ❌ |
| Commercial support | ✅ | ✅ | ❌ |
Building Ubuntu Chiseled images
Ubuntu calls its minimal images “chiseled images”. As explained in this blog post, Canonical introduced a new build tool to create such images, named Chisel. Chisel is a CLI that you provide with the Ubuntu distro version (e.g., “22.04”) and a list of “slices”, which Chisel assembles into a new root file system that you can copy into an empty scratch image. The Ubuntu team split a selected set of official Ubuntu packages into several slices, which you can inspect here. If you are missing slices for a specific package, just open a GitHub issue.
On top of Chisel, Canonical also created the Rockcraft CLI that works on a higher level of abstraction.
Using the Chisel CLI
Before you dive deeper into building Ubuntu Chiseled images, you need to be aware of the following limitations:
- You can only install packages for which the Ubuntu team has already created slice definitions. The slices differ for each Ubuntu release (22.04 has different slices than 24.04). This is particularly relevant if you want to build an image for a programming language interpreter (say, Java, Node.js, or Python). You will only get those versions that the distro version supports. For instance, the newest LTS Ubuntu (24.04) contains Python 3.12.3. No newer 3.12 version (or 3.13) is available! However, the 3.12.3 version includes security patch backports, so it is more secure than the upstream 3.12.3 Python interpreter.
- You cannot pin the versions of packages or slices you want to install.
chiselwill always install the latest version of the package that is available in the official Ubuntu repo at the time you run it. Consequently, you will also need to set up a CI/CD workflow that runs regularly to rebuild your image.
The easiest way to build your own chiseled image is to use a Docker multi-stage build. You should first complete the official Chisel tutorial that explains how to build a Python 3.12.3 image based on Ubuntu 24.04.
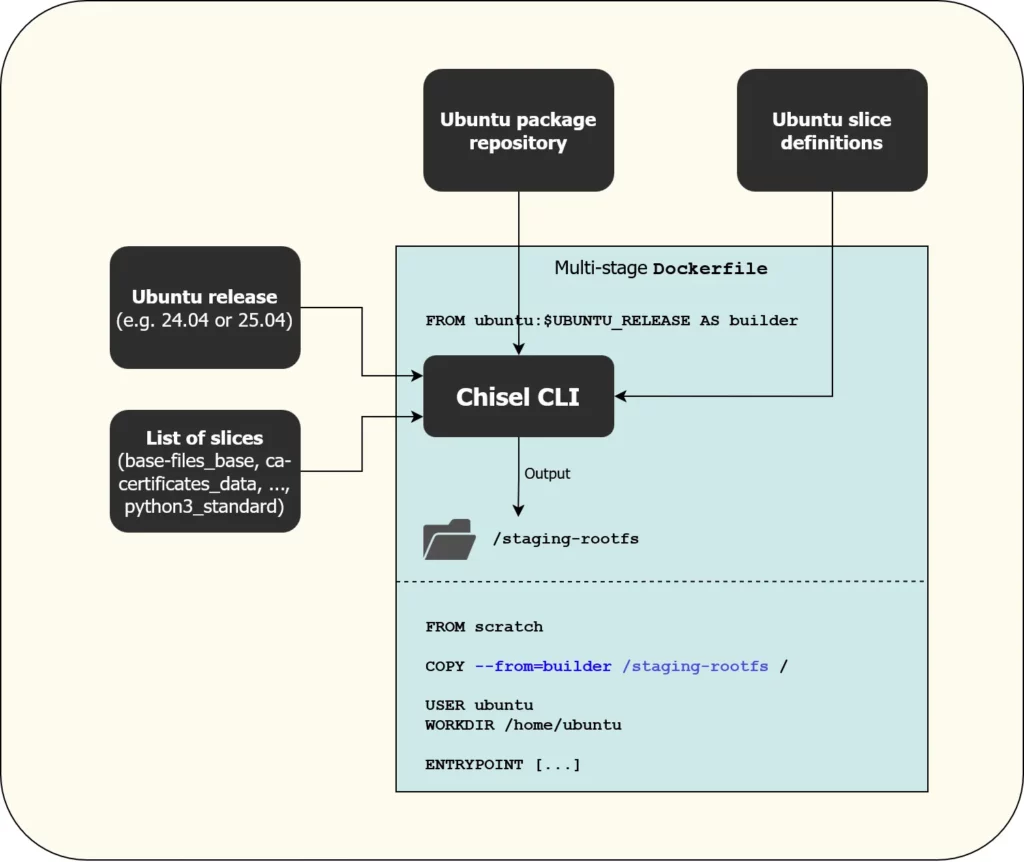
Unfortunately, if you try to scan the chiseled image with a vulnerability scanner such as Trivy or Grype, or use these scanners to generate an SBOM, you will notice that the scanners are unable to detect most packages in the image, and thus cannot reliably report vulnerabilities. As explained in this GitHub issue, Ubuntu made the (questionable) decision to invent their chisel-proprietary package manifest format. Scanners like Trivy don’t understand that proprietary format yet, but Ubuntu wants to collaborate with scanner vendors (see e.g. here for Trivy). In the meantime, you can deploy the following workaround that uses a chisel-wrapper script that generates standard Debian package metadata that scanners like Trivy already understand. These are the modifications you need to apply in your multi-stage build Dockerfile (the one you copied from the official tutorial):
# Add the following 3 lines somewhere before the "chisel cut" command
RUN apt-get update && apt-get install -y git file  # "file" is needed by the chisel-wrapper script
RUN git clone --depth 1 -b main https://github.com/canonical/rocks-toolbox /rocks-toolbox && mv /rocks-toolbox/chisel-wrapper /usr/local/bin/ && rm -rf /rocks-toolbox
RUN mkdir -p /staging-rootfs/var/lib/dpkg

# Replace the RUN line that calls the "chisel cut" command with this one:
RUN chisel-wrapper --generate-dpkg-status /staging-rootfs/var/lib/dpkg/status -- --release "ubuntu-$UBUNTU_RELEASE" --root /staging-rootfs <space-separated-chisel-list>Code language: Dockerfile (dockerfile)
You can find a complete example for a Python 3 project here. It illustrates how to build a Flask-based demo application, and how to fix an edge case caused by the Python interpreter being in a different location in the Chiseled base image, compared to the build stage python:3.12 image.
If you prefer Java, here is an example that demonstrates how to build a Chiseled Java JRE image, using it as base image to run the Springboot Petclinic example app.
Using Rockcraft
Another approach to building Ubuntu Chiseled images is the higher-level Rockcraft CLI.
Rockcraft internally uses Chisel to build the root file system. But Rockcraft additionally lets you declare a YAML file (parsed by Rockcraft) in which you define:
- The Ubuntu version you want to use
- The slices you want to install
- The CPU architectures you want to build the image for (→ multi-platform builds)
- Which non-root user to create and use
- Which services to start (using Pebble, another systemd alternative)
You can find existing images that were built with Rockcraft by searching for “chisel” in the Canonical GitHub organization, e.g.
- Node.js that Canonical regularly builds and pushes to ubuntu/node
- Python that Canonical regularly builds and pushes to ubuntu/python
- RabbitMQ that Canonical regularly builds and pushes to ubuntu/rabbitmq
The main disadvantages of Rockcraft are:
- Rockcraft adds additional complexity and magic to the build process
- Rockcraft forces the usage of the Pebble service manager as the image’s
ENTRYPOINT. The Pebble binary regularly pops up in vulnerability scanners, and you typically won’t need a service manager anyway - The images generated by Rockcraft can currently not be scanned properly by tools like Trivy (this is the same problem as explained above for the Chisel CLI, when not using the
chisel-wrapperscript)
Consequently, I recommend you skip Rockcraft and use the Chisel CLI directly, as it is sufficient to create secure images. You can still look at the stage-packages entries of the rockcraft.yaml file(s) in the above repositories (e.g., this one) to get inspiration for the slices you should include in your image.
Building WolfiOS / Chainguard images
Background on Chainguard
Chainguard is one of the providers filling the niche of providing secure container images. To achieve this, Chainguard built WolfiOS, a huge catalog of (open source) software packaged using Alpine’s APK format. They open-sourced a build tool named Melange, which lets anyone create new APK packages by defining a YAML-based recipe. WolfiOS is essentially a public collection of over 1000 Melange recipes for open source packages, created by Chainguard (and other community contributors). You can find them here. Chainguard regularly rebuilds the binary APKs for the 64-bit Intel/AMD and ARM CPU architectures. You can inspect the APKs here.
In contrast to other Linux distros, Chainguard is very fast to adopt new open source package releases. While a distro like Ubuntu will take months or years to pick up a new Python version, Chainguard’s repository will offer it within days.
Based on this large package repository, Chainguard builds container images using the (also open-source) tool apko. Like Melange, apko is configured with a YAML recipe, in which you specify the list of packages (with optional version pinning), environment variables, and custom Linux users. apko then generates (and optionally pushes) an image from that recipe. Even though apko is based on Alpine’s packaging format, the produced images are not Alpine-based. Most notably, they do not use musl as the underlying C library, but glibc, in those cases where a C library is actually needed.
You can inspect Chainguard’s image catalog here. Chainguard earns money by offering these images to businesses, including older versions, such as Python 3.11, as long as the upstream project still maintains that version.
Building images with apko
Let’s see how we can build images based on WolfiOS packages with apko. The challenge is to get the recipe right. Fortunately, you can leverage Chainguard’s image catalog to extract the correct recipe values.
Proprietary packages
Chainguard actually operates two APK repositories: the open source WolfiOS repository and a private “Chainguard” repository (whose packages are only accessible for paying customers). For any image in the catalog, the “SBOM” tab will reveal whether one or more packages are from the private repository.
For instance, the Python image uses only WolfiOS packages (except for the chainguard-baselayout package that comes from the Chainguard repo, but you can safely ignore that package as it only contains metadata. In contrast, images such as Adoptium JRE or Consul do use private packages.
→ You can only build those images from the catalog that have no packages from the private Chainguard repo.
The following recipe builds a minimal Python 3.11 run-time image (that excludes a shell, C compiler, or pip):
contents:
  repositories:
    - https://packages.wolfi.dev/os
  keyring:
    - https://packages.wolfi.dev/os/wolfi-signing.rsa.pub
  packages:
    - python-3.11

entrypoint:
  command: /usr/bin/python

accounts:
  groups:
    - gid: 65532
      groupname: nonroot
      members: []
  users:
    - gid: 65532
      homedir: "/home/nonroot"
      shell: ''
      uid: 65532
      username: nonroot
  run-as: '65532'

archs:
  - amd64
  - arm64Code language: YAML (yaml)
For each image you want to build, you need to figure out the correct values for:
- Packages to install: in the YAML recipe,
contents.packagesis a string array of package names. When you build your recipe, provide as few entries as possible. Many packages will implicitly reference several other packages. You can also pin concrete versions by the syntax<package-name>~<major.minor.patch>as explained here (e.g., “python-3.11~3.11.1” for the above example, to install a specific patch version of Python 3.11.x) ENTRYPOINTandCMD: With apko,ENTRYPOINT(as known from aDockerfile) is set inentrypoint.command, whereasCMDis set in the root-levelcmdkey- Linux user accounts: creates one or more users and sets the user that is active by default. Most images use the values from the above example
- Environment variables: Sometimes you need to add more environment variables to the recipe. Note that apko implicitly sets
PATHandSSL_CERT_FILEfor you, so there is no need to explicitly set these 2 variables in the recipe.
You can find the full specification for the recipe YAML file format here.
This is the basic approach to determine the correct recipe values:
- Install apko (or use its container image) as explained in the apko README
- To determine the Linux user accounts and the
ENTRYPOINT/CMD, open the image in Chainguard’s image catalog and use the values from the Specifications tab. Make sure to select the correct image tag in the version dropdown before you copy the values from your browser. - To determine the packages, look at the SBOM tab of the image (again, first make sure you selected the correct image tag in the version dropdown) and choose one package that appears to be the most important or relevant one, then put it into your recipe. Next, in your shell, run “
apko show-packages your-recipe.yaml | sort” which prints the alphabetically-sorted list of (implicitly) resolved packages. Compare this list to the one in the SBOM tab in your browser. If the list matches, you are done. Otherwise (if your browser’s SBOM tab still shows packages not present in your shell’s output), you need to add at least one of those packages to your recipe YAML file and run the “apko show-packages” command again, repeating the comparison.
Let’s go through a concrete example for the python:3.12-dev image. This image includes all development tools, so it should be used in a build stage of a multi-stage Dockerfile, as explained in Chainguard’s documentation. A look at the SBOM tab suggests that “python-3.12-dev” is a good first candidate. However, the apko show-packages command resolves this package to only 27 packages, but the SBOM page lists 74 packages (75 if you also count the chainguard-baselayout package). We could throw both lists into ChatGPT and ask it for the delta, slowly figuring out which packages we need to add. But a better way is to look up the Python image’s source, whose extra_dev_packages entry reveals that you also need to add the packages build-base, py3-pip, and uv. After doing so and repeating the comparison, still 22 packages are missing, among them apk-tools, bash, busybox, git and wget. After adding them, the packages match. Consequently, this is the list of packages for the python:3.12-dev image:
contents:
  packages:
    - python-3.12-dev
    - py3.12-pip
    - build-base
    - uv
    - apk-tools
    - bash
    - busybox
    - git
    - wgetCode language: YAML (yaml)
Once you have a finished apko recipe, you can build and push the image using one of the following approaches:
- If you don’t want to push the image (yet) but only want to run it locally for now, run
“apko build <path-to-recipe.yaml> <image-name:tag> <path-to-tar-file>” followed by
“docker load < <path-to-tar-file>”. Now you can run the image with “docker run <image-name:tag>”. Apko will also generate one SBOM file for each architecture by default (using the SPDX format), placing them next to the tar file (e.g., “sbom-x86_64.spdx.json“). - If you want to build and push the image with one command, run
“apko publish <path-to-recipe.yaml> <image-name:tag>” (whereimage-nameincludes the registry’s server host, e.g., “myregistry.com/project/someimage”). This command (re-) builds the image (if necessary) and pushes it. Some notes:- If your registry requires authentication, apko can use the credentials you previously created with “
docker login” - apko’s image builds are reproducible: calling “
apko publish” twice (e.g., on different machines, but given the same recipe) apko produces the same image (with the same manifests and digests), as long as the resolved packages (and their versions) are still the same. Under normal circumstances, achieving reproducibility is challenging for various reasons. One of them is that image manifests include build timestamps, which change on each build, and thus affect the digest. However, apko does not use the current time for the build timestamps, but a past timestamp that corresponds to the timestamp of when the most recently updated WolfiOS package was built. - apko also uploads the SBOMs of the image to the registry, using an attachment mode where apko creates additional image tags named “
sha256-<image-hash>.sbom“. These attachments are not signed, so you should not confuse them with cryptographically verifiable SBOM attestations.
- If your registry requires authentication, apko can use the credentials you previously created with “
You can find a complete example GitHub repository that builds a Chainguard-based Python 3.12 base image and a sample application here.
Building Azure Linux distroless images
Background on Azure Linux
Microsoft created Azure Linux in 2020, when it was still called “Common Base Linux (CBL) Mariner” for versions 1 and 2. The detailed reasons are explained in this blog post. Since version 3, Microsoft calls its Linux distro “Azure Linux”. Azure Linux is based on the RPM package format, using Tiny DNF (tdnf) as its package manager.
Microsoft uses the term “distroless” for its minimal images. To build such distroless images, you use the open source tool Marinara, further discussed below.
Microsoft tightly controls which packages (and versions) are included in Azure Linux. The list is quite exhaustive. See the “SPECS” and “SPECS-EXTENDED” folders of the Azure Linux source code. The versions of the included packages are not always the very latest ones, but usually fairly up-to-date. Microsoft is actively patching vulnerabilities and creating backports of fixes that are only available in newer upstream package versions. Various image vulnerability scanners (like Trivy or Grype) support Azure Linux officially, and thus produce many fewer false positives.
Support options for container images
Microsoft does not offer any support for its Azure Linux-based container images (or Marinara). Prebuilt images (and tooling to build your own Azure Linux images) are designed for internal use by Microsoft.
Building images with Marinara
Marinara is a set of Python scripts that run tdnf commands to install packages and (optionally) create a non-root Linux user. Microsoft publishes a prebuilt image (that contains Python 3 and the Marinara scripts) to mcr.microsoft.com/azurelinux/marinara:3.0.
To create a new distroless image (that you can then use as a base image for your applications), Microsoft suggests a multi-stage build approach, where you have a final “FROM scratch” stage into which you copy the files generated by Marinara in the build stage. There is an example Dockerfile that implements this multi-stage build.
The following command uses that example Dockerfile to build a customized Azure Linux distroless image. Make sure to adapt the bold parts:
docker build https://github.com/microsoft/marinara.git -t your/desired/image:tag -f dockerfiles/dockerfile-new-image --build-arg AZL_VERSION=3.0 --build-arg NAMESPACE=azurelinux --build-arg IMAGE_TYPE="custom-nonroot" --build-arg PACKAGES_TO_INSTALL="distroless-packages-base nodejs" --build-arg USER="nonroot" --build-arg USER_UID=65532
This command uses Docker/BuildKit’s feature to build a Dockerfile from a Git repo (without first having to locally clone the Git repo). As explained in the Marinara docs, the created image:
- Comes with a non-root user whose name and ID you provide as build args
- The only packages Marinara installs into the image are those defined in the
PACKAGES_TO_INSTALLbuild arg, separated by spaces. You need to include at least one ofdistroless-packages-minimalordistroless-packages-base. See here or here to learn which packages these two variants contain. There is also a third option, thedebugpackage, but it contains a shell, resulting in a non-minimal image!
Note: if you run the above build command on a long-living (non-ephemeral) machine regularly over the course of several weeks or months (e.g., on a CI/CD agent VM), add --no-cache to the “docker build …” command, to avoid working on stale data.
To learn which packages exist in Azure Linux (and in which version), start an interactive shell via
“docker run --rm -it mcr.microsoft.com/azurelinux/base/core:3.0 bash”
and then run a search using “tdnf list | grep <search string>”. If you want to learn more about the exact contents of a package, look at the package’s spec file in the SPECS folder here. Beware that pinning specific package versions of a package is not supported!
To check whether you need to rebuild an image, extract the file /var/lib/rpmmanifest/container-manifest-1 from the new image you just built, and compare its content to a file from a previously built image. Here is an excerpt of the file structure:
SymCrypt-OpenSSL.1.8.1-1.azl3.x86_64
SymCrypt.103.8.0-1.azl3.x86_64
attr.2.5.2-1.azl3.x86_64
azurelinux-release.3.0-29.azl3.noarch
bash.5.2.15-3.azl3.x86_64
...Code language: plaintext (plaintext)
A complete example GitHub repository that builds an Azure Linux-based Python 3.12 base image and a sample application using it is available here.
Conclusion
In my experience, typical scenarios for why you would want to build your own minimal image are:
- There is no prebuilt image that contains the packages you need, or
- There are prebuilt images, but they contain too many packages, exposing an unnecessarily large attack surface
At first glance, it sounds tedious to set up your own image build infrastructure. But the example GitHub repositories I provided above demonstrate that this can be done with little effort. You can leverage GitHub’s free Actions workflows in a public repo and run a scheduled workflow to build, push, and sign your images.
Of all three minimal image vendors discussed in this article, I recommend WolfiOS / Chainguard images. Its documentation is excellent, and you get access to the most up-to-date upstream package versions, while still having the option to pin older versions.
However, Chainguard is a start-up, so WolfiOS might get cancelled at any time. Therefore, it is good to have alternatives such as Ubuntu Chiseled or Azure Linux Distroless. Of those two, Azure Linux Distroless offers a much larger package catalog. While Ubuntu’s packages are as numerous as Azure Linux packages, the number of chisels the Ubuntu team provides is considerably smaller, see the table at the beginning of this article. However, if your desired packages exist in both Ubuntu Chiseled and Azure Linux, your choice comes down to a matter of personal preference and which one offers the newer package version.